Provisioning Windows AD based lab/dev environment in automated way using VirtualBox, Vagrant and PowerShell DSC
Leave a reply
Update: Microsoft is deploying an updated version of “Disable Subsites” feature:
This update makes the setting options for new subsite creation easier to understand and prevents users from being able to create subsites using alternate paths when the subsite setting is disabled.
Admins in the SharePoint admin center can choose to either enable or disable subsite creation across sites or enable for classic sites only. Now, when disabling subsite creation, not only will the subsite option be hidden from the command bar including classic but also users will not be able to create new subsites directly through an URL or API.
The option: Hide the Subsite command has been renamed to Disable subsite creation for all sites and will also hide the subsite creation command (including classic) and disable users from being able to create new subsites through a URL or API.
The option: Show the Subsite command only for classic sites, has been renamed to Enable subsite creation for classic sites only.
The option: Show the Subsite command for all sites, has been renamed to Enable subsite creation for all sites.
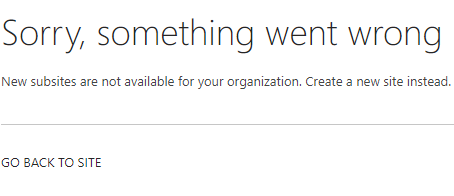
After this update is applied, if you have “Subsite Creation” set to “Disable subsite creation for all sites”, then if any attempt to create a subsite – you’ll get an error message “Sorry, something went wrong. New subsites are not available for your organization. Create a new site instead.”
Microsoft recommend “flat structure”, i.e. no subsites. So SPO admins are disabling subsites creation at tenant level. Did you know that you still can create subsite? Let me explain how it is done.
If creation subsites is allowed, you should be able to see it like this:
But actually subsites are not always best practice. Microsoft recommend “flat structure”, i.e. instead of subsite you should have a separate site collection, and if you need a hierarchy and navigation – use Hub sites. So, in Office 365 SharePoint admins usually “disable” SubSites creation:

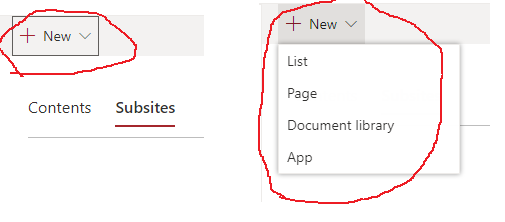
Now, you see, SubSites are not really disabled, but only the button to create subsites is hidden: “This controls whether the Subsite command appears on the New menu on the Site contents page”.
Anyway, the result is: you are not able to create a SubSite (web) in SharePoint Online:
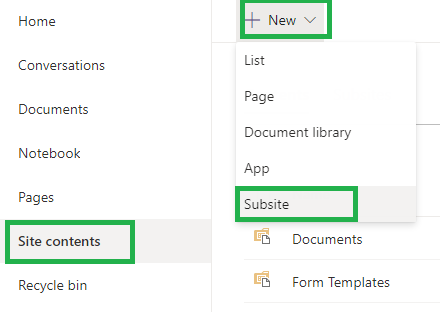
Actually there are at least 3 options to create a SubSite:
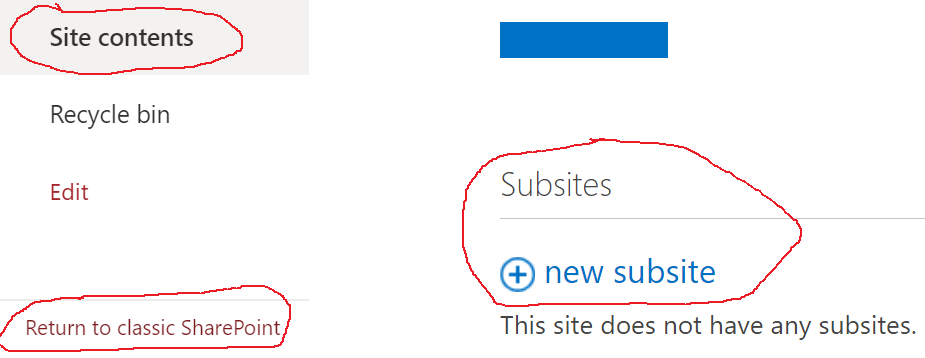
Step 1: Select “Site Contents” page
Step 2: Click “Return to classic SharePoint”
Step 3: Create SubSite
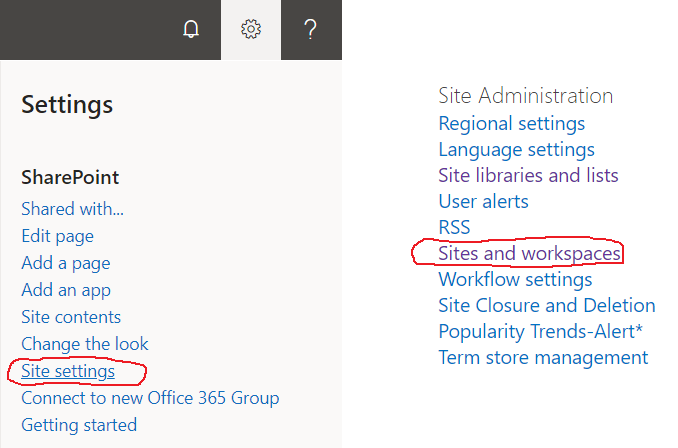
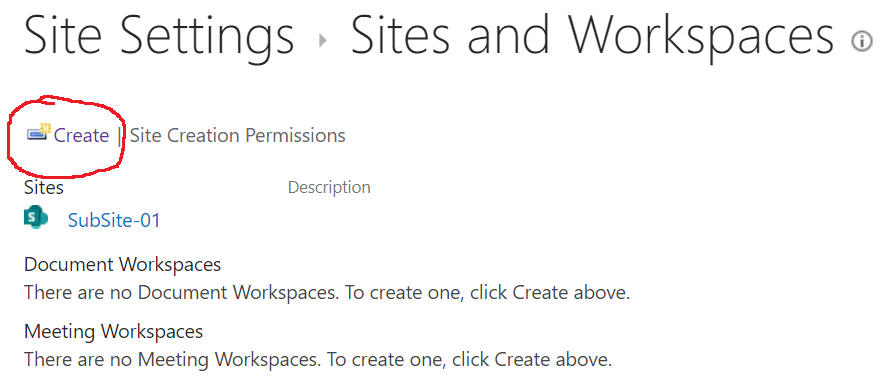
Step 1: Go to “Site Settings”
Step 2: Select “Sites and Workspaces” page (site/_layouts/15/mngsubwebs.aspx)
Step 3: Create a SubSite
Step 1: Install PowerShell PnP
Step 2: Connect to your site with PnP
Step 3: create a SubSite
Install-Module SharePointPnPPowerShellOnline
Connect-PnPOnline -Url <your site Url> -UseWebLogin
New-PnPWeb -Url "<new Web Url>" -Title "MySubSite" -Template "STS#3"
References:
See also: How to create a SharePoint Site in Office 365 if site creation is disabled
Microsoft SharePoint Migration Tool (SPMT) is installed under user profile, i.e. local administrator permissions are not required.
That means regular corporate user – site owner – can do self-migration from SharePoint on-prem to Office 365 SharePoint Online.
Generally, if you want to join a public team – you must know exact team name to find it. This KBA explains how to find a public team by name or description or content even when you do not know exact team name. Quick and simple answer: use SharePoint Search center or Microsoft Search, (or Bing if it is integrated).
Below is why it is so complicated in teams and on how to find a public Team…
In Microsoft Office 365, under MS Teams, there are 3 types of teams:
Private team: you can only join the team if you are invited or know the team code.
SharePoint site behind the private team is shared only to members – not for everyone. You cannot see team name or description or content until you are team member (details). You are not able to search for the team name or content.
Public team: you can join the public team if you wish. The site behind the public team is shared with everyone except external users, so you can see public team name and description, but from MS Teams (desktop or web application) you cannot see public team content until you are team member.
Org-wide team: you are joined the team automatically (details)
From Teams – you can click on “Join or create a team” and you should be able to see some public teams (but not all):

There is a “Search teams” box at the top right,
so what if you are looking for a specific public team (not in the list) …
You know exact team name or at least some first letters.
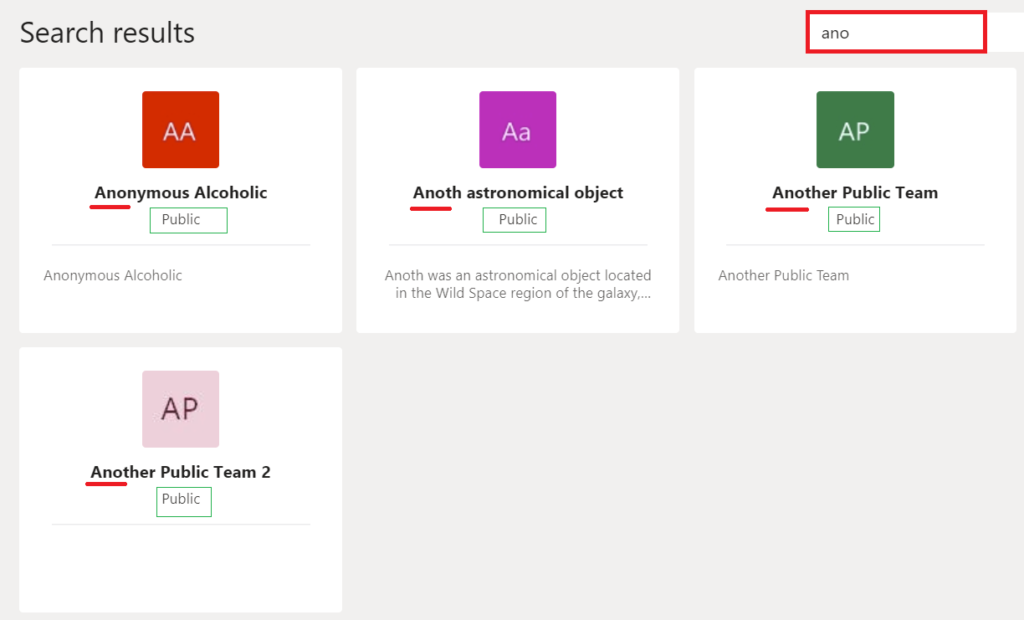
Solution: You are lucky. Just start typing team name in search bar at top right and hit “enter”- you will see shortened list of public teams matching your search criteria:
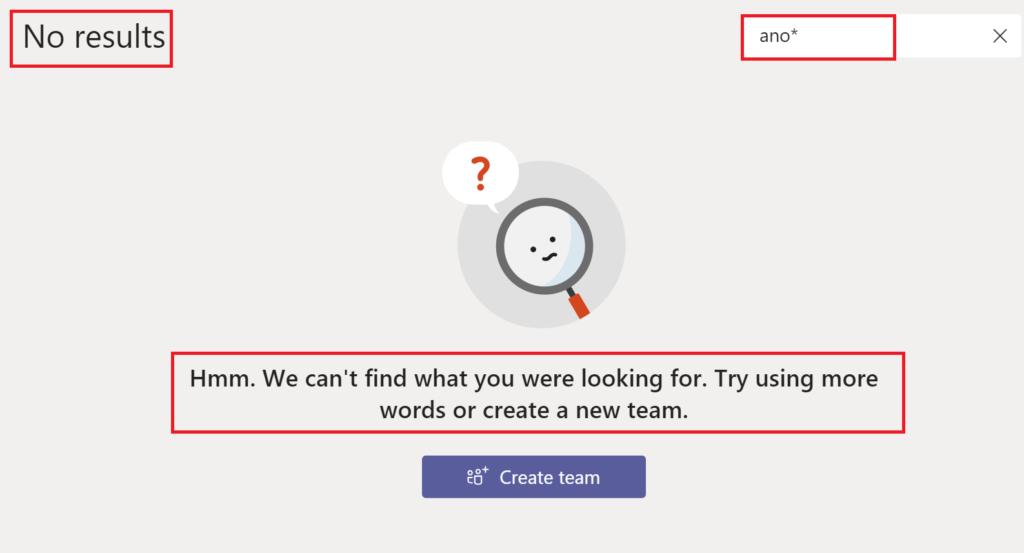
NB: do not use wildcards, it will not work:
NB: do not use top search bar, it will not work:
You want to join a public team, but you do not know exact team name.
You know (or guess) something about the team, like
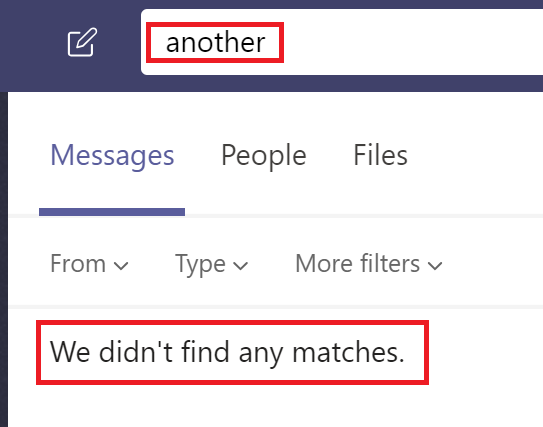
Unfortunately, in this case both great Microsoft technologies – Search and Team – fail. You will not be able to find a public team:
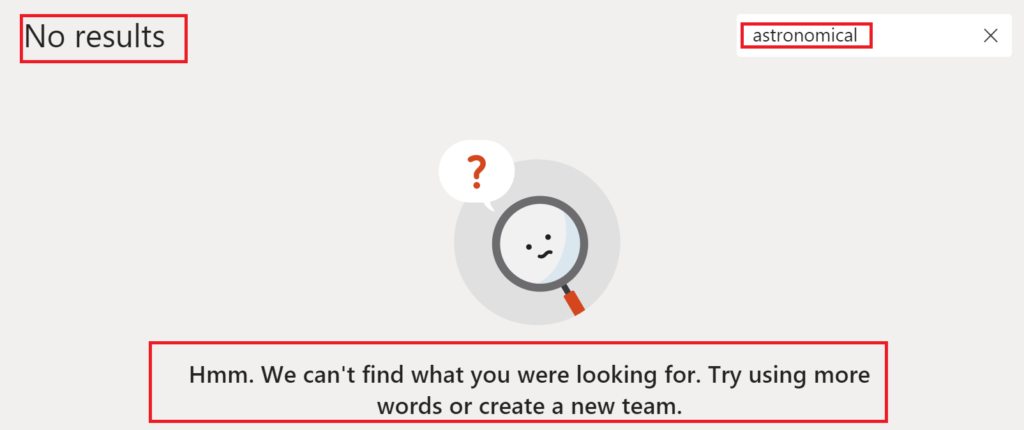
Actually Microsoft does not have a solution and just did not provide workaround:
here is the concern “Search for a public team WITHOUT providing the exact name” with no answer from Microsoft.
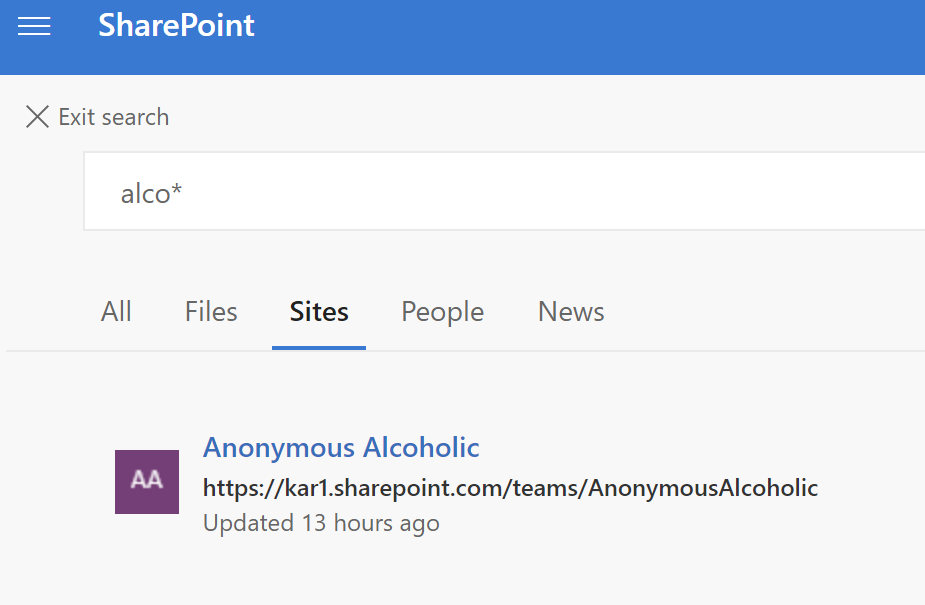
Just use SharePoint search of Bing Search or Office.com – any other plain search wherever you can.
SharePoint site is created once a team is created to store actual content. If the team is public – SharePoint site behind will be accessible for everyone.
For public teams – SharePoint site has “Everyone except external users” by default in “Members” group:
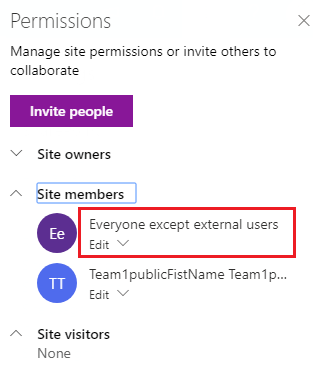
which means literally “Everyone except external users” has access to the site with “Edit” permissions.
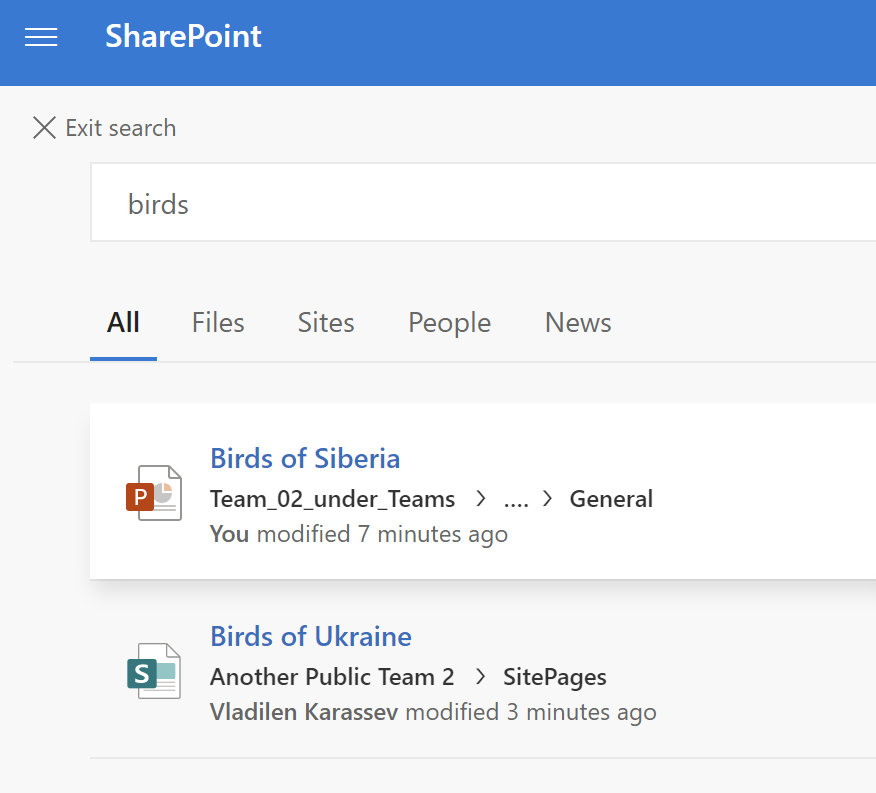
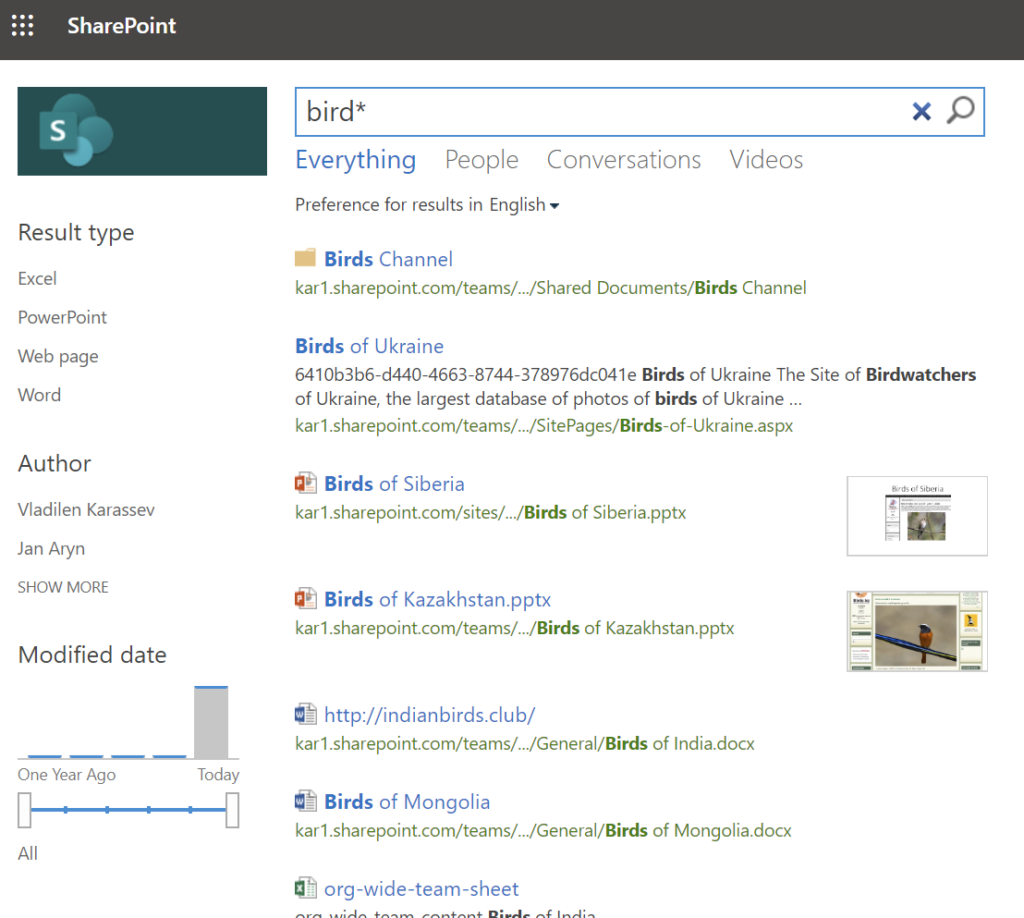
SharePoint search is security-trimmed, i.e. you will see the site content in search results only if you do have access to the site. So just go to the SharePoint landing page or SharePoint search center of Office.com and search for what you know or guess about the team:
You can use all the power of SharePoint search (wildcards, refiners, keyword query language KQL etc)
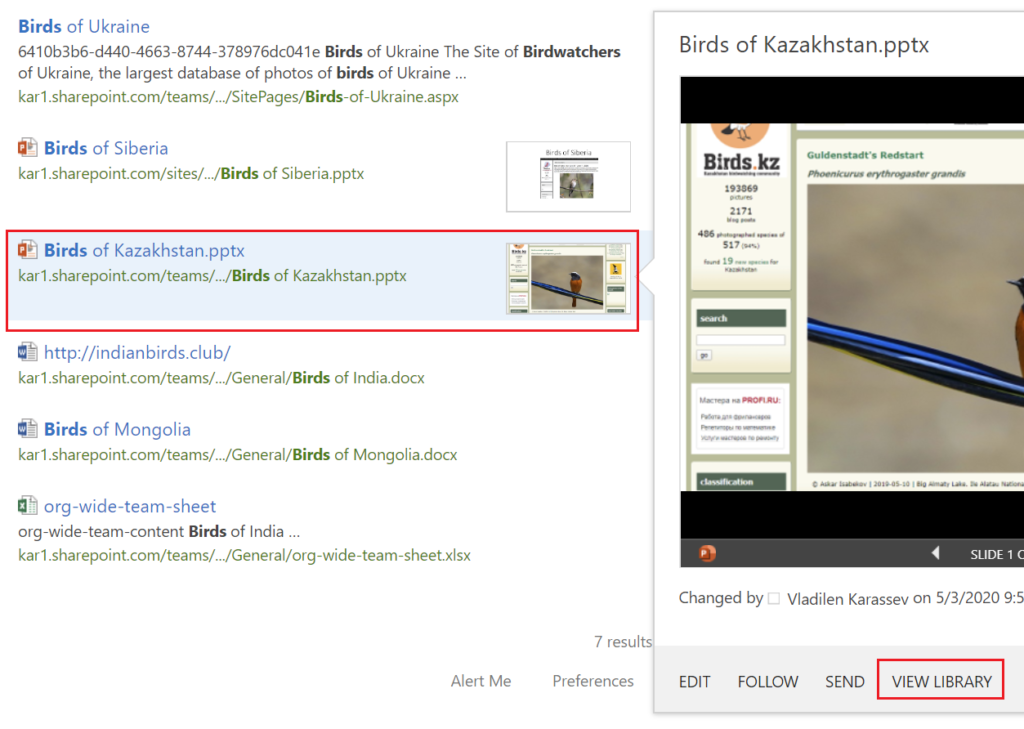
Once you found something – you can go to the SharePoint site:
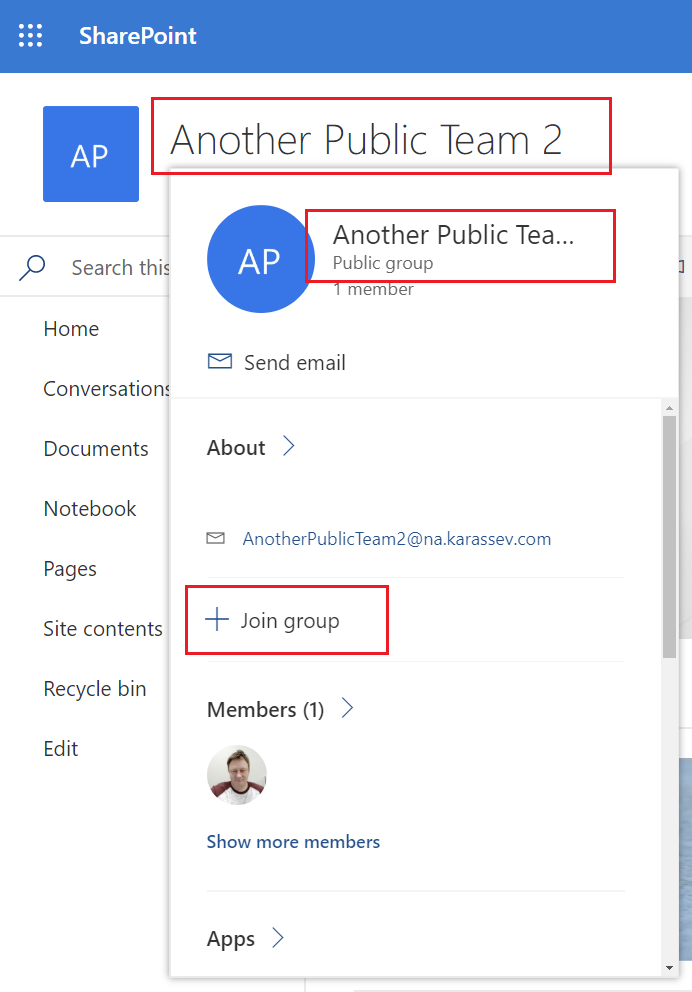
Now from the site – look at the site name and hover the mouse over the site name – you’ll see pop-up window.
Now you know exact team name – and you can search for the team under Teams,
or, if you are so lucky you see “Join” button – just join the team.click site title or hove over the site title:
One moment – you cannot see team’s chat messages in SharePoint, as chats are kept in Azure. But you can search for chat content after you joint the team.
Somehow both – SharePoint Search and Teams Search are not working against site/team description. Hopefully this bug will be addressed.
You can also search for site Url in teams.
When you create a team – Office 365 generates a short team name (removes spaces and adds numbers if the team name is not unique; e.g. if the team name “Test” you might have “test381” as a short name, but if the team name is “This Is My Unique Team” – short name might be “ThisIsMyUniqueTeam”).
After you can change team name and/or SharePoint site name.
Team search under MS teams work for both names – short name initially assigned (kept as site specific Url) and new team name. But only starting with the beginning of the string.
What is the correct way of searching for a Public Team in Microsoft Teams
btw, there is a good video tutorial on how to find a public team in Office 365 using full-text search
By default site creation is enabled and anybody can create a new site collection from SharePoint start page :

with two options: “Team site connected to an Office 365 group” and “Communication site”

SharePoint administrator might disable Sites creation. In Office 365 under SharePoint Admin Center -> Settings -> Site Creation there is “Let users create sites from the SharePoint start page and OneDrive”:

Under classic settings page -> Site Creation it is called “Show the Create site command” with explanation “Display the Create site command on the SharePoint home page and in the sites list in OneDrive so users can create new sites”:

If site creation is disabled, user will not see “+ Create site” in SharePoint landing page:

The fun part is users are still able to create a new Office-365 group based site collection
as “Let users create sites from the SharePoint start page and OneDrive” means literally “from the SharePoint start page and OneDrive” and does not mean you cannot create a site from other places. The same with “Show the Create site command” as it is literally about “Show…command” but not “disable … command”.


Use Direct link: https://changeThisToYourTenantName.sharepoint.com/_layouts/15/CreateGroup.aspx
e.g.
https://contoso.sharepoint.com/_layouts/15/CreateGroup.aspx

and worth to mention that from Teams anybody can create a Team and a corresponding SharePoint site:

Unfortunately, if sites creation is disabled, you cannot create a communication site.
The only way to limit self-site creation is using PowerShell:
– create a security group
– add to this group users who will be able to create sites
– via PowerShell Set-AzureADDirectorySetting command set “GroupCreationAllowedGroupId” property
Microsoft: “Manage who can create Groups“

This is just a memo for myself how to Python with Anaconda Jupyter Notebooks
Anaconda: https://www.anaconda.com/
Anaconda prompt
cd your code
jupyter notebook
!pip install matplotlib
import matplotlib as plt
plt.__version__
Eclipse
Java IDE + Install New Software from http://www.pydev.org/updates/
PyCharm
File – Other Settings – Settings for New Projects – Project Interpreter – “+”
Spyder
adfsgv
Django
pip install django==3.0.3
django-admin startproject wisdompets
Set-Location "C:\Users\Vlad\code\Django2\wisdompets"
Get-ChildItem
python manage.py runserver
python manage.py startapp adoptions
python manage.py makemigrations
Virtual environment under Windows
python -m venv ./venv
.\venv\Scripts\activate
pip install Office365-REST-Python-Client
...
pip freeze > requirements.txt
deactivate
reference: Building Your First Python Analytics Solution by Janani Ravi
As I am a SharePoint person, and retention policies and labels are not a SharePoint engineer responsibility, I do not go to the m365 Compliance Center frequently. Below are My notes for myself on key moments – how to create and configure Office 365 retention labels and Policies at Compliance Center and use labels in SharePoint Online (SPO).
In SPO at each site collection level you can still work with retention policies the old way – create policies under Site Collection Settings – Content Type Policy – and apply policies at library level under Library Settings/Information Management Policy Settings. There is also Site Retention Policy.
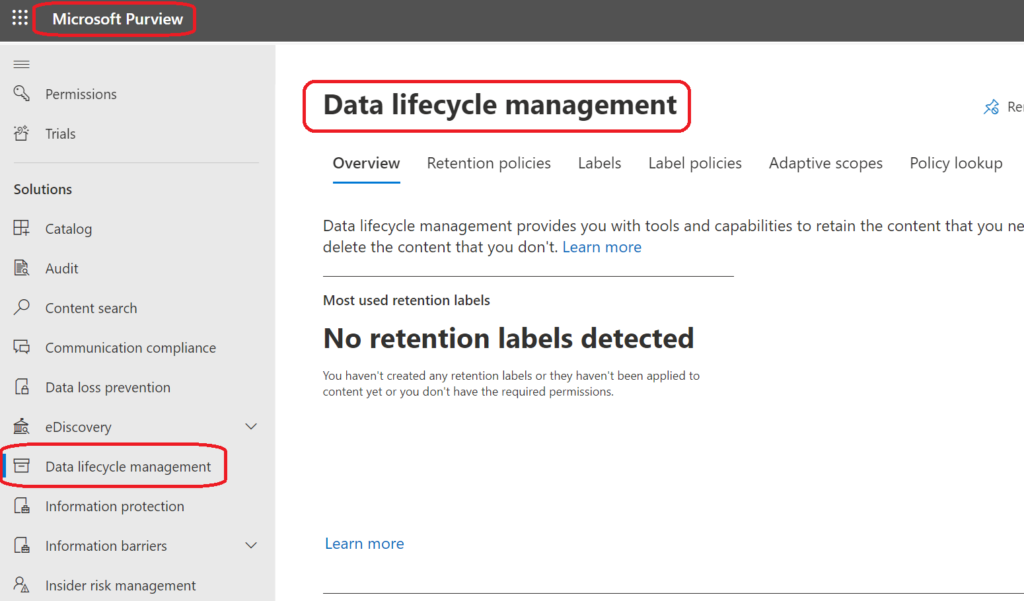
But Microsoft is making efforts to centralize and unify such things – so you can specify retention policies in one place and apply them across all Office 365 content (not only SharePoint). That place was called Office 365 Security and Compliance Center (SCC). Later Microsoft separated Security Center and Compliance Center. So currently Retention Policies are under “Microsoft Purview” (former Microsoft Compliance Center) -> Solutions -> “Data lifecycle management”:
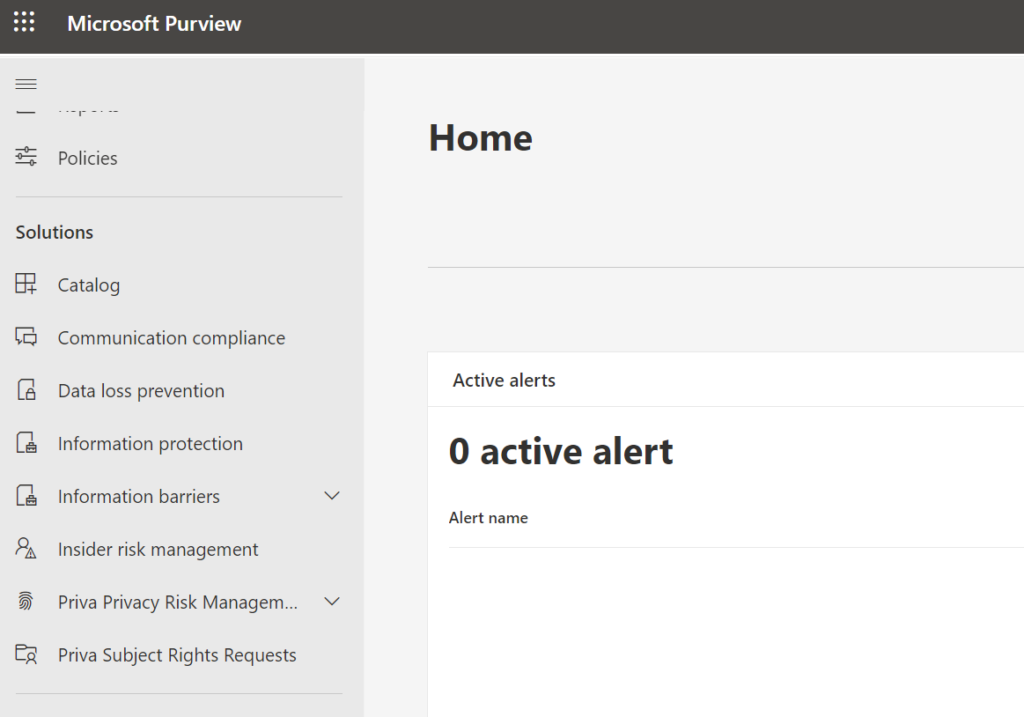
To get access to “Data lifecycle management” solution – you need to have a “” or “” roles. SharePoint or Teams administrator cannot access Purview. Even having “Global reader” or “Security reader” an admin will not be able to see “Data lifecycle management” blade. Here is how Microsoft Purview looks like for a Global reader:
Although SharePoint admins usually do not have access to SCC and do not go to Site content, we still need to know how it all works. And labels are recommended way to specify retention in SharePoint, so here we are.
Labels are applied to documents, documents are kept in libraries, and at each library you can “Apply a label to items in this library”.
Labels are created in SCC under Classification. The main part looks familiar to SharePoint people:
You can
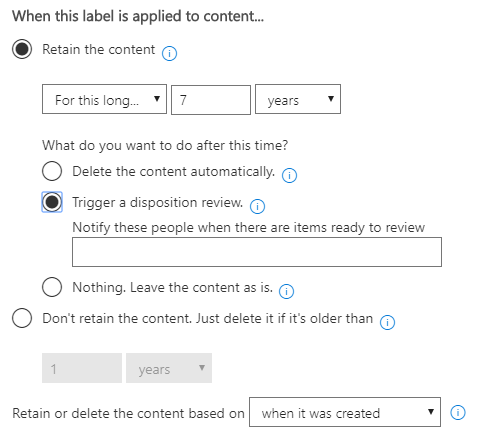
after it was created/modified/labelled
Now you need to publish created labels – and that is how you create a policy. I.e. policies are where you specify which labels to which content (Exchange, OneDrive, SharePoint, Office 365 groups)
You can also auto-apply labels based on conditions, like
but as per Microsoft, “It will take up to 7 days to automatically apply the label to all items that match your conditions.”

Note: “trainable classifier” means an AI ML will be used, and as per Microsoft “Creating machine learning rules requires an Office 365 E5 subscription for your organization”
You can do nothing with labels at SharePoint admin center. Labels are created, published and auto-applied at SCC. At each site collection levels site administrators can apply labels.
At site collection settings you can still see “Content Type Policy Templates” and “Site Policy”, but that is not the case. Labels are applied at library level under Library Settings/Apply label to items in this list or library.
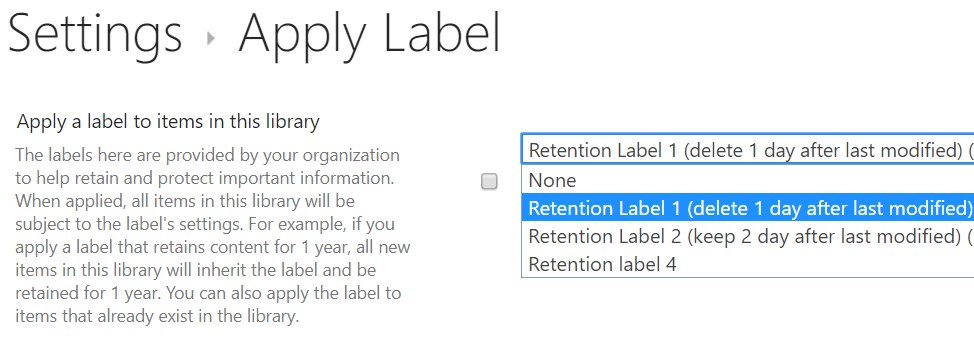
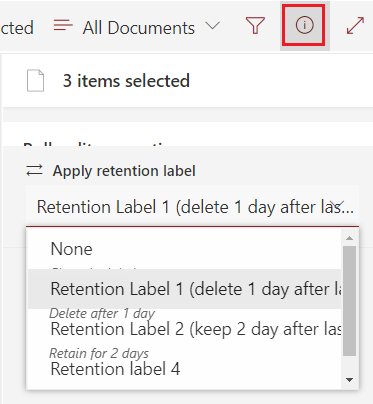
where you can select a label to apply for all new items in the library. With

You can also apply the label to items that already exist in the library.
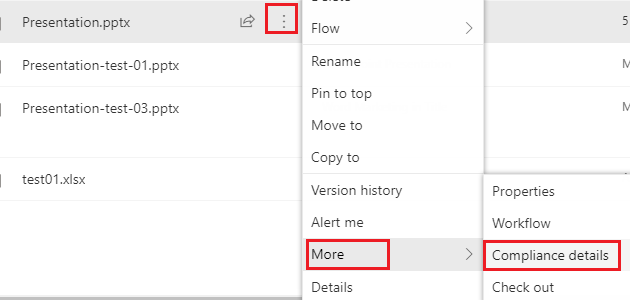
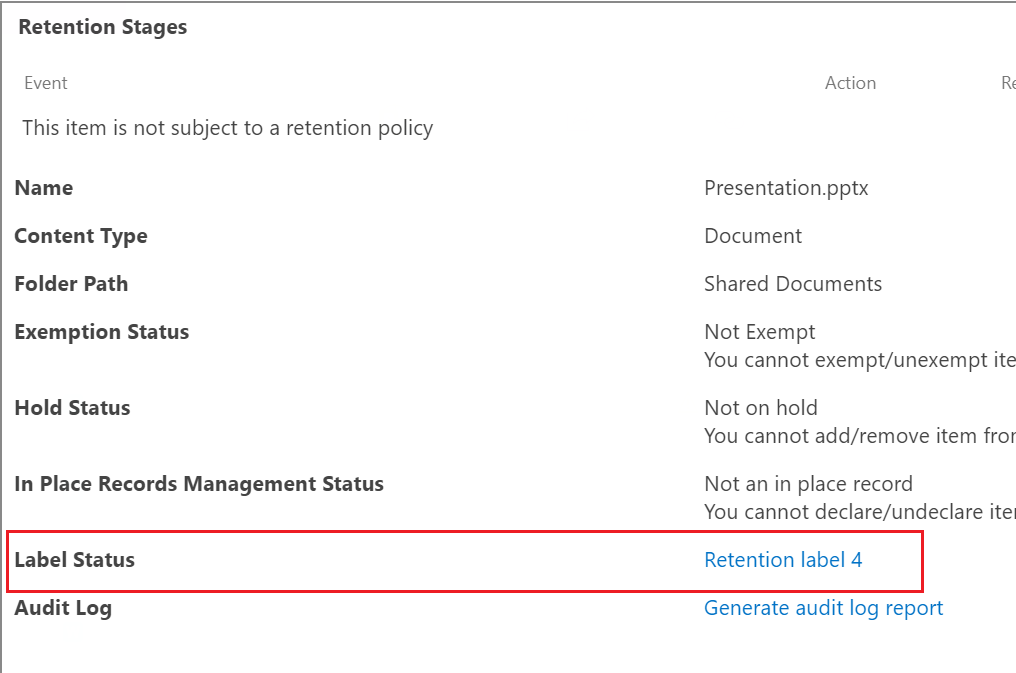
You can also apply (change) label for each single item or multiple selected items under Details pop-up page:
or from under Contect Menu/More/Compliance details:
Microsoft recently implemented “Adaptive” retention policies. At step 2 of “Create retention policy” you’ll be asked “Choose the type of retention policy to create”: “A policy can be adaptive or static. Advantage of an adaptive policy will automatically update where it’s applied based on attributes or properties you’ll define. A static policy is applied to content in a fixed set of locations and must be manually updated if those locations change.”
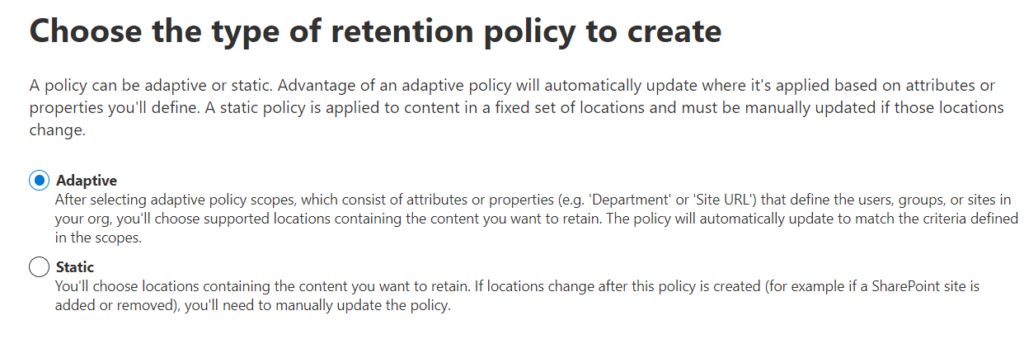
And if you selected “Adaptive” – on the next step you will need to provide the adaptive scope (so at this moment you should already have created your adaptive scopes):

So, let us create your adaptive scopes.
What type of scope do you want to create? SharePoint sites…
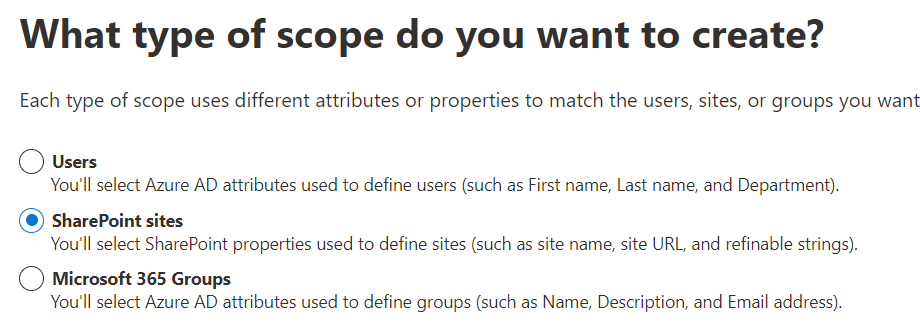
And then you’ll have nothing more then set of conditions:
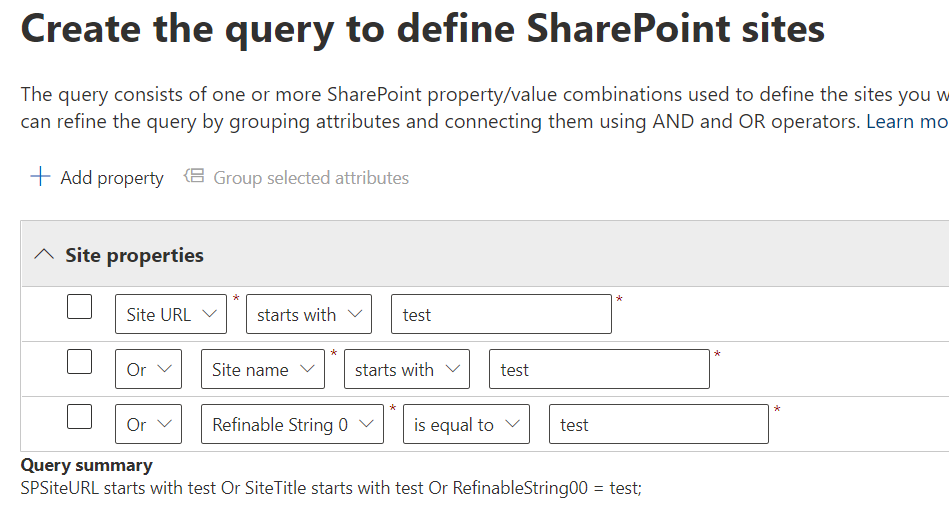
where you can use objects: “Site Url”, “Site Name” and “Refinable String 0″..”Refinable String 99”. Conditions would be “is equal to”, “is not equal to”, “starts with” and “not starts with”. Or you can select “Advanced query builder” and enter LQL query.
What is the takeaway from this for SharePoint administrators? We would be asked to configure SharePoint the way compliance/retention people can use Refinable Strings.
It would be a good idea to let users know, that their files will be deleted, but the next question would be “can I get a list of files that are scheduled to deletion”?
Surely it is possible for admins to go through site content and find files that were modified last time earlier than a specific date, but there is another method – you can recommend your users to search through their site using
See details in “How to figure out – which files are expiring due to age and going to be deleted as result of retention policy.”
(WIP)
Let me do some quick PoC on Office 365 DSC in my Office 365 Dev environment…
So far it is not working…
I have created a simple configuration:
Configuration o365DSC_Config_Tenant
{
    param(
        [Parameter(Mandatory = $true)]
        [PSCredential]
        $credsGlobalAdmin
    )
    Import-DscResource -ModuleName Office365DSC
    node localhost
    {
        SPOTenantSettings MyTenantSettings
        {
            IsSingleInstance                              = "Yes"
            GlobalAdminAccount                            = $credsGlobalAdmin
            PublicCdnEnabled                              = $false
            PublicCdnAllowedFileTypes                     = "CSS,EOT,GIF,ICO,JPEG,JPG,JS,MAP,PNG,SVG,TTF,WOFF"
            NotificationsInSharePointEnabled              = $true
            OwnerAnonymousNotification                    = $true
            LegacyAuthProtocolsEnabled                    = $false
            Ensure                                        = "Present"
        }
    }
}
and ran it with
$adminAccountCred = Get-Credential -UserName $adminUPN -Message "pw pls"
$mPath = 'C:\scripts\o365\Office365DSC'
$cd = @{
    AllNodes = @(
        @{
            NodeName = 'localhost'
            PSDscAllowPlainTextPassword = $true
        }
    )
}
o365DSC_Config_Tenant -OutputPath $mPath -credsGlobalAdmin $adminAccountCred -ConfigurationData $cd
Start-DscConfiguration -ComputerName 'localhost' -Wait -Verbose -Path $mPath -Force
the error I got:
VERBOSE: [VPC]:                            [[SPOTenantSettings]MyTenantSettings] Test-TargetResource returned False
VERBOSE: [VPC]: LCM:  [ End    Test     ]  [[SPOTenantSettings]MyTenantSettings]  in 11.4040 seconds.
VERBOSE: [VPC]: LCM:  [ Start  Set      ]  [[SPOTenantSettings]MyTenantSettings]
VERBOSE: [VPC]:                            [[SPOTenantSettings]MyTenantSettings] Setting configuration for SPO Tenant
VERBOSE: [VPC]:                            [[SPOTenantSettings]MyTenantSettings] The use of the public CDN is not enabled, for that the PublicCdnAllowedFileTypes par
ameter can not be configured and will be removed
A parameter cannot be found that matches parameter name 'Ensure'.
    + CategoryInfo          : InvalidArgument: (:) [], CimException
    + FullyQualifiedErrorId : NamedParameterNotFound,SharePointPnP.PowerShell.Commands.Admin.SetTenant
    + PSComputerName        : localhost

VERBOSE: [VPC]: LCM:  [ End    Set      ]  [[SPOTenantSettings]MyTenantSettings]  in 3.7290 seconds.
The PowerShell DSC resource '[SPOTenantSettings]MyTenantSettings' with SourceInfo
'C:\scripts\o365\Office365DSC\o365DSC_Config_Tenant.ps1::12::9::SPOTenantSettings' threw one or more non-terminating errors while running the Set-TargetResource
functionality. These errors are logged to the ETW channel called Microsoft-Windows-DSC/Operational. Refer to this channel for more details.
    + CategoryInfo          : InvalidOperation: (:) [], CimException
    + FullyQualifiedErrorId : NonTerminatingErrorFromProvider
    + PSComputerName        : localhost

VERBOSE: [VPC]: LCM:  [ End    Set      ]
The SendConfigurationApply function did not succeed.
    + CategoryInfo          : NotSpecified: (root/Microsoft/...gurationManager:String) [], CimException
    + FullyQualifiedErrorId : MI RESULT 1
    + PSComputerName        : localhost

VERBOSE: Operation 'Invoke CimMethod' complete.
VERBOSE: Time taken for configuration job to complete is 15.486 seconds
More to come…