How to Find Content Shared with Everyone in SharePoint and Teams

There is a known problem in SharePoint (and Teams*) – complicated permissions system. Site owners/administrators provide access, site contributors upload documents and at any moment nobody knows – who has access to which files. As a result – sometimes sensitive documents become overshared (over-exposed). The biggest concern is when sites content is shared with “Everyone”. How do we know which content is shared with “Everyone”? Is there a report?

Obviously, only data owner knows who should have access to site documents, so we (SharePoint admins) do not fix permissions automatically (until there is a policy), but at least we can help site owners with reports and maybe initiate permissions review for “nasty” sites?

Below I’m sharing 4 possible solutions:

  • Solution #0 – Out-of-the-box EEEU report, but it comes with Premium license only
  • Solution #1 – also OotB report that comes with some 3-rd party tools
  • Solution #2 – PowerShell “Brute force” – free but require advanced skills and efforts
  • Solution #3 – Search-based – also free, and require less skills and efforts

(*) Microsoft with the introduction of Teams had to simplify permissions in SharePoint – since there should only be 3 types of access levels – owner, member and visitor. It was… in some ways, but in other ways it made things worse.

Solution #0 (Ootb EEEU report)

Microsoft implemented this report (Content shared with ‘Everyone except external users’ (EEEU) reports) in around mid-2024, but it requires additional license – Microsoft SharePoint Premium – SharePoint Advanced Management. So if you do not have Premium license – check below.

Solution #1 (3-rd party tools)

You are lucky if you can use 3-rd party tools (e.g. ShareGate, SysKit Point, AvePoint, Metalogix etc.), with the ability to get full permissions report. Though – if your m365 environment is not small – there might be a problem to get full permissions report for all tenant sites. Some tools allow you to get tenant-wide permissions report for specific Ids – this option should work better for large environments.

Still there might be another problem. Consider the following. When I say “shared with Everyone” – I actually mean at least 3 possible “everyone” system logins:

  • Everyone
  • Everyone except external users
  • All users

– those are system id’s, but what if there are other ids – e.g. migrated from on-prem or cloud-born custom security groups in tenant that also includes everyone or many users (e.g. dynamic security group that includes all org accounts)?

What if your Identity management operates security groups “All employee” or “Contractors” or “All licensed users”? Do you think these groups can be identified as “Everyone” groups? Do you think it’d be a good idea to check if content is shared with other large groups (not only system Everyone…)? Would you like to run permissions report separately for all groups that include “all” or “almost all” users?

Also, knowing that full reports heavily load the system, 3-rd party tools might by default limit “how deep report is” to the root site and lists/libraries, not including e.g. folders and items. So you might need go to settings and turn on “full deep” option Keep it in mind.

Obviously this option #1 is not free, as it requires licenses to be obtained. And still it worth to consider option 3.

Solution #2 (PowerShell “Brute force”)

You can get full permissions report per site or for entire tenant with PowerShell, which if free… The only you need is to write a script yourself or find existing one. Sounds easy?

Well, first problem is it takes a decent amount of time and competences to write such script. If if you find one – it would require some skills to adopt and run it. Frankly say, I have not seen so far scripts that were out-of-the-box ready to do that job. And it is not a good idea to run scripts you got from internet against your production environment until you understand it tested it and fully confident with.

Another possible problem – size of environment. The script I designed and use to get comprehensive permissions report might run hours against a good site – if I need full details on site/subsites, lists/libraries, folders and list items levels. So if you have less than 1000 sites – probably this approach can fly. But if your environment is 10K+ sites – it will take forever. So the approach might not work for large enterprise environments.

One might say – we can limit report with only root web permissions to get it faster. But this would be not accurate. And what is not accurate in the IT security – leads to even bigger risks. So, we need check permissions up to every item level deep, as even one file with sensitive info shared inappropriately can cause security issue. (Btw, 3-rd party tools usually by default limit reports to libraries level, so check reporting options…)

The other issue with this approach… Let say you got full permissions report… It would look like “resource -> group -> permissions”… How do you know for each group – what is the group in terms of membership?

Ok, if this solution is not easy to get working – what are other options?

This solution is based on simple but clever idea: why do we need to iterate through all the tenant documents/items if all the content is already crawled by search? Search is also respect permissions. Can we just use search to get files shared with Everyone? Let us see.

What if we use some dummy user account with no specific permissions provided and no group memberships and try to search content on behalf of that account. The idea is if this user can see some data – then these data is open to everyone.

Check this and this articles. Can we get results programmatically (e.g. with PowerShell)? Can we use Microsoft Graph search API? Sure. Check also this article “How to search against SharePoint Online Content with Microsoft Graph search API with PowerShell“.

Solution #3 Option #1 – search through tenant

With this option we would use search query “*” and all 5 possible SharePoint entities – driveItem’,’listItem’,’list’,’drive’,’site’ to find everything that is shared with everyone. We’d pull results with paging (we’d use “from” option in a loop to pull all results). After we get all results – we’d select only unique site collections. But! We might have some problems here.

Problem #1. Again, for small environments or if there are not much “Open” sites – it would work. But for large enterprise environments the problem is the same as in “brute force”. Search would returns too many results – and it might take weeks (exact time is unpredictable) to get all of them. (Surely there are sites “legally” shared with everyone, public Office 365 group based sites, communication sites… So your search will be flooded with content from sites you already know are shared with all).

Problem #2. We are getting results with paging. But recently Microsoft started limiting number of returning results. E.g. your search request result might say like “there are 3659735 total hits” but after result number 1000 it just stops returning anything, even with paging.

Solution#3 Option #2 – loop sites

The idea is: why do we need to get all search results if even one result from a site would be enough to put the site to the list of “open” sites. In other words, we do not need all results from the site, we only need to know if there are any results from the site, at least one – so we know if the site is open for everyone or not.

So, consider the following approach:

  1. You get list of all sites in tenant.
  2. You run search request against each site in the loop
    (e.g. consider KQL option “Site: https://yourTenant.SharePoint.com/sites/YourSite”.
    If at least something found in the site – add the site to the “Open Sites” list.
    With this approach you will get list of sites shared with “Everyone…” in a predictable time.

Solution#3 Option #3 – exclude known “open” sites

There are sites “legally” shared with everyone – e.g. corporate portal, department communication sites, public teams, public Viva Engage communities etc. If it is know that these sites are public – you can exclude them from all sites list – so in the “Solution#3 Option #2 – loop sites” – you’d loop only through sites that are not supposed to be public. I know – percentage of “legally public” sites in tenant to all sites is a relatively small number, so should not significantly decrease elapsed time… but still.

Pros and cons of the Solution # 3

Pro 1: the only fast enough (at least predictable time to complete) and accurate enough to rely on solution.

Pro 2: There might be custom security groups intended to hold all or part of the enterprise (e.g. “All employee” or “all contractors”). If the enterprise comprises from several businesses or regions – it might be “All Business 1” or “All EMEA”… you got the idea. So you can tweak this search-based solution by adding your dummy account you are running search on behalf of to some of theses groups to find out if there are resources shared maybe not with everyone but with all “North America based” users or with “all employees”, which might make sense also.

Con 1 : crawling and indexing takes time, so search-based reports can miss recent changes in data and permissions

Con 2: this approach cannot be automated (since we need an interactive authentication). I.e. we need to run it manually every time.

Con 3: After we get all sites shared with everyone – we do not know – at what level permissions are broken and provided to everyone. It might be entire site or one file. It does not really help if you try to get all search results from the site. If you want to know what exactly is shared with everyone – on the site – run permissions report against this site (shortlist of sites).

Notes

Note 1: consider there are resources like “Styles Library” shared with everyone by default, especially on migrated sites

Note 2: this is a separate topic, but consider implementing/using sensitivity labels. At least you can start with high-sensitive sites. With sensitivity labels – site owners/member would know – what kind of site they are working on.

What’s next

Ok, we know list of SharePoint resources shared with everyone, but what would be the next step? Should we communicate to site owners – if so how to let site owners know that there are resources shared with Everyone… on their sites.
To be continued…

References

Video tutorial:

Access SPO Site Programmatically via MS Graph API and SharePoint API

Scenario

You are a software developer. Your company uses Microsoft Office 365 (SharePoint, Teams etc.). The need is to work with a specific site collection programmatically (from code – Python, C#, Java, PowerShell, JavaScript etc.) – e.g. upload/download documents, update list items, search etc.

The code must run without user interaction (unattended, aka daemon app). Sometimes this is also called “SharePoint Automation”.

The solution is based on a new Graph API feature – Sites.Selected and a classic SP-Only app.

Solution

  1. Register an Azure App and configure it as usual.
    Select API Permissions blade and add two permissions:
    – Microsoft Graph -> Applications Permissions -> “sites.selected
    – SharePoint -> Applications Permissions -> “sites.selected
  2. Request “Grant admin consent” from a tenant/global admin
  3. Request SharePoint admin to run PowerShell code (e.g. this one) to assign proper permissions to your azure app for a specific site collection (consider site owner consent)
  4. (optionally) Provide SharePoint API permissions:
    (require Site Collection Owner/Admin account) – use
    https://YourTenant.sharepoint.com/teams/YourSite/_layouts/15/appinv.aspx
    to add SharePoint API permissions to your app. E.g. full control permissions to site collection would be
<AppPermissionRequests AllowAppOnlyPolicy="true">  
   <AppPermissionRequest Scope="http://sharepoint/content/sitecollection" 
    Right="FullControl" />
</AppPermissionRequests>

Consider minimal permissions (e.g. Right=”Read” see more with Sumit)

Problem Solved

  • you get access to one and only one site collection (“least privilege” principal)
  • you get both – SharePoint API and Microsoft Graph API permissions to SharePoint
  • you can use app secret or certificate to authenticate – depending on what are your security requirements

Note: if your scenario require authenticated user present – the solution would be a little different: Connect-PnPOnline Interactive with Client App Id

Update:

Sites.Selected API MS Graph permissions was introduced by Microsoft in 2021. It was a huge step forward, but still devs were limited with MS Graph API against SharePoint.
So devs had to use AppInv at site level to provide ACS permissions to their apps to use SharePoint CSOM and REST APIs.
Recently Microsoft introduced Sites.Selected SharePoint API permissions for registered Azure Apps! So now devs should be fully happy without ACS-based permissions AppInv.aspx. (See more here on disabling SP Apps Only SPNs)

Thanks to Leon Armston and Scott Murdock

Update 2:

Microsoft announced end-of-life for ACS permissions, so we’d need to avoid ACS permissions for new development.

References:

Authenticate to Microsoft Graph from PowerShell Interactively

Scenario

You are a developer or power user in a company with Microsoft 365 tenant.
You need to connect to Microsoft Graph and then call Microsoft Graph API to consume some MS Graph resources on behalf of authenticated user programmatically with PowerShell – e.g. add/remove documents or list items, search for sites or documents content etc. – whatever available with Graph API.

You do not have tenant admin permissions or any tenant-level admin permissions (SharePoint, Teams, Exchange etc. ). But you can register an Azure App and request tenant admin consent.

Solution

  • register an Azure App
  • under authentication blade – add platform – “Mobile and Desktop app”
    add “http://localhost” (and select …/nativeclient Url ?)
  • under API permissions blade – add delegated permissions you need
    (refer to specific API you’ll use)
  • install MSAL.PS PowerShell module
  • use the following code to get graph access token and call graph API
$AppId = ""
$TenantId = ""
$connectionDetails = @{
    'TenantId'    = $AppId
    'ClientId'    = $TenantId
    'Interactive' = $true
}

$token = Get-MsalToken @connectionDetails
# or 
$token = Get-MsalToken -TenantId $TenantId -ClientId $appId -Interactive 

$Headers = @{
    'Authorization' = "bearer $($token.AccessToken)"
}

Invoke-RestMethod -Uri 'https://graph.microsoft.com/v1.0/me' -Headers $Headers

You can find the code sample here: https://github.com/VladilenK/

Did not work:

Az PowerShell module did not work for me:

Connect-AzAccount -Tenant ""
$azAccessToken = Get-AzAccessToken -Resource "https://graph.microsoft.com" 

$Headers = @{
  'Authorization' = "$($azAccessToken.Type) $($azAccessToken.Token)"
}

Invoke-RestMethod -Uri 'https://graph.microsoft.com/v1.0/me' -Headers $Headers

As I understand we need somehow let Azure know API permissions we want (e.g. via app registerd)…

PnP did not work for me too:

$url = "https://orgname.sharepoint.com"
Connect-PnPOnline -ClientId "" -Url $url -Interactive 
$pnpToken = Get-PnPGraphAccessToken 
$Headers = @{
    'Authorization' = "bearer $($pnpToken)"
}
Invoke-RestMethod -Uri 'https://graph.microsoft.com/v1.0/me' -Headers $Headers

# did not work as well:
$pnpToken = Get-PnPAppAuthAccessToken
$pnpToken = Get-PnPAccessToken 

the error message was (maybe I missed something – please let me know):

“code”: “InvalidAuthenticationToken”, “message”: “Access token validation failure. Invalid audience.”

References

SharePoint site full permissions report

There has always been one problem in the SharePoint world: full site permissions report. Full means across entire site – including all objects with broken permissions.
It seems like Microsoft has solved the problem: Full site permissions report is available for site owners out-of-the-box.

How to get SharePoint All Site Permissions Report

(Ensure you are site collection admin or team/group owner).
Just navigate to Site Usage, scroll to the end and run report.

  1. Select gearbox “Settings” and then Site usage:

Or Select “Site Contents”, then “Site Usage” as shown below:

2. Scroll down to the “Shared with external users” block and click “Run report”:

  1. Create/Select folder (*) for the report and click “Save”:
    • If there are no folders in the Documents folder – you need to create one (otherwise you will not be able to save it:)
  • Once yo have a folder available – just click “Save”:

Give it some time (5-10 minutes) – check the folder’s content. There should be a file with a report on all site permissions.
For items shared with direct access, the report contains one row for each user / item combination.
SharePoint groups are shown in the report as groups (not individual users inside them… so you have to check group membership to get really full permissions report).

Again, you must be a site admin to run the report.

  1. Secure the permissions report
    If you don’t want other site members to see the report – secure the report’s folder – e.g. for site owners and for those who must be able see the report…
    Consider creating a separate library for permissions reports and secure it instead of securing a folder under Documents.

Some more ideas on SharePoint permissions

Permissions are tricky in SharePoint. By default, you have permissions assigned to the root site of the site collection and all subsites, libraries etc. inherit root permissions.
But you can break inheritance at any level you need to provide specific (unique) permissions to the resource.
Of course you can always navigate to the resource and check resource permissions. But… what if there are hundreds of broken permissions… should you iterate everything under your site to check manually if permissions are broken or inherited?

So the real problem was – you never knew who have access to your site as there was no out-of-the-box tool to get all site permissions in one single report. There are third-party solutions – like ShareGate, Metalogix or SysKit – or you can develop PowerShell script generating report on all SPO site permissions. But… finally Microsoft solved this problem – Microsoft implemented out of the box full site permissions report.

Reference:

Microsoft Report on file and folder sharing in a SharePoint site

Microsoft Search country-targeted bookmarks: new “Use Azure AD locations” flag

If you have country-specific content – Microsoft Search allows bookmarks to be configured to pop-up only for users from a specific country.

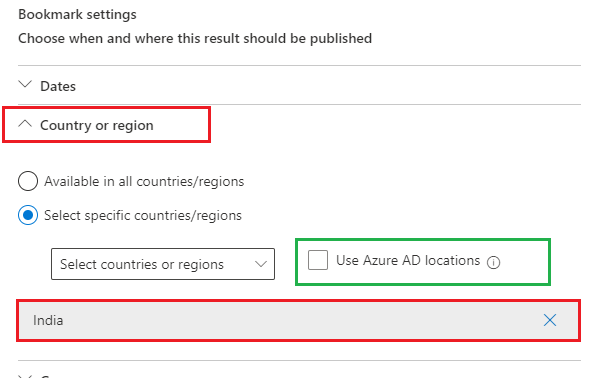
And “Use Azure AD locations” flag is a new option that make it actually works…
For a long time country settings were the same but without “Use Azure AD locations” flag. So what does “Use Azure AD locations” flag do?

Use Azure AD locations

“Use Azure AD locations” flag is a straight-forward configuration settings. It says: “This bookmark will only appear for users with Azure AD locations that match selected countries or regions. If cleared, the user’s IP address will be used to determine location. This checkbox can be altered from both Country or region setting and Targeted variations setting.”

I have tested this new “Use Azure AD locations” flag – it works. Once you configure user’s country in AAD and country-targeted bookmarks – all works good. Bookmarks appear for the user.

What if we do not “Use Azure AD locations” flag

to be provided

What was before “Use Azure AD locations” flag

What was before Microsoft implemented this “Use Azure AD locations” option? How did Microsoft understand “this user is from that country”. What was the criteria to correlate User <-> Country? License assigned country? Windows locale? Browser settings? Azure AD properties?

How does Microsoft define “this user is from that country”. What are the criteria to correlate User <-> Country? Physical IP address? License assigned country? Locale? Browser settings? Azure AD properties?

It turned out, the way it was designed previously:
– configure Microsoft 365 integration with Bing
– in Bing -> Settings : select Country/Region
– search from Bing
that was the only way to make it work! So yes, do not leave “Use Azure AD locations” option unchecked. Microsoft confirmed it was poor design.

Always “Use Azure AD locations” flag.

Resources: