As I am a SharePoint person, and retention policies and labels are not a SharePoint engineer responsibility, I do not go to the m365 Compliance Center frequently. Below are My notes for myself on key moments – how to create and configure Office 365 retention labels and Policies at Compliance Center and use labels in SharePoint Online (SPO).
In SPO at each site collection level you can still work with retention policies the old way – create policies under Site Collection Settings – Content Type Policy – and apply policies at library level under Library Settings/Information Management Policy Settings. There is also Site Retention Policy.
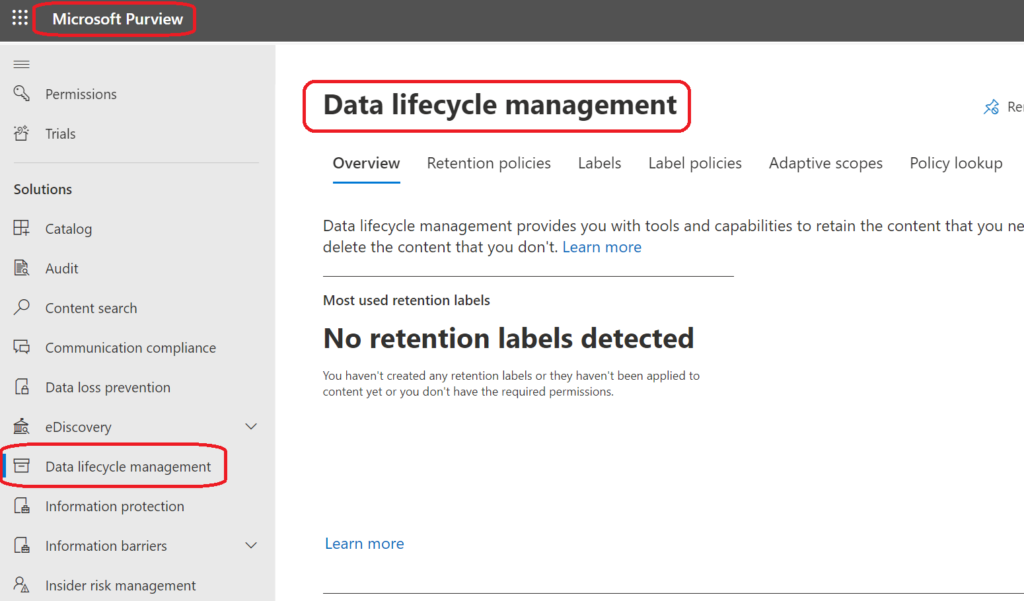
But Microsoft is making efforts to centralize and unify such things – so you can specify retention policies in one place and apply them across all Office 365 content (not only SharePoint). That place was called Office 365 Security and Compliance Center (SCC). Later Microsoft separated Security Center and Compliance Center. So currently Retention Policies are under “Microsoft Purview” (former Microsoft Compliance Center) -> Solutions -> “Data lifecycle management”:
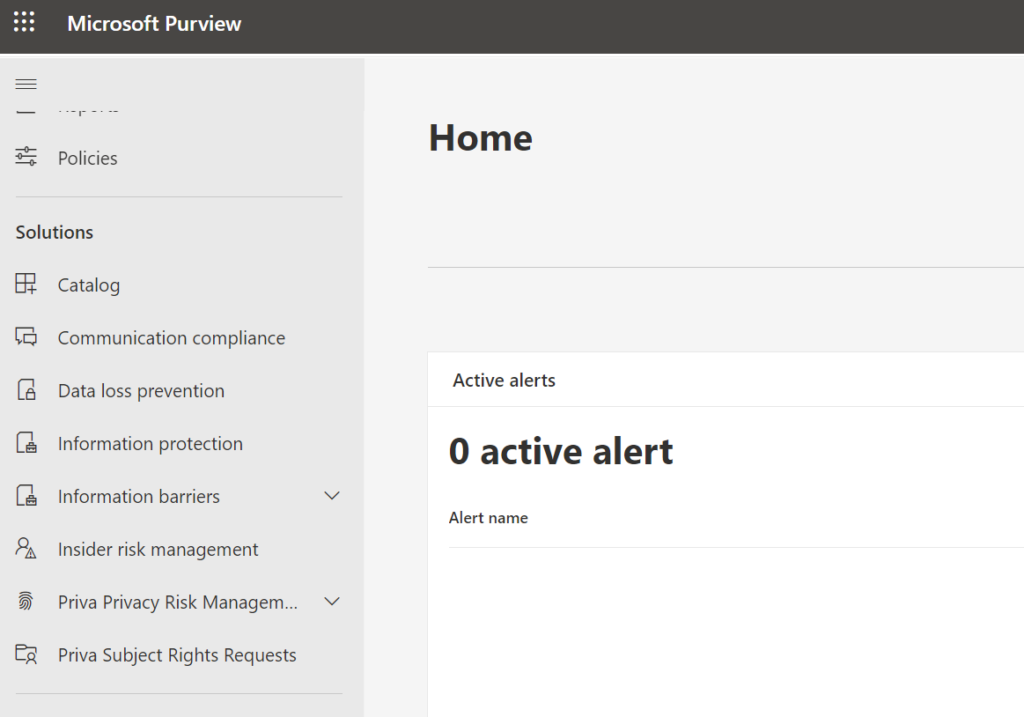
To get access to “Data lifecycle management” solution – you need to have a “” or “” roles. SharePoint or Teams administrator cannot access Purview. Even having “Global reader” or “Security reader” an admin will not be able to see “Data lifecycle management” blade. Here is how Microsoft Purview looks like for a Global reader:
Although SharePoint admins usually do not have access to SCC and do not go to Site content, we still need to know how it all works. And labels are recommended way to specify retention in SharePoint, so here we are.
Labels are applied to documents, documents are kept in libraries, and at each library you can “Apply a label to items in this library”.
Create Labels
Labels are created in SCC under Classification. The main part looks familiar to SharePoint people:
Label Settings
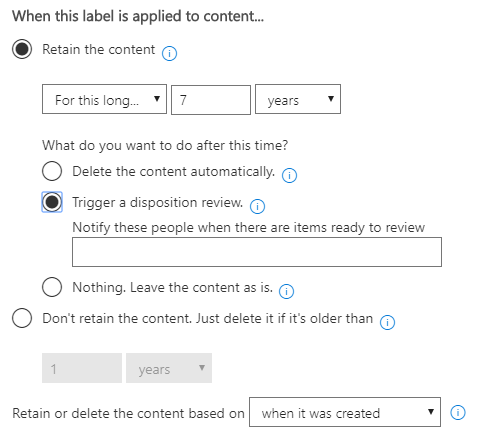
You can
Retain Content forever or for a specified number of days/months/years and then – delete it or trigger a disposition review or do nothing
Delete content if it’s older than specified number of days/months/years
after it was created/modified/labelled
Apply labels
Now you need to publish created labels – and that is how you create a policy. I.e. policies are where you specify which labels to which content (Exchange, OneDrive, SharePoint, Office 365 groups)
You can also auto-apply labels based on conditions, like
content that contains sensitive info
content that contains specific words or phrases, or properties
content that matches a trainable classifier
but as per Microsoft, “It will take up to 7 days to automatically apply the label to all items that match your conditions.”
Note: “trainable classifier” means an AI ML will be used, and as per Microsoft “Creating machine learning rules requires an Office 365 E5 subscription for your organization”
SharePoint admin center
You can do nothing with labels at SharePoint admin center. Labels are created, published and auto-applied at SCC. At each site collection levels site administrators can apply labels.
SharePoint site
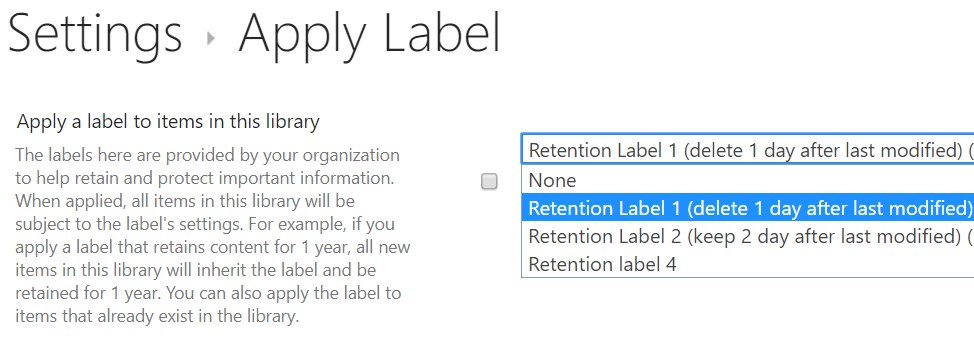
At site collection settings you can still see “Content Type Policy Templates” and “Site Policy”, but that is not the case. Labels are applied at library level under Library Settings/Apply label to items in this list or library.
where you can select a label to apply for all new items in the library. With
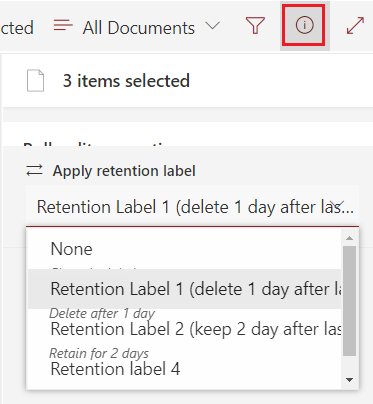
You can also apply the label to items that already exist in the library.
You can also apply (change) label for each single item or multiple selected items under Details pop-up page:
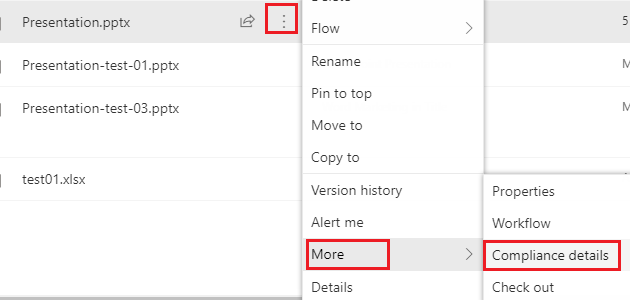
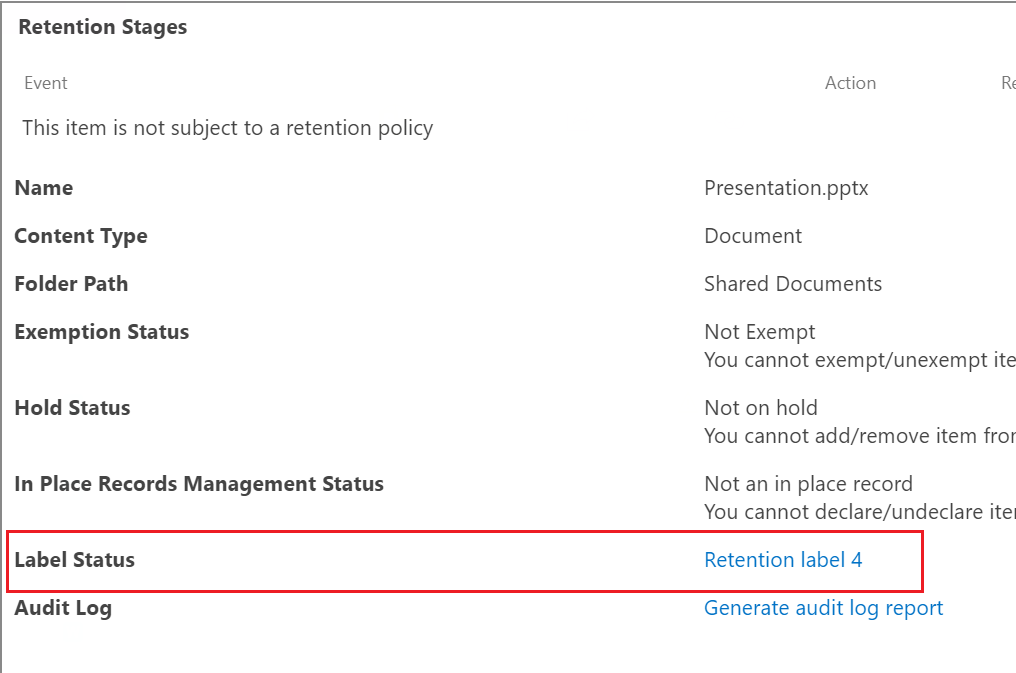
or from under Contect Menu/More/Compliance details:
Adaptive retention policies and scopes
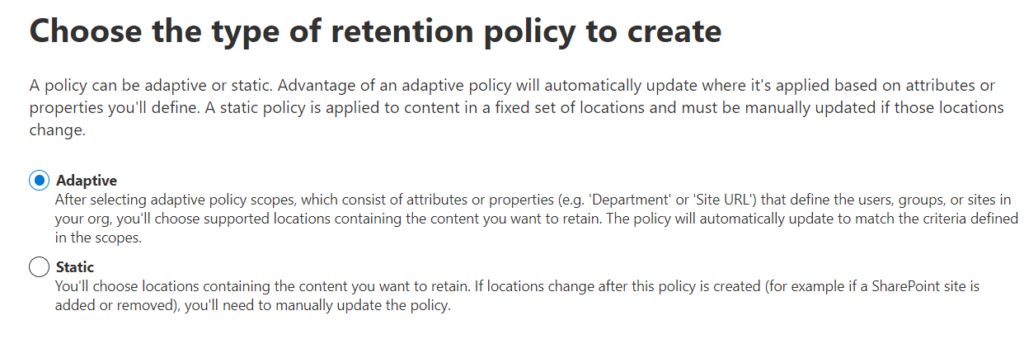
Microsoft recently implemented “Adaptive” retention policies. At step 2 of “Create retention policy” you’ll be asked “Choose the type of retention policy to create”: “A policy can be adaptive or static. Advantage of an adaptive policy will automatically update where it’s applied based on attributes or properties you’ll define. A static policy is applied to content in a fixed set of locations and must be manually updated if those locations change.”
And if you selected “Adaptive” – on the next step you will need to provide the adaptive scope (so at this moment you should already have created your adaptive scopes):
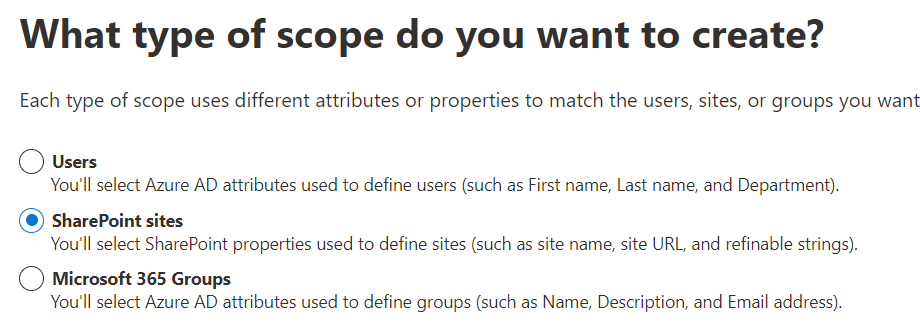
So, let us create your adaptive scopes. What type of scope do you want to create? SharePoint sites…
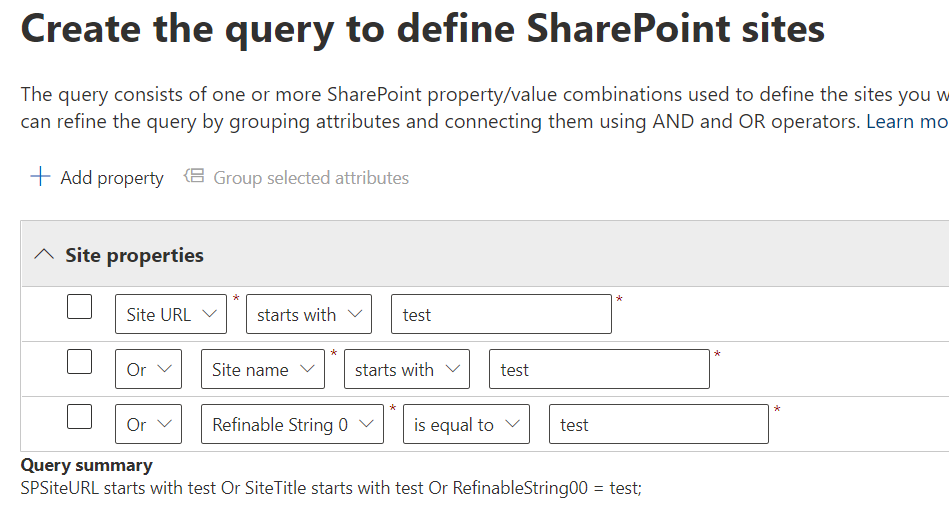
And then you’ll have nothing more then set of conditions:
where you can use objects: “Site Url”, “Site Name” and “Refinable String 0″..”Refinable String 99”. Conditions would be “is equal to”, “is not equal to”, “starts with” and “not starts with”. Or you can select “Advanced query builder” and enter LQL query.
What is the takeaway from this for SharePoint administrators? We would be asked to configure SharePoint the way compliance/retention people can use Refinable Strings.
How do users know – what files are going to be deleted
It would be a good idea to let users know, that their files will be deleted, but the next question would be “can I get a list of files that are scheduled to deletion”?
Surely it is possible for admins to go through site content and find files that were modified last time earlier than a specific date, but there is another method – you can recommend your users to search through their site using
VERBOSE: [VPC]:                            [[SPOTenantSettings]MyTenantSettings] Test-TargetResource returned False
VERBOSE: [VPC]: LCM:  [ End    Test     ]  [[SPOTenantSettings]MyTenantSettings]  in 11.4040 seconds.
VERBOSE: [VPC]: LCM:  [ Start  Set      ]  [[SPOTenantSettings]MyTenantSettings]
VERBOSE: [VPC]:                            [[SPOTenantSettings]MyTenantSettings] Setting configuration for SPO Tenant
VERBOSE: [VPC]:                            [[SPOTenantSettings]MyTenantSettings] The use of the public CDN is not enabled, for that the PublicCdnAllowedFileTypes par
ameter can not be configured and will be removed
A parameter cannot be found that matches parameter name 'Ensure'.
    + CategoryInfo          : InvalidArgument: (:) [], CimException
    + FullyQualifiedErrorId : NamedParameterNotFound,SharePointPnP.PowerShell.Commands.Admin.SetTenant
    + PSComputerName        : localhost

VERBOSE: [VPC]: LCM:  [ End    Set      ]  [[SPOTenantSettings]MyTenantSettings]  in 3.7290 seconds.
The PowerShell DSC resource '[SPOTenantSettings]MyTenantSettings' with SourceInfo
'C:\scripts\o365\Office365DSC\o365DSC_Config_Tenant.ps1::12::9::SPOTenantSettings' threw one or more non-terminating errors while running the Set-TargetResource
functionality. These errors are logged to the ETW channel called Microsoft-Windows-DSC/Operational. Refer to this channel for more details.
    + CategoryInfo          : InvalidOperation: (:) [], CimException
    + FullyQualifiedErrorId : NonTerminatingErrorFromProvider
    + PSComputerName        : localhost

VERBOSE: [VPC]: LCM:  [ End    Set      ]
The SendConfigurationApply function did not succeed.
    + CategoryInfo          : NotSpecified: (root/Microsoft/...gurationManager:String) [], CimException
    + FullyQualifiedErrorId : MI RESULT 1
    + PSComputerName        : localhost

VERBOSE: Operation 'Invoke CimMethod' complete.
VERBOSE: Time taken for configuration job to complete is 15.486 seconds
Update (Apr 2024): It seems like Microsoft changed this behavior for Microsoft 365, so consider this article as an obsolete. Though it is possible that content is still relevant for on-prem versions of SharePoint server.
Scenario:
You have a list (or a document library) in SharePoint Online. You can search through the list but some fields (or document properties) like “Description”, “Subject”, “Author”, “Owner”, “AssignedTo”, “Created”, “CreatedBy” are not searchable.
Cause:
Crawled properties are mapped to non-searchable managed properties. So this is by design. Check Microsoft’s “Overview of crawled and managed properties in SharePoint Server” (we do not have this document for SharePoint Online, so we have to rely on this doc; though you can go to your Search schema in SPO to verify). You see some pre-created managed properties do not have “Searchable” option enabled.
Solution:
(See below for details, as this is still not finished:)
Prove:
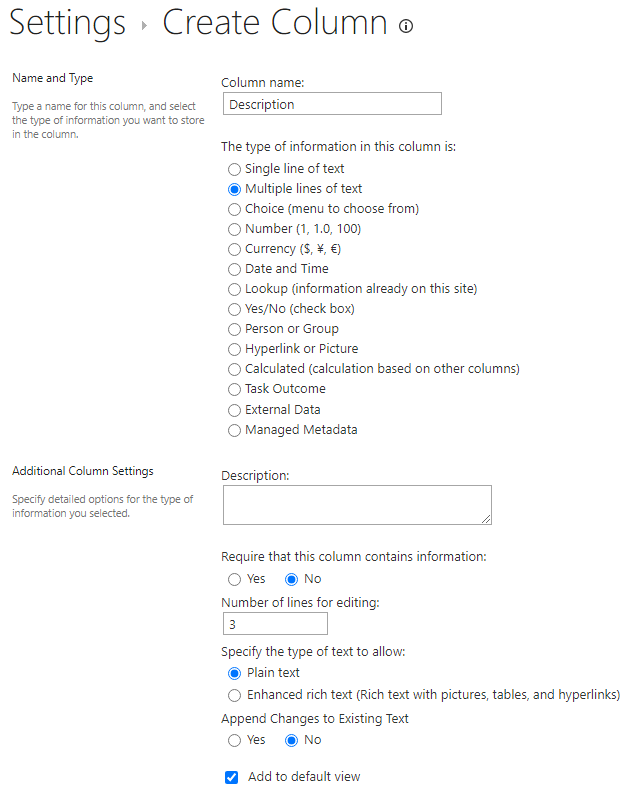
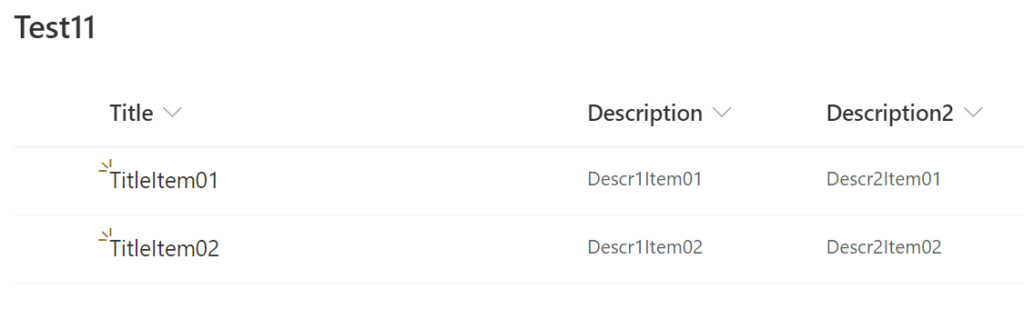
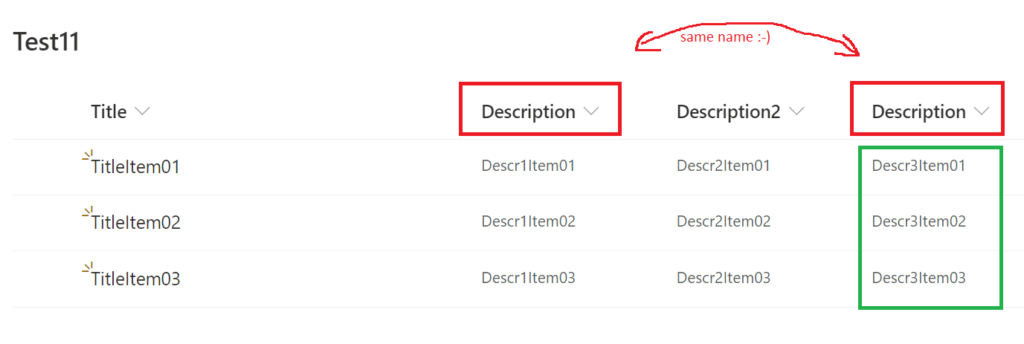
I have created a new SPO site test78, a new list Test11 and created (not added from existing) a custom field “Description” to the list:
I also created “Description2” column the same way. No data is added to the list so far.
Search schema looks like:
for Description managed property:
mapping:
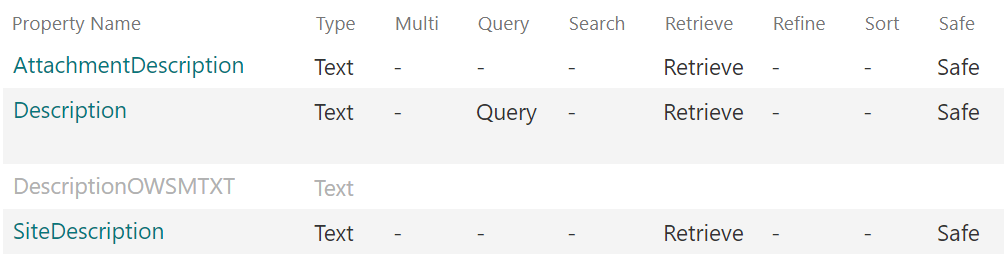
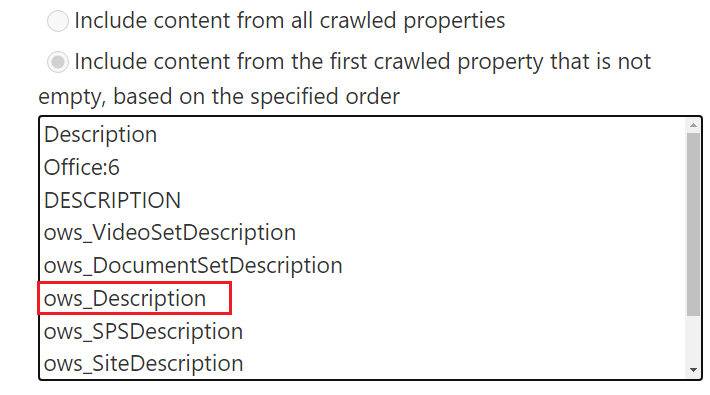
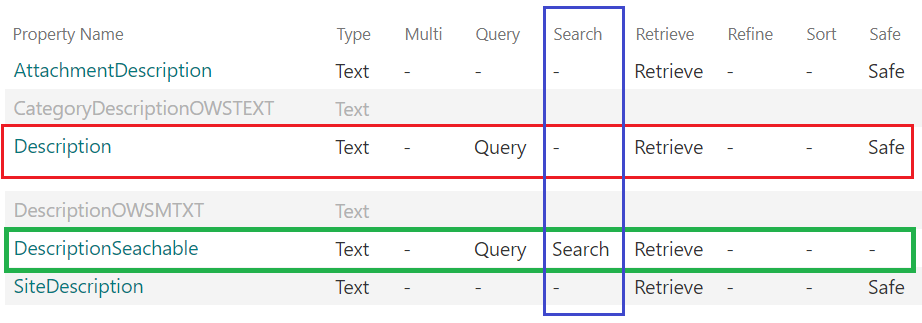
Notice that “Description” managed property is not searchable and “ows_Description” crawled property is mapped to “Description” managed property.
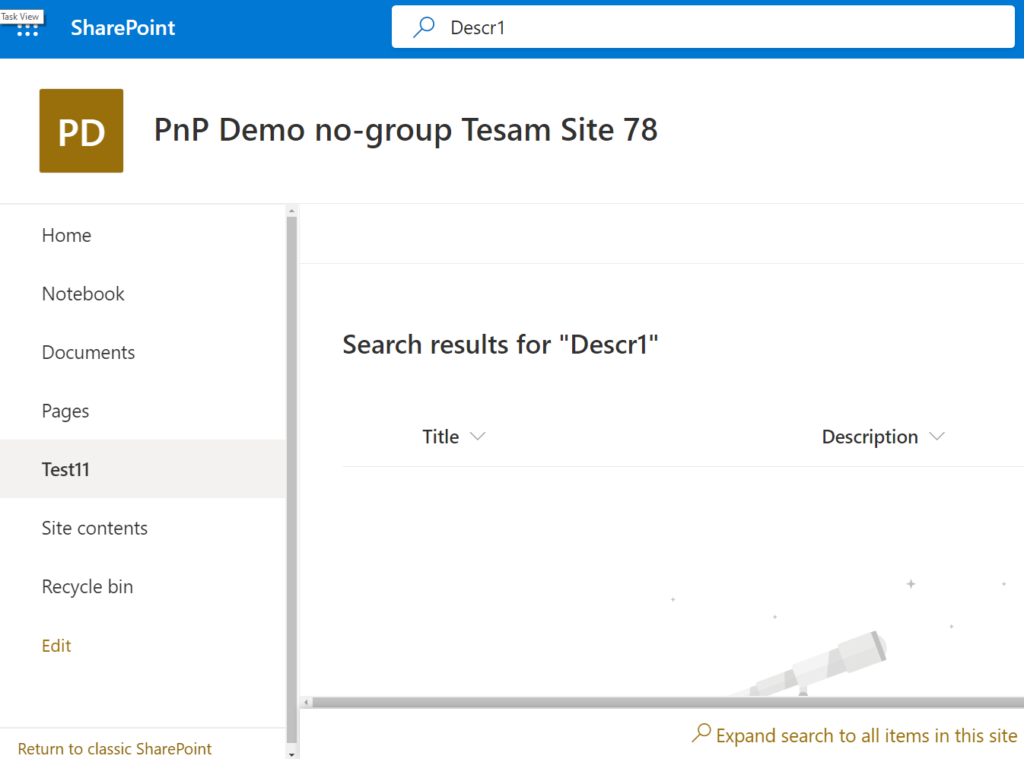
Searching for “ows_Description” crawled property gives me:
and that’s OK, as we have no data in the list so “ows_Description2” crawled property does not exist.
Now let me add some data to the list:
and wait a few minutes while continues crawl grabs data.
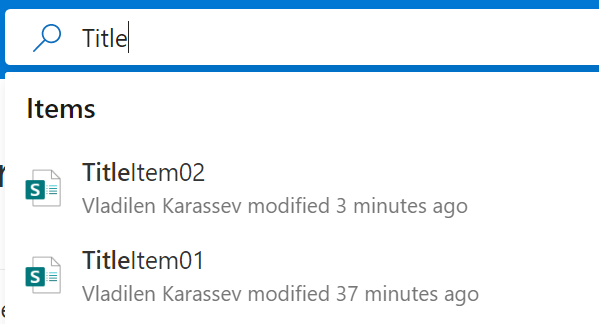
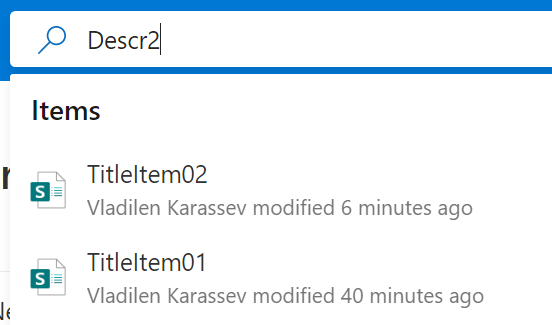
You can see:
Title and Description2 are searchable, but we are not able to search through “Description” field content.
Explanation
Actually this is by design. Microsoft: “The index only includes content and metadata from the managed properties”. (Maybe Microsoft tries to protect their resources from overloading or maybe they protect us from irrelevant results, but including entire document content in full-text search and at the same time not including properties like Document Subject – this does not make sense to me). So the sad fact is list column “Description” is mapped to non-searchable managed property by default.
“Searchable” means: “…The content of this managed property is included in the full-text index.” I.e. if the property is not searchable – “The content of this managed property is not included in the full-text index.” => that’s by design.
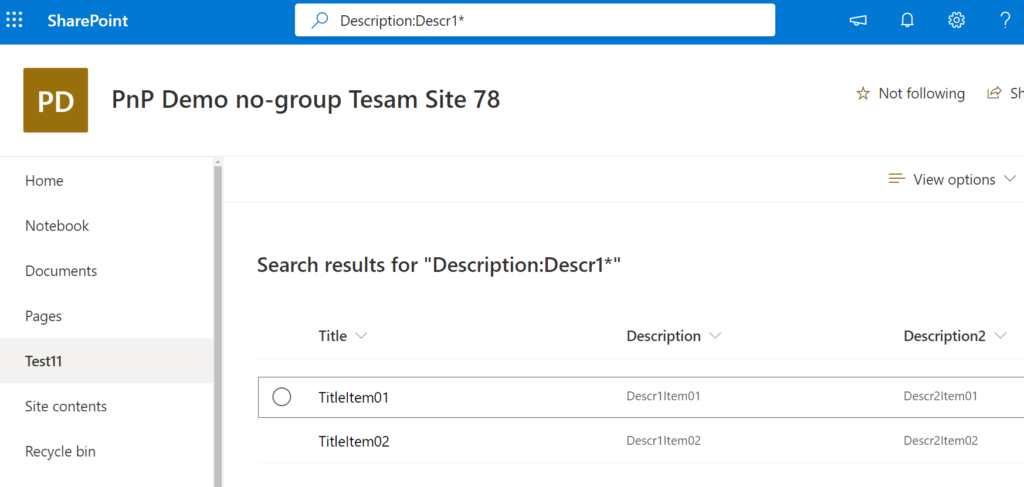
But – the good news – the property is Queryable! Queryable “Enables querying against the specific managed property”.
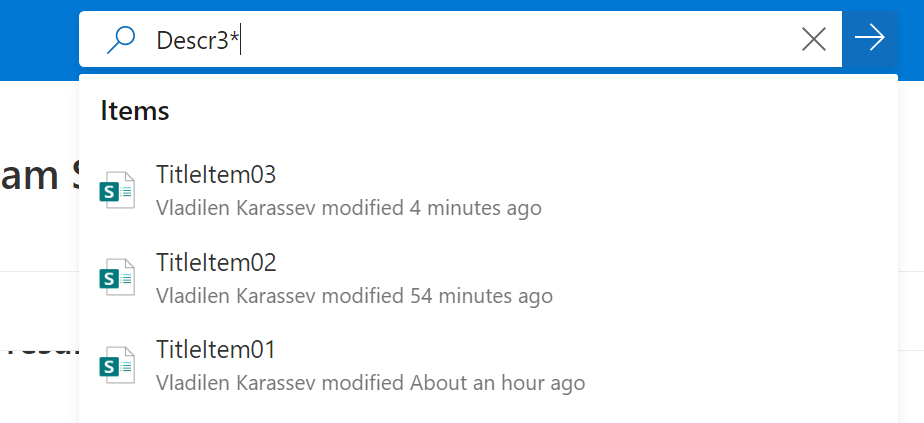
E.e. “Description:Descr1*” query should work. And it works:
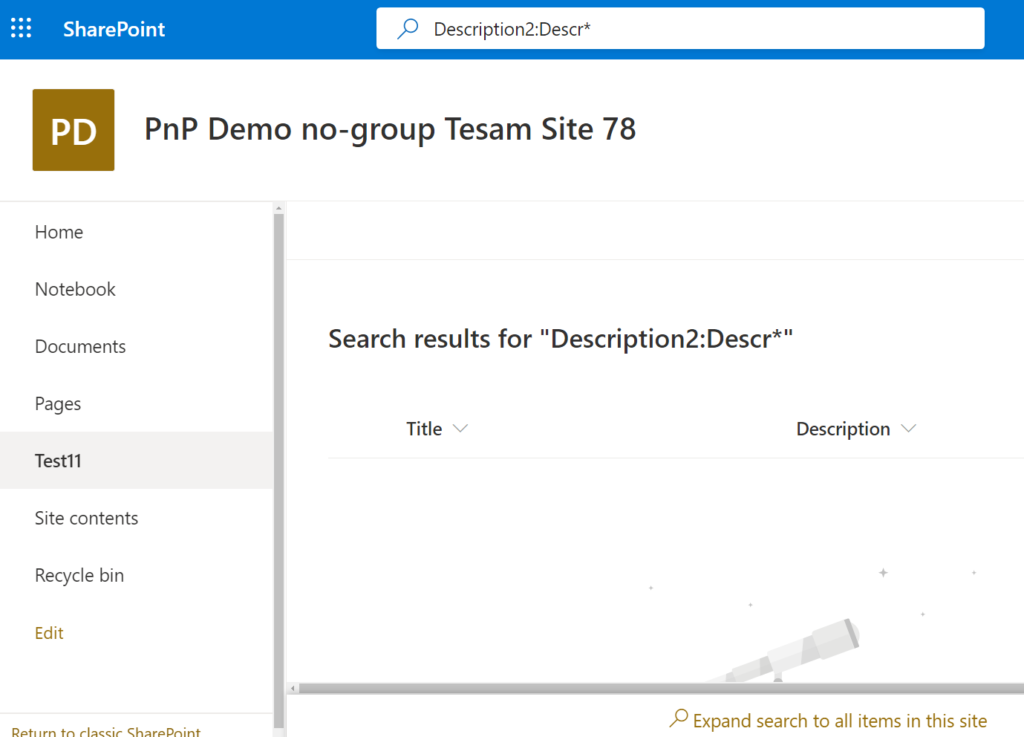
“Description2:Descr*” query should not work as we did not map Description2 property to any managed properties, so we can find content via full-text search but cannot find under managed property:
Solution
Option #1. Use queries like “Description:TextToSearch” (check also SharePoint KQL).
Option #2. Do not use name “Description”. Choose something else like “Short Description” or “Case Description”
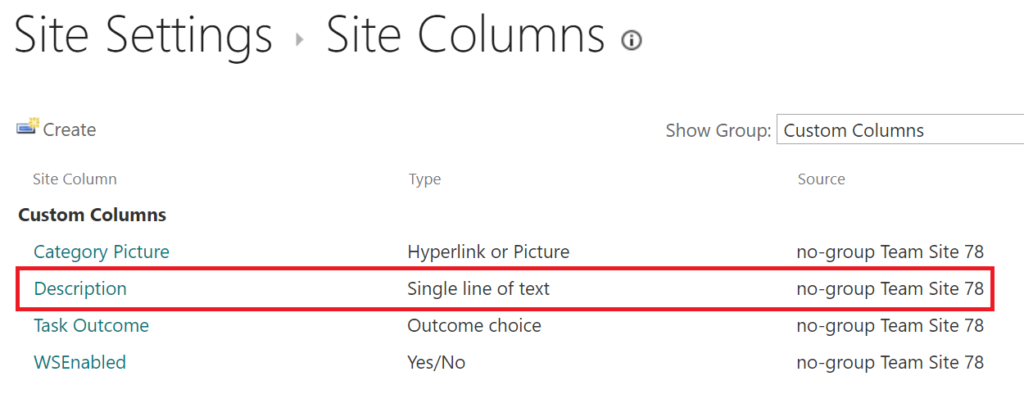
Option #3. Use existing site column “Description” from group:Custom Columns. It’s “single line of text” though. Note: “SharePoint Server Standard Site Collection features” must be activated.
The thing is it’s internal name is “CategoryDescription” and display name is “Description”. So if you add this column to the list – the content will be searchable:
Option #4 Create a new site column, name it e.g. “DescriptionSrchblClmn”. Add this column to the list from existing site columns. Rename it to “Description”.
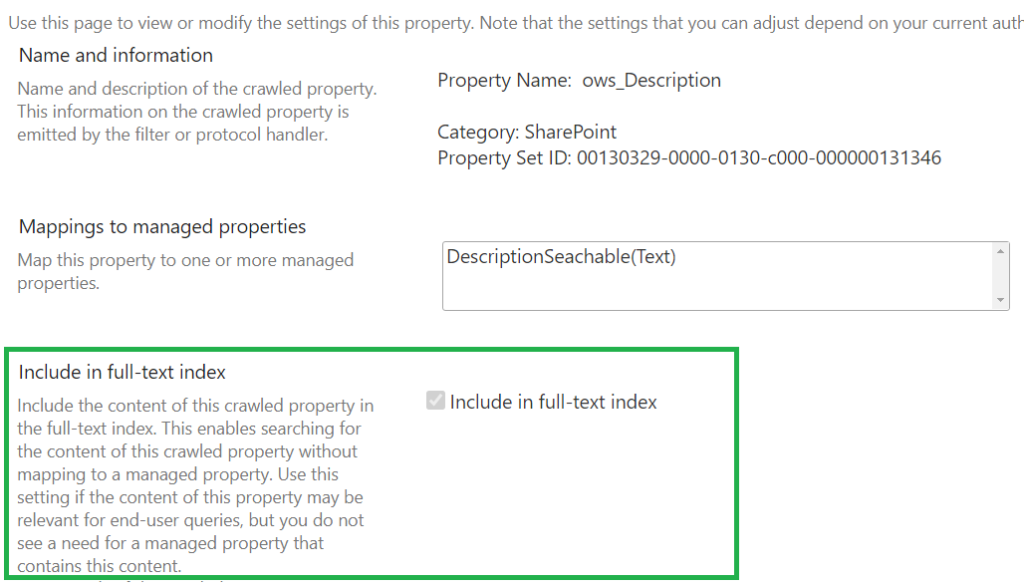
Option #5. Create your own managed property (e.g. “DescriptionSearchable”), make it searchable and map it to “ows_Description” crawled property.
ensure crawled property has “Include in full-text index” option ON:
NB: changing search schema affects other site lists/libraries.
Remember: if you made a change in search schema, run “Reindex site” under Site Settings -> “Search and Offline Availability”. It’s like on-prem “Full crawl” but works at web level.
If you are managing SharePoint search, specifically if you are customizing SharePoint search schema, especially in SharePoint Online (Office 365) – you know how slow it works and how tiresome it is to “Search for a crawled property name”.
Recently I found out that wildcard works. No, even two wildcards work!
In this example I need crawled property started from ows and contains doc and type:
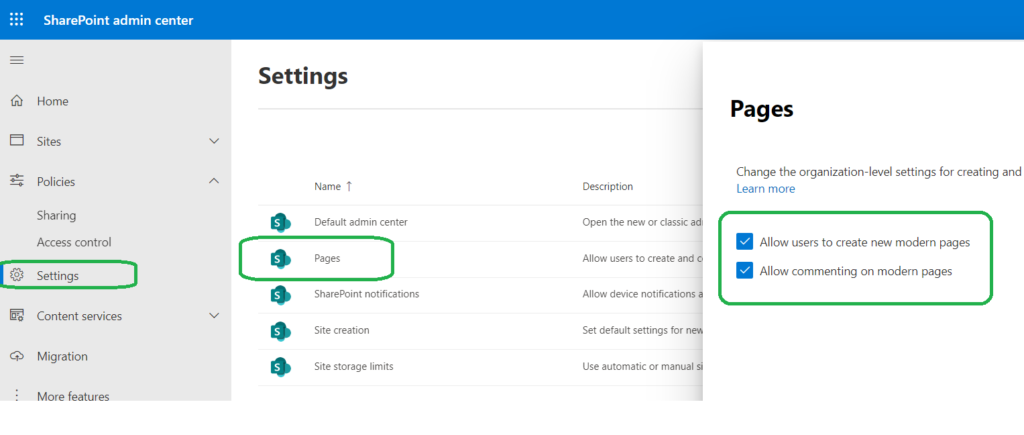
Microsoft: “You can also select to allow or prevent commenting on modern pages. If you allow commenting, it can be turned on or off at the page level“
By default both – Allow users to create new modern pages – Allow commenting on modern pages are turned on (enabled)
Tenant or SharePoint admin can find settings under SharePoint Admin Center -> Settings -> Pages
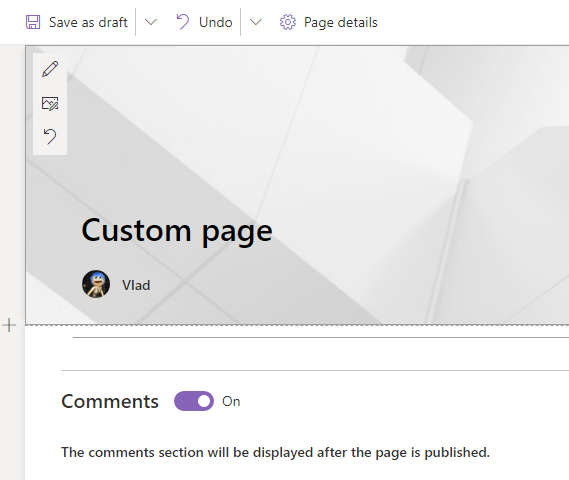
When you are creating a modern site page – there is an option “Comments” turned On by default:
And page with comments looks like:
Comments on site pages (aka modern pages) can be enabled or disabled at each of the levels: – Tenant level – Site (aka site collection) level – Web (aka subsite ) level – Page level Here is how it is done:
Level
How it’s done
Who can do it
Tenant
GUI ( SharePoint Administration) or PowerShell
Global Administrator or SharePoint Administrator
Site (Site Collection)
PowerShell
Global Administrator or SharePoint Administrator
Web (Subsite)
PowerShell
Site Collection Administrator or Owner (Full Control rights to web)
Page
GUI (Page Editing screen)
Site Member (Edit right to page)
If commenting on modern pages disabled at higher level – lower level settings do not work. E.g. If you disable “Allow commenting on modern pages” at tenant level (it takes minutes) – the functionality will gone from all modern pages of all sites.
When you switch page comments Off – all existing comments will be hidden (but not deleted). If you later turn comments On – comments will reappear, including Likes.
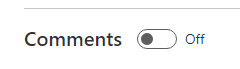
If “Allow commenting on modern pages” disabled at tenant or web level – you will not see “Comments On/Off” switch while editing page. If “Allow commenting on modern pages” disabled at site collection level – you will see “Comments On/Off” switch while editing page, but you will not be able to turn it ON.
PowerShell
When you disable “Allow commenting on modern pages” at tenant level – PowerShell Object (site/web) property “CommentsOnSitePagesDisabled” will not be changed for any site/web. You can still with PowerShell set it to True/False: “Set-PnPWeb -CommentsOnSitePagesDisabled:$false” but it does not take any effect.
If you enable “Allow commenting on modern pages” at tenant level (it takes ~10 minutes) – the functionality will return to all modern pages and all webs and sites properties “CommentsOnSitePagesDisabled” will ???. You can change it with PowerShell: “Set-PnPWeb -CommentsOnSitePagesDisabled:$false”.
# having Site Collection Admin Permissions:
# disable Comments On Site Pages for a subsite:
$webName = "SubSite_02"
Set-PnPWeb -Web $webName -CommentsOnSitePagesDisabled:$true
# enable Comments On Site Pages for a subsite
# (only if comments enabled at tenant level):
Set-PnPWeb -Web $webName -CommentsOnSitePagesDisabled:$false


# having global admin or SharePoint admin permissions:
# site collection:
Set-PnPTenantSite -Url $siteUrl -CommentsOnSitePagesDisabled:$true
# tenant-level Comments:
Set-PnPTenant -CommentsOnSitePagesDisabled:$true # disable
 comments
Set-PnPTenant -CommentsOnSitePagesDisabled:$false # enable comments

# does not work:
Set-PnPSite -CommentsOnSitePagesDisabled:$true
How do I know if if the page is modern page or classic page (PowerShell)?
Note: We did not discuss “Wiki Pages” or “Web part Pages”, we discussed only “Modern Pages” (aka Site Pages). I have tested it all personally using Communication sites. MS-Team (group-based) and standalone SharePoint (no-group) sites – TBP.
… by teams you are bringing in collaboration but you are losing discoverability… … you put everything in one document library which becomes overloaded… … you have to rely on search to try to find it… … challenge for teams to become scalable (not everything can be added to tabs) – @DarceHess, Microsoft 365 & SharePoint PnP Weekly – Episode 91