Tag Archives: Microsoft Graph

Install PowerShell and configure your PowerShell environment

In this article I’ll guide you through how to get PowerShell and configure your environment for PowerShell scripting against Microsoft 365. For those who do not need detailed instructions:

  • Install PowerShell 7 (cross-platform one)
  • Install Visual Studio Code
    • find and install PowerShell plugin for VSCode
    • install MgGraph (Microsoft Graph) module
    • install PnP.PowerShell module
  • Get and configure Azure App Registration
    • registration a new Azure App
    • configure API permissions and get admin consent
    • configure authentication

Windows PowerShell

Every Windows computer comes with PowerShell pre-installed. So if you are on a Windows machine – try the following: Start -> Windows PowerShell. You’ll see:

So you can type something like “Get-Date” or “Get-ComputerInfo” or “Get-Disk” or “Get-Random” and see results right away, e.g.:

But, hold on! This is not the PowerShell we need. This is so-called PowerShell 5 (classic, legacy one, nowadays called “Windows PowerShell”). Though you can use Windows PowerShell OotB, we will use new, modern, cross-platform PowerShell (for Windows, Linux, and macOS).

PowerShell

This is how nowadays called a new cross-platform PowerShell. Just “PowerShell” (or PowerShell 7, as 7 is it’s current/latest major version. Here is the Microsoft’s official guide “Install PowerShell on Windows, Linux, and macOS“. There are multiple options to install PowerShell 7 – just choose your one (you are Power User, you should figure it out). E.g. you can use your Windows PowerShell window to install PowerShell 7:

Once modern PowerShell, your Start->PowerShell experience should look like:

Notice that you have both – PowerShell 5 (for Windows) and PowerShell 7 (cross-platform).

Start PowerShell 7 and try something like “Get-Command” or “Get-Help”. Congratulations! Let go to the next step.

IDE – Integrated Development Environment

So far what you did – you used PowerShell cmdlets in command-line window. It is ok to use plain PowerShell window to quickly run one or a few PowerShell commands, but usually we work with scripts. A PowerShell script is a program written in PowerShell – composed of a sequence of PowerShell cmdlets, structured with logic to perform specific tasks. So we would need some kind of editor for PowerShell programs. Actually you can use any universal text editor – like Notepad, Notepad++ to create your code, you’d save it as .ps1 file (e.g. myFirstScript.ps1) and than run you script with PowerShell. But there is a better way – using IDE. IDE stands for “Integrated Development Environment” – a developer-oriented text editor equipped with a bunch of goodies that help creating and debugging code.

Visual Studio Code

One of the most popular IDE is Visual Studio Code (or vscode) – a free open-source IDE from Microsoft. You can get it from code.visualstudio.com – just download it and install it.

I’d recommend you to take some brief vscode introduction lessons – like this one from Microsoft. VScode can be used to code in many programming languages – Python, C#, Javascript etc. We will be using it to code in PowerShell. I’d recommend to create a new folder for your PowerShell scripts, and from VSCode open a folder. After you trust yourself – you’ll see something like:

Using “New file” icon – create a new file, name it e.g. “my-first-script.ps1” (.ps1 extension is required).

PowerShell plugin

VSCode will realize that you are coding in PowerShell and suggest you to install a PowerShell plugin (or you can install it manually):
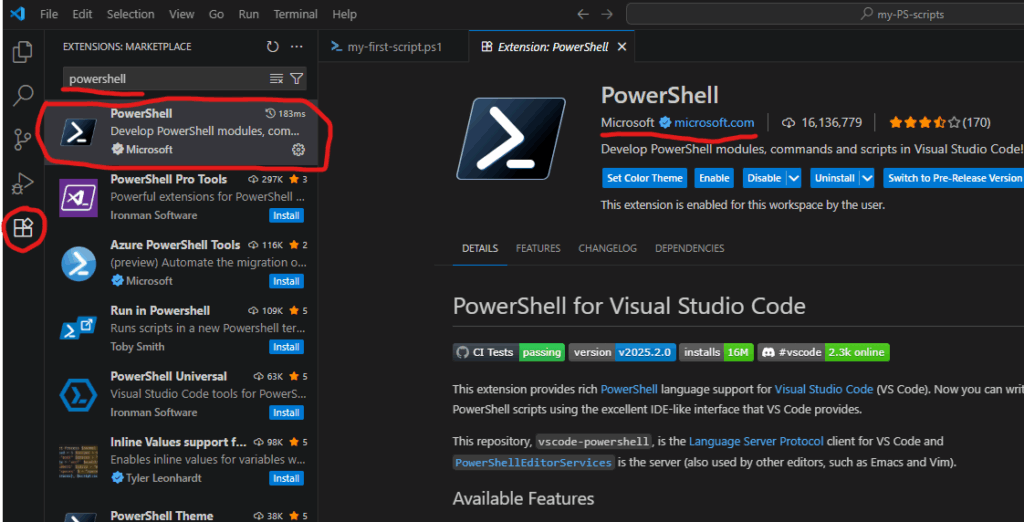
PowerShell plugin is the last piece we need to start scripting in PowerShell.

PowerShell Modules

Technically, what we already installed – enough to start coding for SharePoint (e.g. calling Microsoft Graph API via built-in Invoke-RestMethod), but there are some much more convenient ways – using modules.

PowerShell is built around modules. Every command you use is provided by a module. PowerShell includes built-in modules out of the box that offer essential cmdlets (such as Get-Host). However, to work with Microsoft 365 services, you’ll need additional modules that contain cmdlets specifically designed for interacting with Microsoft 365. There are modules to work with Teams, Exchange, SharePoint, Entra Id etc. Below are the most popular modules.

Microsoft Graph

Microsoft Graph is a unified API endpoint developed by Microsoft that allows developers and IT professionals to access and interact with a wide range of Microsoft 365 services and data. It acts as a gateway to data stored across Microsoft services. Utilizing Microsoft Graph from PowerShell code is better done with Microsoft Graph PowerShell SDK. So check it out and install.

PnP.PowerShell

The other very popular and useful module is PnP.PowerShell. PnP is an open source community backed by Microsoft (but PnP products are not officially supported by Microsoft). The PnP team does an excellent job of developing and providing a wide range of tools, SDKs, documentation, learning videos, and other resources to help developers work with Microsoft 365 efficiently. For PowerShell developers they maintain PnP.PowerShell module. So please go ahead and install it as well.

Authentication and Authorization

To work with Microsoft 365, the first step is authentication – essentially proving that you are actually who you claim to be (via providing login name and password or fingerprint etc.). Once you authenticated to Microsoft – you can access resources if you have permissions and cannot access others because you do not have permissions provided. This is called authorization.

This is true for your interactive experience with Microsoft 365 via browser, or Teams app etc. The same is true when you access Microsoft 365 programmatically – via PowerShell code. You need to authenticate and being authorized.

For smooth authentication and authorization to Microsoft 365 from your PowerShell code you’d need so called App Registration properly configured. App Registration is where API permissions and authentication methods are specified.

There are two authentication methods most commonly used in programming – interactive and non-interactive. Interactive authentication – is when a program acts on behalf of a user (e.g. you as a current user). The other method is used when your program needs to work unattended (without user presence) – on behalf of an application itself with it’s own permissions. You’d need separate app registration for each of these methods.

Interactive Applications

Interactive programs is what we will mostly use in this “PowerShell for Power Users” series of tutorials. Interactive login require delegated API permissions configured in the App Registration and proper authentication configuration Authentication blade. When your interactive program works – it’s effective permissions are the intersection of your personal permissions and permissions specified in the app registration.

Here is how to get an app registration, configure delegated API and authentication.

Non-Interactive Applications

Non-Interactive programs (also called daemon apps or background services or scheduled jobs etc.) are used mostly used by admins for tenant-level automation. But it is possible to automate something for a specific site, e.g. one of the common scenarios – data analytics can automate pulling some data from SharePoint site into e.g. Azure Data factory via pipeline. Non-Interactive authentication require application API permissions configured in the App registration and a secret generated or certificate uploaded. When a non-interactive program works – it’s effective permissions are the permissions specified in the app registration.

Here is how to get unattended access for a specific SharePoint site with Sites.Selected.
Granular Application Permissions to SharePoint

In 2021 Microsoft implemented “Sites.Selected” Graph API permissions to allow application access (without a signed in user) to specific sites (entire site only). In 2024 Microsoft implemented granular access – to specific list/libraries, as well as to specific documents/files and list items. Now name convention is *.SelectedOperations.Selected.
Permissions come in two flavors – delegated and application:

  • Files.SelectedOperations.Selected – Allow the application to access a subset of files (files explicitly permissioned to the application). The specific files and the permissions granted will be configured in SharePoint Online or OneDrive.
  • ListItems.SelectedOperations.Selected – Allow the application to access a subset of lists. The specific lists and the permissions granted will be configured in SharePoint Online.
  • Lists.SelectedOperations.Selected – Allow the application to access a subset of lists. The specific lists and the permissions granted will be configured in SharePoint Online.


New Microsoft Graph Connector service plan

Microsoft Graph connectors allow your organization to index third-party data into Microsoft Graph. Microsoft Graph connectors enable Microsoft 365 Copilot better as it has more information relevant to your organization to answer prompts.

According to Microsoft, Microsoft 365 will soon include a new service plan, Graph Connectors Search with Index, offering a 50 million item index limit per tenant at no cost. Rollout starts September 2024.

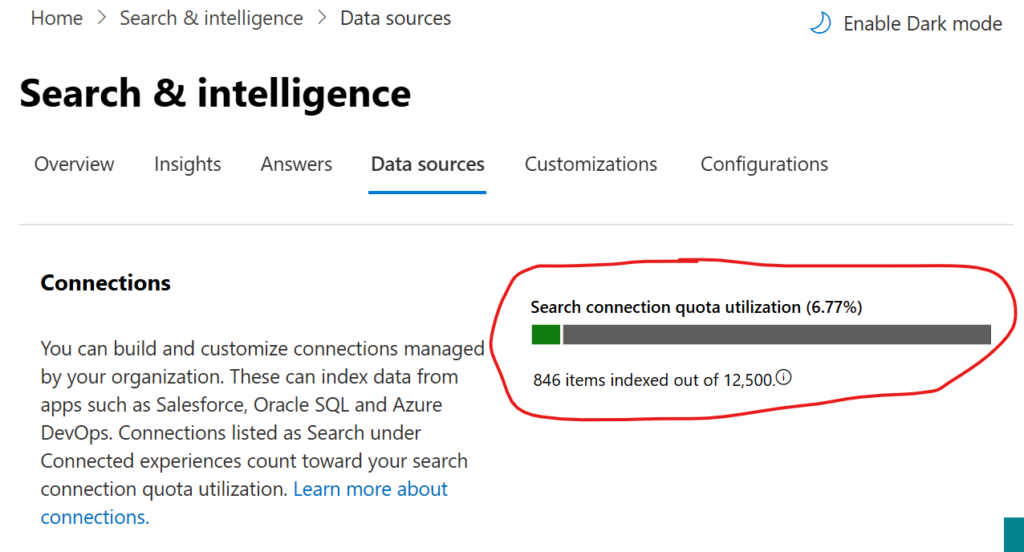
Microsoft Search and Intelligence - Data Sources. 
You can build and customize connections managed by your organization. These can index data from apps such as Salesforce, Oracle SQL and Azure DevOps. Connections listed as Search under Connected experiences count toward your search connection quota utilization.

Previously, to index third-party data into Microsoft Graph through Microsoft Graph connectors, you either needed to have a built-in entitlement through specific licenses (e.g., 500 items of index quota per Microsoft Copilot for Microsoft 365 license) or purchase add-on quota. With this change, the index quota per license entitlement is removed, as is add-on cost for additional quota. You now receive an entitlement of 50 million items for each tenant.

Each entity (or record) from the source data system that you add to Microsoft Graph can be considered an item which then shows up as a unique citation in Copilot’s responses, as a unique search result in Microsoft Search, etc. Depending on the type of data source, 1 item is –

  • 1 document (word, excel, ppt, pdf, etc.) in file share
  • 1 wiki page in Confluence
  • 1 webpage in a website
  • 1 ticket/issue in Jira

Total quota utilized is calculated in terms of total items stored in the index. Updates/changes to an item are not counted in any manner. There are no cost implications of updating an item multiple times. It still counts as 1 item only.

Applicable to subscriptions: Office 365 E1, Office 365 E3, Office 365 E5, Microsoft 365 E3, Microsoft 365 E5, Microsoft 365 F1, Microsoft 365 F3, Office 365 F3, Microsoft 365 Business Basic, Microsoft 365 Business Standard, Microsoft 365 Business Premium, Office 365 G1, Office 365 G3, Office 365 G5, Microsoft 365 G3, Microsoft 365 G5, Office 365 A3, Office 365 A5, Microsoft 365 A3, Microsoft 365 A5

Using Microsoft.Graph PowerShell to Search in Microsoft 365

There is a Microsoft.Graph PowerShell module provided by Microsoft which simplifies usage of Microsoft Graph API. Below is how to authenticate to MS Graph and how to search within SharePoint and Teams Microsoft 365 content using Microsoft.Graph PowerShell module.

Authentication

Interactive authentication code sample:

# Prerequisites
Get-Module Microsoft.Graph.Authentication -ListAvailable 
Get-Module Microsoft.Graph.Search -ListAvailable 

# Interactive Authentication
$clientid = 'd82858e0-ed99-424f-a00f-cef64125e49c'
$TenantId = '7ddc7314-9f01-45d5-b012-71665bb1c544'
Connect-MgGraph -ClientId $clientid -TenantId $TenantId

For daemon app authentication we need a certificate configured in Azure App and installed on the user machine. Daemon app authentication code sample (please specify your tenant id, app (client) id and certificate thumbprint:

# App Authentication
$TenantId = ""
$clientID = ""
$certThumbprint = ""
Connect-MgGraph -ClientId $clientid -TenantId $TenantId -CertificateThumbprint $certThumbprint

Search with Microsoft.Graph

# Search
$params = @{
	requests = @(
		@{
			entityTypes = @(
				"driveItem"
			)
			query = @{
				queryString = "test*"
			}
			from = 0
			size = 50
			fields = @(
				"title"
				"description"
			)
                        region = "NAM"
		}
	)
}

$res = Invoke-MgQuerySearch -Body $params
$res.HitsContainers[0].Hits

Note: when you are calling MS Graph Search API authenticated as user – you need to remove “region” parameter.

Code samples: https://github.com/VladilenK/m365-PowerShell/tree/main/KBA/Search

Search Microsoft 365 content programmatically: all articles index

Video tutorial:

Authentication to Microsoft Graph: Azure Registered Apps Certificates and Secrets

Before we can make a call to Microsoft 365 from our code – we need to be authenticated. There are many kinds of authentication flows that Microsoft supports. For more details – please refer to Microsoft Identity Platform documentation but in short – there are two major kind of authentications – as a current user and as a daemon application and in both cases we need an application to be registered in Azure.

Briefly here is what you need to have for your custom application to authenticate to Microsoft 365:

  • register Application in Microsoft Azure
  • configure Authentication blade (for interactive apps)
  • configure Secrets or Certificates (for daemon apps)

Register Application in Microsoft Azure

1. You’d go to https://portal.azure.com/
2. Type app registration in search and select App registration

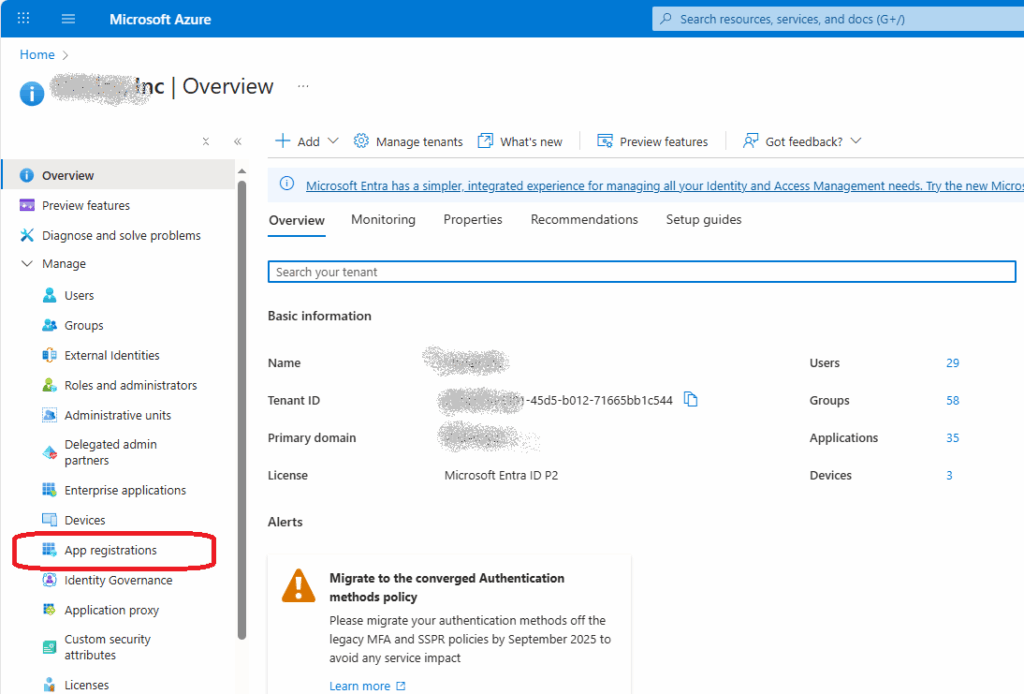
Update (July 2025) – the search for “App reg” is not working… But you can go to App registrations from Entra Id:

How to navigate to app registrations in Azure


3. Select “New registration”

4. For now, you’d just need to provide your application display name and leave other fields as default – Single tenant and no redirection Url, then click “Register”

register an application in azure

5. If you are seeing an error message telling that your are not allowed to register an app – you’d reach your AAD/EntraId/Global admins so they can register an app for you.

6. Under Azure Portal App Registrations you should be able to see your app:

search for registered app in entra id

7. Under Overview blade notice you Client Id and tenant Id:

get client id and tenant id from app registration


Configure Authentication blade for interactive apps

Azure apps for interactive authentication are configured differently (check MS app types and authentication flows) for different scenarios/platforms.

Here is a good article from MS. Microsoft Graph quick start can register an app for you. Microsoft publish tutorials for .net, Go, Java, JavaScript, PHP, Python, TypeScript…

In a few words, you’d need to add Platform as below

start configuring authentication for registered app in entra id

manually if you know how to configure it.
Otherwise, Quickstart and/or Integration assistant might help you.

Here is how I configure apps for interactive user authentication for PowerShell.

configuring redirect url for a registered app in azure entra id

You do not need Certificates or Secrets for authentication as current user.

Configure Secrets or Certificates for daemon apps

Daemon apps (aka service apps, also called background jobs) – all kind unattended access scenarios do not require configuration under Authentication blade – but require Secrets or Certificate. You’d need to be familiar with certificates, as certificates considered as more secure way to authenticate and some authentication flows allow secrets, but some require certificates.

So for daemon apps you need a secret and/or certificate:

configuring secrets and certificates under app registration in Microsoft azure entra id

Here is how I configure daemon app for PowerShell.

Having an app configured as above – you should be able to authenticate against Microsoft 365 Graph API, but should not have access to resources, as app is not authorized yet.

References

Search M365 content from code: use-cases

Why do we need to implement search in our applications?

Use-cases for search on behalf of current user

Along with the usual ones – where you just need your app to search for some data and bring it to user – there is one different scenario I’d like to share:

You need to quickly detect content in SharePoint that is open for everyone

Brute force solution – getting detailed permissions report for all SharePoint sites might not be a feasible option, especially in large environments – it is a very resource-consuming task and might take days and weeks. So consider the following…

Since search is security-trimmed – a user can get only search results he/she already has access to; but what if we create an account and do not grant any SharePoint permissions or group memberships to this account, and then we’d search for everything on behalf of this account? That would mean that all what search returns represent content that is shared with everyone. There are some tricks and gotchas – here is the separate article on the same.

Use-cases for unattended search

What are the use-cases when you need to search in your daemon app or background job? Be aware that when you search on behalf of application credentials – search is NOT security-trimmed and your query would run against ALL SharePoint content… Here are some possible scenarios.

  • Content detection/Investigation
    • Let say you want some data is never shared with anyone and never appeared in search for anyone
    • Or you might want to investigate what is the location some specific data is available at
  • Imagine you are building sites classification system and
    you use indexed custom site properties – so you are able to refine search results based on site metadata to get list of specific sites (adaptive scopes used in retention policy are based on the same mechanics)
  • Automation – let say you have a requirement to configure every tenant site in some ways – for instance – add some hosts to allowed domains to embed video or set some site properties based on who created the site or activate or deactivate some features and so on – how would you do that? You’d probably have a scheduled job that runs let say every hour against only new sites – sites created during that last hour. How would you get these recently created sites? Search with Graph API is the only nice solution today.

Index of other articles on the subject:

  • Search Microsoft 365 content programmatically: Index
  • Search Microsoft 365 content programmatically: Use-case scenarios
  • Authentication to Microsoft Graph: Azure Registered Apps Certificates and Secrets
  • Authorization to Microsoft Graph: Azure Registered Apps API permissions
  • Calling Microsoft Graph Search API from code as current user
  • Calling Microsoft Graph Search API from daemon/service app
  • Using Microsoft.Graph PowerShell module to Search in Microsoft 365
  • Using PnP.PowerShell module to Search in Microsoft 365

Search m365 SharePoint and Teams content programmatically via MS Graph API

In the articles below I’m sharing my techniques on searching in Microsoft 365 SharePoint and Teams from application using Microsoft Graph API.
Specifically I’m covering

  • Microsoft Graph search API
  • Microsoft.Graph PowerShell module
  • PnP.PowerShell module

In two flavors:

  • Search on behalf of currently authenticated user
  • Unattended Search with daemon (also called service) applications

Index of my articles on the subject:

Video tutorials

Search through Microsoft 365 SharePoint from code

Below is how do I search Microsoft 365 content programmatically from PowerShell using MS Graph API, PowerShell PnP, Microsoft Graph module, MSAL library being authenticated as user or daemon application. Let me focus on SharePoint content here but you can use the same technique to search through other Microsoft 365 services. Also, I’ll be using PowerShell but same ideas should work for other platforms/languages – Python, C#, node.js etc.

First, we need to be authenticated

Here is how to authenticate to Microsoft 365 Graph API.

Second, we need to be authorized

To search on behalf of currently authenticated user we need delegated “Sites.Read.All” API permissions. I recommend you to add both Graph API and SharePoint API permissions as different libraries might use different API’s under the hood. Ensure you add delegated “Sites.Read.All” even if you already have “Sites.FullControl.All” as by some reason “Sites.FullControl.All” does not always work for search.

Here is how an app API permissions to search as current user should look like:

app API permissions to search as current user

Actually, for interactive authentication app ownership is not required, so we can surely use our own registered app, but also it is possible to use any other app registered in Azure and properly configured, e.g. Enterprise “PnP Management Shell” app id: “31359c7f-bd7e-475c-86db-fdb8c937548e”
How do I create and configure Azure App with delegated permissions to SharePoint for PowerShel usage

For unattended search – e.g. search on behalf of daemon app – we need application “Sites.Read.All” API permissions. Again, I suggest both Graph API and SharePoint API permissions added. Here is how an app API permissions to search as daemon app should look like:

Ensure you got admin consent for API permissions.

In case you have incorrect permissions in your app – Microsoft Graph will be kind enough to inform you exactly what you need. Example:

“Access to ChatMessage in Graph API requires the following permissions: Chat.Read or Chat.ReadWrite, ChannelMessage.Read.All. However, the application only has the following permissions granted: Sites.Read.All, User.Read”

Assuming we have configured apps – let us get started with

Microsoft Graph API

Microsoft Graph API allows search through all the Microsoft 365 content – including Exchange e-mail messages, Yammer (Viva Engage) and Teams chat messages and surely OneDrive and SharePoint content (please refer to the original doc).

Authenticate as current user to Search with Graph API

I use MSAL.PS PowerShell module to get token, then I build a headers variable

# Prerequisites
Get-Module MSAL.PS -ListAvailable | ft name, Version, Path 
# Install-Module MSAL.PS -Force -Scope CurrentUser -AcceptLicense
Import-Module MSAL.PS

# Interactive Authentication
$clientid = 'd82858e0-ed99-424f-a00f-cef64125e49c'
$TenantId = '7ddc7314-9f01-45d5-b012-71665bb1c544'
$token = Get-MsalToken -TenantId $TenantId -ClientId $clientid -Interactive
$headers = @{Authorization = "Bearer $($token.AccessToken)" }

Authenticate as service/daemon app

You’d need to update the script providing Tenant id, client (app) id and client (app) secret:

# App Authentication
$clientID = ""
$clientSc = ""
$TenantId = ""

# Construct URI and body needed for authentication
$uri = "https://login.microsoftonline.com/$tenantId/oauth2/v2.0/token"
$body = @{
    client_id     = $clientID
    client_secret = $clientSc
    scope         = "https://graph.microsoft.com/.default"
    grant_type    = "client_credentials" 
}

# Get OAuth 2.0 Token
$tokenRequest = Invoke-WebRequest -Method Post -Uri $uri -ContentType "application/x-www-form-urlencoded" -Body $body -UseBasicParsing
$token = ($tokenRequest.Content | ConvertFrom-Json).access_token
$headers = @{Authorization = "Bearer $token" }
$headers

Search m365 SharePoint and OD content with Microsoft Graph API

In this sample I limited search scope to list items only ($entityTypes = “[‘listItem’]”). Check other entity types here.

Code:

# Search
$entityTypes = "['listItem']"
$apiUrl = "https://graph.microsoft.com/beta/search/query"
$query = "*"
# body for interactive search
$body = @"
{ 
  "requests": [
    {
      "entityTypes": $entityTypes,
      "query": {
        "queryString": "$query"
      }
    }
  ]
}
"@

$res = Invoke-RestMethod -Headers $Headers -Uri $apiUrl -Body $Body -Method Post -ContentType 'application/json'
$res.value[0].hitsContainers[0].hits

If you are getting error message “SearchRequest Invalid (Region is required when request with application permission.)”:

that’s OK, just modify your body to include region like this (“region”: “NAM” for North America or “GBR” or …). Also, I can modify body with from/size for paging (technique used to iterate through search results if there are many) and return just specific fields to decrease traffic and improve performance:

# Search
$entityTypes = "['driveItem','listItem','list','drive','site']"
$entityTypes = "['driveItem','listItem']"

$query = "LastModifiedTimeForRetention<2021-01-01"
$apiUrl = "https://graph.microsoft.com/beta/search/query"
$query = "test*"
$body = @"
{ 
  "requests": [
    {
      "entityTypes": $entityTypes,
      "query": {
        "queryString": "$query"
      },
      "from" : 0,
      "size" : 5,
      "fields": ["WebUrl","lastModifiedBy","name" ],
      "region": "NAM"
    }
  ]
}
"@

$res = Invoke-RestMethod -Headers $Headers -Uri $apiUrl -Body $Body -Method Post -ContentType 'application/json'
$res.value[0].searchTerms
$res.value[0].hitsContainers[0].hits
$res.value[0].hitsContainers[0].hits.Count

We’d not use region for interactive calls or we’ll get “Region is not supported when request with delegated permission.”.

Microsoft.Graph PowerShell module

There is a Microsoft.Graph PowerShell module provided by Microsoft which simplifies authentication and search operations.

Interactive authentication code sample:

# Prerequisites
Get-Module Microsoft.Graph.Authentication -ListAvailable 
Get-Module Microsoft.Graph.Search -ListAvailable 

# Interactive Authentication
$clientid = '31359c7f-bd7e-475c-86db-fdb8c937548e'
$clientid = 'd82858e0-ed99-424f-a00f-cef64125e49c'
$TenantId = '7ddc7314-9f01-45d5-b012-71665bb1c544'
Connect-MgGraph -ClientId $clientid -TenantId $TenantId

For daemon app authentication we need a certificate configured in Azure App and installed on the user machine. Daemon app authentication code sample (please specify your tenant id, app (client) id and certificate thumbprint:

# App Authentication
$clientID = ""
$certThumbprint = ""
$TenantId = ""
Connect-MgGraph -ClientId $clientid -TenantId $TenantId -CertificateThumbprint $certThumbprint

Code sample for SharePoint search with Microsoft.Graph PowerShell module

As currently authenticated user

# Search in the current user context
$params = @{
	requests = @(
		@{
			entityTypes = @(
				"driveItem"
			)
			query = @{
				queryString = "lorem"
			}
			from = 0
			size = 25
			fields = @(
				"title"
				"description"
			)
		}
	)
}

$res = Invoke-MgQuerySearch -Body $params
$res.HitsContainers[0].Hits
   

Again, in case with app authentication – an additional parameter – region – is required:

# Search
$params = @{
	requests = @(
		@{
			entityTypes = @(
				"driveItem"
			)
			query = @{
				queryString = "lorem"
			}
			from = 0
			size = 25
			fields = @(
				"title"
				"description"
			)
                        region = "NAM"
		}
	)
}

$res = Invoke-MgQuerySearch -Body $params
$res.HitsContainers[0].Hits

It’s a good idea to explore returning object.

PnP.PowerShell module

PnP.PowerShell allows you to search through Microsoft 365 SharePoint content with PowerShell style – using command and options.

Let us authenticate interactively:

# Interactive Authentication
$clientid = 'd82858e0-ed99-424f-a00f-cef64125e49c'
$TenantId = '7ddc7314-9f01-45d5-b012-71665bb1c544'
$siteUrl = "https://s5dz3.sharepoint.com"
Connect-PnPOnline -ClientId $clientid -Tenant $TenantId -Url $siteUrl -Interactive

Authentication on behalf of service/daemon app would require certificate installed on the machine and configured in the app and look like:

# Application (daemon) Authentication
$clientID = ""
$certThumbprint = ""
$TenantId = ""
$siteUrl = "https://contoso.sharepoint.com"
Connect-PnPOnline -ClientId $clientid -Tenant $TenantId -Url $siteUrl -Thumbprint $certThumbprint

There are no differences in Microsoft 365 SharePoint Search with PowerShell code samples for interactive and daemon apps (no region parameter).

Examples:

# search
$query = "test*"
$res = Submit-PnPSearchQuery -Query $query 

# examples of query:
$query = "test*"
$query = "* contentclass:STS_ListItem_DocumentLibrary"
$query = "* author:Patti"
$query = "test* site:https://s5dz3.sharepoint.com/teams/sxc"

# examples of submitting request
$res = Submit-PnPSearchQuery -Query $query 
Submit-PnPSearchQuery -Query $query -All 
Submit-PnPSearchQuery -Query $query -MaxResults 5
Submit-PnPSearchQuery -Query $query -SortList @{"LastModifiedTime" = "ascending"} 

# exploring result object:
$res.ResultRows.Count
$res.ResultRows[0]
$res.ResultRows.Title
$res.ResultRows.OriginalPath
$res.ResultRows.LastModifiedTime

Video tutorials

Video tutorials (playlist) on how to authenticate to Microsoft 365 and Search through Microsoft 365 content from code

References

Microsoft Graph CLI vs PowerShell SDK

Microsoft recently (Oct 2023) announced Microsoft Graph command-line interface (CLI) tool – mgc.
Microsoft: “The Microsoft Graph PowerShell command-line interface (CLI) acts as an API wrapper for the Microsoft Graph APIs, exposing the entire API set for use from the command line”. Example:

mgc users list --filter "displayName eq 'John Smith'"

Meantime there is a Microsoft Graph PowerShell SDK (PowerShell module Microsoft.Graph ) since 2020. Example:

Get-MgUser -Filter "displayName eq 'John Smith'"

So, what is the difference? Why Microsoft provides two similar tools? What are the use case scenarios, functionality and scope of each one?

Here is the comparison:

Microsoft Graph SDKMicrosoft Graph CLI
Access to all Microsoft Graph APIs
Cross-platform support
Supports modern authentication
Uses least privilege
Open source
Receives regular updates

WIP…