In large Microsoft 365 environments, leadership and governance teams often need visibility into collaboration resources owned by a specific organization unit – typically defined by a manager and their reporting chain. Native tools make it easy to inspect a single Team or site, but not to answer a simple question at scale: “What Teams and SharePoint sites are owned by anyone under this leader?” This PowerShell script builds that inventory by expanding a manager’s hierarchy and correlating owners to Microsoft 365 Groups/Teams and their associated SharePoint sites.
There is a known problem in SharePoint: 5,000 Items List View Threshold. Actually any SharePoint list can have up to 30 million items and a library can have up to 30 million files and folders. See more SharePoint capabilities and limits. The important moment is you cannot have more than 5k items in a single view (explained here). So obviously you’d need to create a custom view with a filter that would show less than 5,000 items and you are good (here Microsoft explains how it works and provide more options to manage large lists). But there are scenarios where we have to use PowerShell to deal with large lists.
Scenario 1 (most frequent): List is close to 5k items view threshold, and business wants you to remove items based on some criteria and keep the list (e.g. remove older items, or completed items etc.). Optionally business wants you to archive older items into another list, and keep original list short. It is too
Scenario 2: users did not create a smaller views in advance and now stuck with the list not functioning without ability to edit/create a custom view. This could happen with a regular list or library, or
Scenario 3: overflow of the access request list. This is a particular case of the scenario 2. In SharePoint site we have an “access request” functionality. If a user have no permissions to a site, and tries to open this site – he/she will get “Access denied” page with an ability to request access to a resource. These requests are saved in a special hidden list. Sometimes when you have too many requests – this list grows to 5,000 requests and you cannot go to the list to approve/decline new requests.
All these scenarios require us to use PowerShell. Here is the technique.
In this article I’ll guide you through how to get PowerShell and configure your environment for PowerShell scripting against Microsoft 365. For those who do not need detailed instructions:
Install PowerShell 7 (cross-platform one)
Install Visual Studio Code
find and install PowerShell plugin for VSCode
install MgGraph (Microsoft Graph) module
install PnP.PowerShell module
Get and configure Azure App Registration
registration a new Azure App
configure API permissions and get admin consent
configure authentication
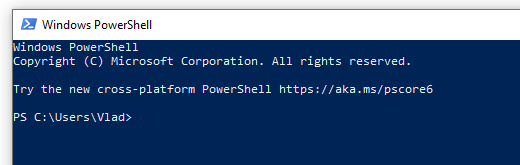
Windows PowerShell
Every Windows computer comes with PowerShell pre-installed. So if you are on a Windows machine – try the following: Start -> Windows PowerShell. You’ll see:
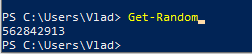
So you can type something like “Get-Date” or “Get-ComputerInfo” or “Get-Disk” or “Get-Random” and see results right away, e.g.:
But, hold on! This is not the PowerShell we need. This is so-called PowerShell 5 (classic, legacy one, nowadays called “Windows PowerShell”). Though you can use Windows PowerShell OotB, we will use new, modern, cross-platform PowerShell (for Windows, Linux, and macOS).
PowerShell
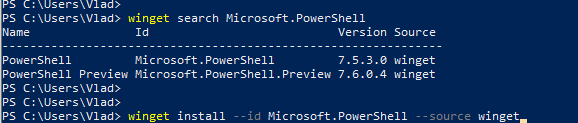
This is how nowadays called a new cross-platform PowerShell. Just “PowerShell” (or PowerShell 7, as 7 is it’s current/latest major version. Here is the Microsoft’s official guide “Install PowerShell on Windows, Linux, and macOS“. There are multiple options to install PowerShell 7 – just choose your one (you are Power User, you should figure it out). E.g. you can use your Windows PowerShell window to install PowerShell 7:
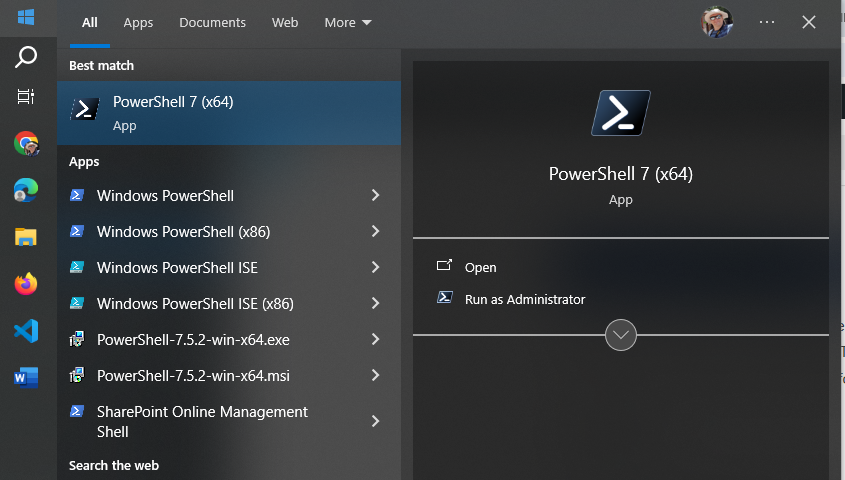
Once modern PowerShell, your Start->PowerShell experience should look like:
Notice that you have both – PowerShell 5 (for Windows) and PowerShell 7 (cross-platform).
Start PowerShell 7 and try something like “Get-Command” or “Get-Help”. Congratulations! Let go to the next step.
IDE – Integrated Development Environment
So far what you did – you used PowerShell cmdlets in command-line window. It is ok to use plain PowerShell window to quickly run one or a few PowerShell commands, but usually we work with scripts. A PowerShell script is a program written in PowerShell – composed of a sequence of PowerShell cmdlets, structured with logic to perform specific tasks. So we would need some kind of editor for PowerShell programs. Actually you can use any universal text editor – like Notepad, Notepad++ to create your code, you’d save it as .ps1 file (e.g. myFirstScript.ps1) and than run you script with PowerShell. But there is a better way – using IDE. IDE stands for “Integrated Development Environment” – a developer-oriented text editor equipped with a bunch of goodies that help creating and debugging code.
Visual Studio Code
One of the most popular IDE is Visual Studio Code (or vscode) – a free open-source IDE from Microsoft. You can get it from code.visualstudio.com – just download it and install it.
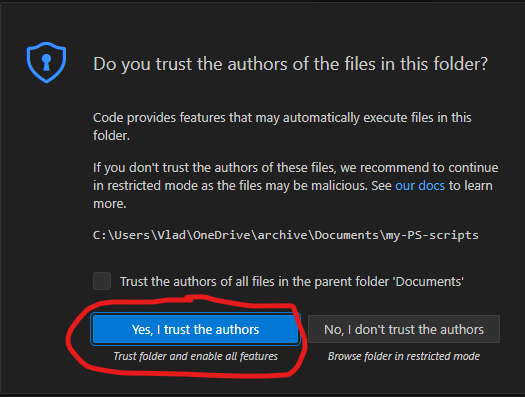
I’d recommend you to take some brief vscode introduction lessons – like this one from Microsoft. VScode can be used to code in many programming languages – Python, C#, Javascript etc. We will be using it to code in PowerShell. I’d recommend to create a new folder for your PowerShell scripts, and from VSCode open a folder. After you trust yourself – you’ll see something like:
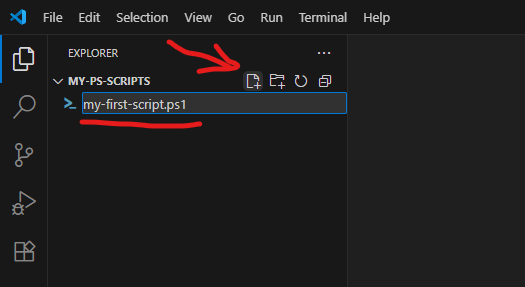
Using “New file” icon – create a new file, name it e.g. “my-first-script.ps1” (.ps1 extension is required).
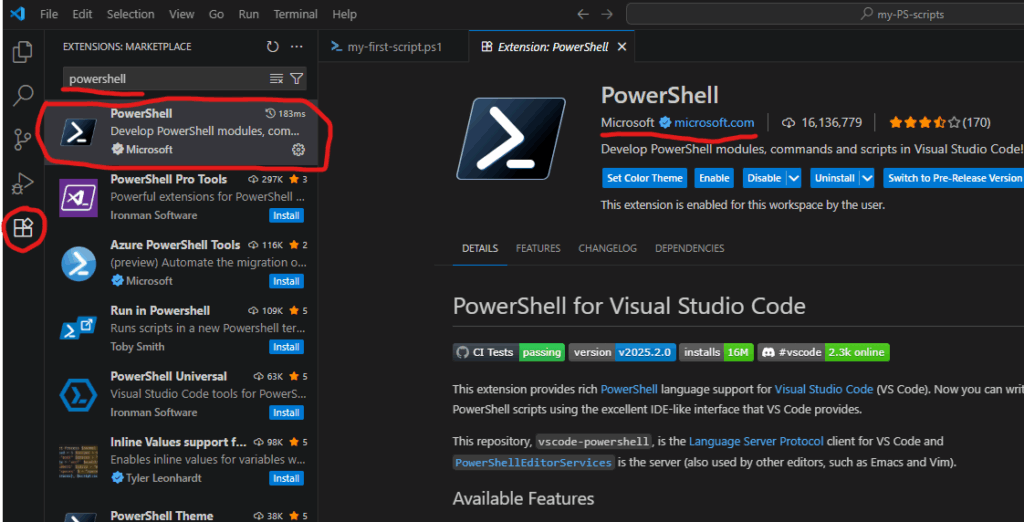
PowerShell plugin
VSCode will realize that you are coding in PowerShell and suggest you to install a PowerShell plugin (or you can install it manually):
PowerShell plugin is the last piece we need to start scripting in PowerShell.
PowerShell Modules
Technically, what we already installed – enough to start coding for SharePoint (e.g. calling Microsoft Graph API via built-in Invoke-RestMethod), but there are some much more convenient ways – using modules.
PowerShell is built around modules. Every command you use is provided by a module. PowerShell includes built-in modules out of the box that offer essential cmdlets (such as Get-Host). However, to work with Microsoft 365 services, you’ll need additional modules that contain cmdlets specifically designed for interacting with Microsoft 365. There are modules to work with Teams, Exchange, SharePoint, Entra Id etc. Below are the most popular modules.
Microsoft Graph
Microsoft Graph is a unified API endpoint developed by Microsoft that allows developers and IT professionals to access and interact with a wide range of Microsoft 365 services and data. It acts as a gateway to data stored across Microsoft services. Utilizing Microsoft Graph from PowerShell code is better done with Microsoft Graph PowerShell SDK. So check it out and install.
PnP.PowerShell
The other very popular and useful module is PnP.PowerShell. PnP is an open source community backed by Microsoft (but PnP products are not officially supported by Microsoft). The PnP team does an excellent job of developing and providing a wide range of tools, SDKs, documentation, learning videos, and other resources to help developers work with Microsoft 365 efficiently. For PowerShell developers they maintain PnP.PowerShell module. So please go ahead and install it as well.
Authentication and Authorization
To work with Microsoft 365, the first step is authentication – essentially proving that you are actually who you claim to be (via providing login name and password or fingerprint etc.). Once you authenticated to Microsoft – you can access resources if you have permissions and cannot access others because you do not have permissions provided. This is called authorization.
This is true for your interactive experience with Microsoft 365 via browser, or Teams app etc. The same is true when you access Microsoft 365 programmatically – via PowerShell code. You need to authenticate and being authorized.
For smooth authentication and authorization to Microsoft 365 from your PowerShell code you’d need so called App Registration properly configured. App Registration is where API permissions and authentication methods are specified.
There are two authentication methods most commonly used in programming – interactive and non-interactive. Interactive authentication – is when a program acts on behalf of a user (e.g. you as a current user). The other method is used when your program needs to work unattended (without user presence) – on behalf of an application itself with it’s own permissions. You’d need separate app registration for each of these methods.
Interactive Applications
Interactive programs is what we will mostly use in this “PowerShell for Power Users” series of tutorials. Interactive login require delegated API permissions configured in the App Registration and proper authentication configuration Authentication blade. When your interactive program works – it’s effective permissions are the intersection of your personal permissions and permissions specified in the app registration.
Non-Interactive programs (also called daemon apps or background services or scheduled jobs etc.) are used mostly used by admins for tenant-level automation. But it is possible to automate something for a specific site, e.g. one of the common scenarios – data analytics can automate pulling some data from SharePoint site into e.g. Azure Data factory via pipeline. Non-Interactive authentication require application API permissions configured in the App registration and a secret generated or certificate uploaded. When a non-interactive program works – it’s effective permissions are the permissions specified in the app registration.
Are you ready to elevate your Microsoft 365 experience? Whether you’re a SharePoint site owner, Teams channel manager, or a power user working across OneDrive, Exchange, and other services, PowerShell can be the game changer you didn’t know you needed. This blog series, “PowerShell for Power Users, Unlocking the Full Potential of Your Microsoft 365 Workflow” introduces you to Microsoft’s powerful command-line shell and scripting language—and shows you how it can transform your productivity, automate repetitive actions, and give you deeper control across your Microsoft 365 workspace.
Why PowerShell in Microsoft 365?
Traditionally seen as a tool for IT professionals, PowerShell is now essential for power users who want to automate tasks, customize environments, and solve problems efficiently across Microsoft 365. PowerShell empowers you to:
Automate routine operations in SharePoint, Teams, OneDrive, and Exchange
Pull reports on usage, structure, and compliance that are not available out-of-the-box
Manage site collections, lists, libraries, Teams channels, and mailbox settings
Perform bulk operations that would be tedious through the UI
Audit and troubleshoot environments with precision
Integrate with Microsoft Search, Copilot, and Power Platform for intelligent workflows
What Can You Expect from This Series?
We’ll start with the basics—demystifying the PowerShell interface, understanding cmdlets, and connecting to services like SharePoint Online, Teams, and Exchange. Then we’ll dive into real-world scenarios. Each article will include clear explanations, sample scripts, and best practices—making PowerShell approachable even if you have no prior scripting experience.
Who Should Follow This Series?
This blog is for any Microsoft 365 user who wants to:
Move beyond manual, repetitive tasks
Learn scripting at their own pace, with practical examples
Boost productivity and efficiency across Microsoft 365
Bridge the gap between business needs and IT solutions
Getting Started
If you’re curious but feel intimidated by scripting, don’t worry—PowerShell is more user-friendly than you might think, and this series is designed with beginners in mind. All you need is a willingness to learn and experiment. In the next articles, we’ll cover how to set up your environment, write your first simple script, and start automating tasks you do every day across Microsoft 365. Your journey toward becoming a PowerShell power user starts here!
In all cloud models – IaaS, PaaS, SaaS, user is always responsible for data. Microsoft is responsible for service, but data is something that client should take care of. Microsoft says “Microsoft 365 Backup helps your organization recover from data corruption events like ransomware attacks or accidental deletions”. That is exactly the point… Backup is a part of disaster recovery and business continuity concepts and should always be taken seriously. So let us go deeper in Microsoft’s “Microsoft 365 Backup ” offering.
Usually I do not retell what is already documented and explained by Microsoft itself or by other Microsoft 365 MVPs and gurus. What I do is I go beyond and share some insights from researches and real-world practices or at least highlight what seemed to me interesting or important.
SharePoint backup
What to backup
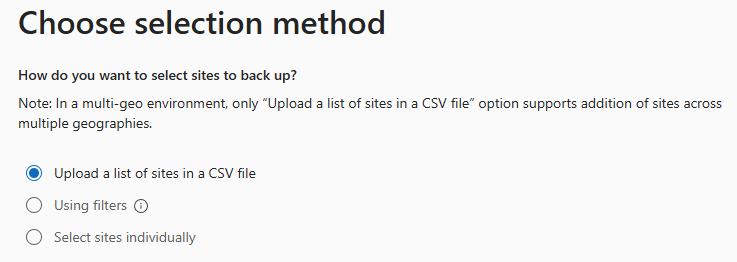
At the step 1 “Choose selection method” of the SharePoint backup policy creation, we have a choice: “How do you want to select sites to back up?” and our options are:
Upload a list of sites in a CSV file
Using filters
Select sites individually
First option – “Upload a list of sites in a CSV file” – you’d create a list of up to 50,000 sites as CSV file (example provided, but it’s just one column with sites Urls no header) and upload it.
Third option – “Select sites individually” is also straightforward . Good news – you can search (filter) sites by name or url.
Second option – “Using filters” seemed like the most promising, but a) you can only use “Site name or URL contains” and “Site last modified”, and b) Only existing sites that match these filters will be added to this policy. If new sites are created that match these filters, they won’t be added to the policy automatically. You can add or remove sites by setting the policy scope again later.
Thinking that first and third options are static by definition, that means the policy is not actually a policy, it’s just a master that produces a static SharePoint backup configuration.
Worth to highlight:
Literally we can modify only what to include, we cannot modify “Retention”, i.e. how exactly sites are backed up. Microsoft says: “Backups are initially kept for 14 days. After 14 days, the latest backup from each week will be kept for one year after it was created.”
Some sites within the scope might already be included in other policies. If so, they will not be added to this policy again.
Each policy is a static backup configuration that includes static list of sites selected during the policy setup.
SharePoint backup limitations:
CSV list cannot have more than 50,000 sites (but you can have more than one policy)
Sometimes a restored SharePoint site looks like it’s connected to a Microsoft 365 group (and Teams), but it’s actually a standalone site. So just restoring a deleted SharePoint site that was previously connected to team is not enough, there is some more work to be done. This article explains (from SharePoint admin standpoint) how that could happen and how to fix the broken SharePoint site to restore it’s lost connection to group and teams (the right way).
Scenario
A Teams-connected SharePoint site was deleted by one of the team owners during a cleanup. They didn’t see any useful content in Teams channels or files, so they deleted the team—along with the connected SharePoint site.
However, some team members had been using the SharePoint site directly (not through Teams). Two months later, they tried to access the site and received a 404 error. They contacted IT support to ask what happened and whether the data could be restored.
IT support found that the team was deleted by someone who had already left the company. Fortunately, the SharePoint site was still in the recycle bin (retained for 90 days), so it could be restored. But the Microsoft 365 group and the team (with chat messages, etc.) were already permanently deleted (retention is only 30 days).
After restoring the site, it appeared to be group-connected, but the group no longer existed.
Symptoms of a Broken Connection
Site permissions show ownership by a group, but clicking the group name does nothing.
Searching for the group in Microsoft 365 returns no results.
PowerShell shows a RelatedGroupId, but that group ID doesn’t exist in Entra ID.
The site behaves like it’s group-connected but lacks full functionality.
Normal Teams-Connected Site vs. Standalone Site
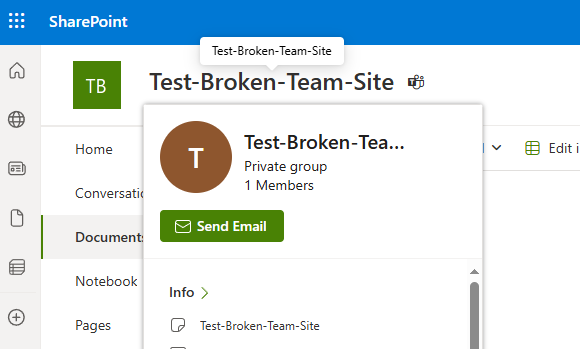
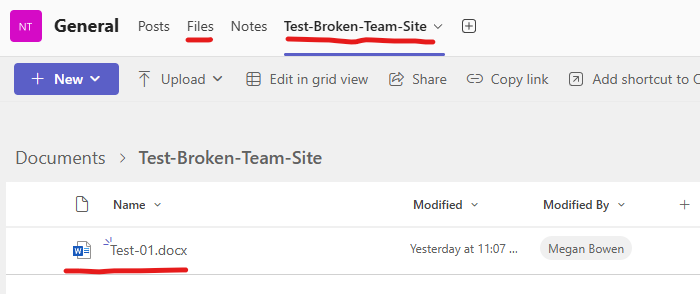
Let us test it from scratch. I will create a new team called “Test-Broken-Team-Site”.
Here is how the normal teams-connected SharePoint site looks like. When you hover your mouse over the site name, a pop-up window appears showing team details.
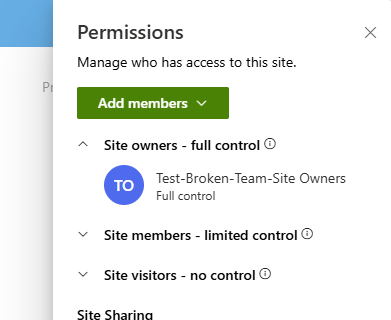
When you go to the site permissions – you can see that the site is owned by group “SiteName Owners”:
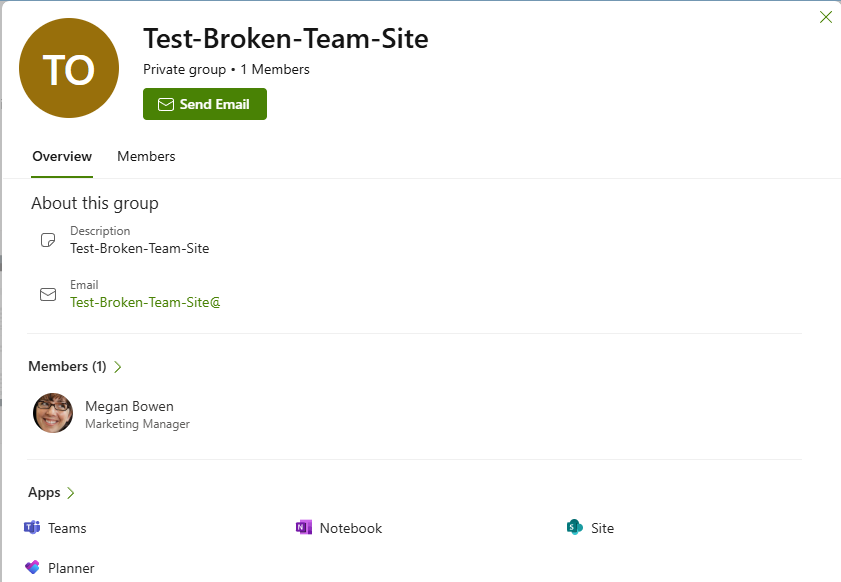
If you click the group name, another pop-up window appears with more information, including group members:
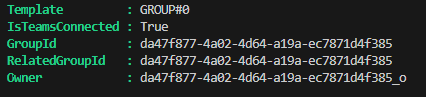
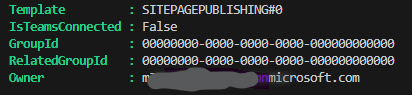
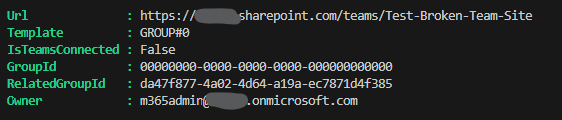
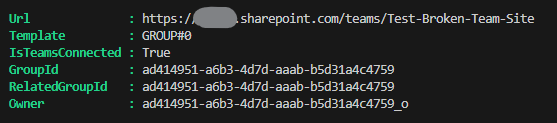
You can see that IsTeamsConnected property is true and GroupId and RelatedGroupId are specified and the site owner is the same group Id with “_o” suffix.
Compare this with the same request against a standalone site:
IsTeamsConnected property is false, Group id is “00000000-0000-0000-0000-000000000000” and the site owner is the real user id.
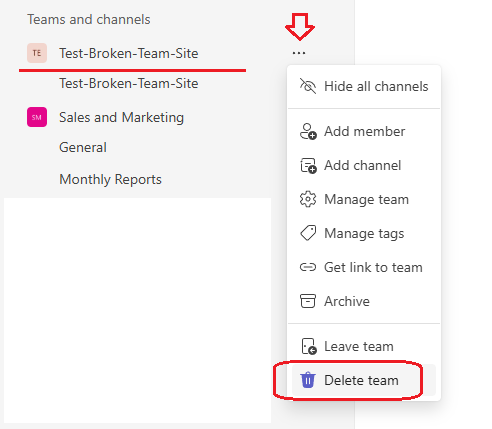
Deleting the team and the site
I also posted some messages in the general team channel and created some test documents. Now let me delete the team. Any team owner can do this via:
What users will see after the team deletion:
“404 FILE NOT FOUND” error upon any attempt to go to the SharePoint site via browser:
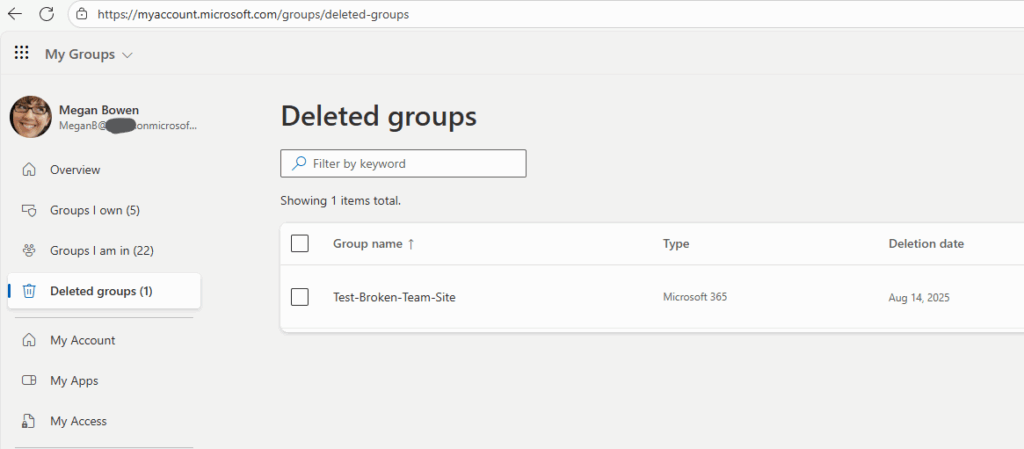
The deleted group under “https://myaccount.microsoft.com/groups/deleted-groups”:
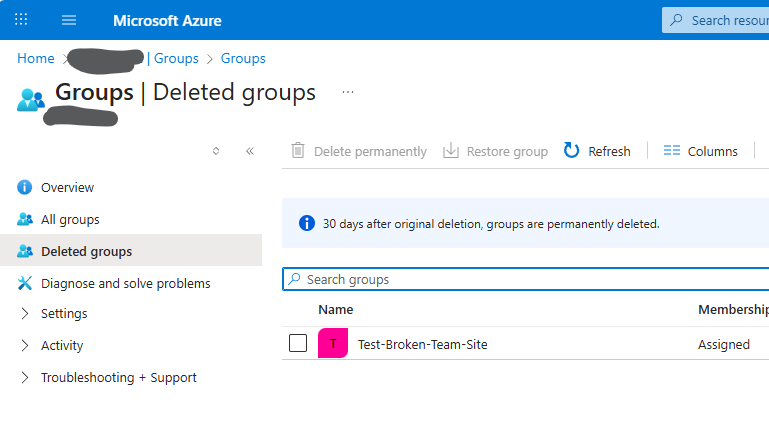
From the admin standpoint the deleted resource looks like.
The group appears under “Deleted Groups” in Entra ID and Microsoft 365 Admin Center (note that the group can be restored within 30 days):
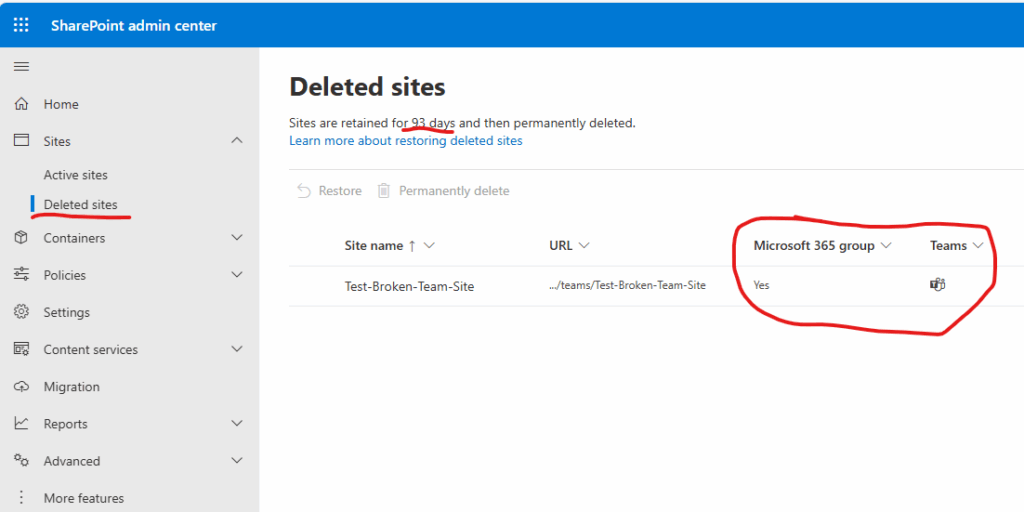
The site appears under “Deleted Sites” in SharePoint Admin Center (retained for 93 days and marked as group-connected with a team), and the site is marked as Microsoft 365 group connected and with a team:
Restoring SharePoint site
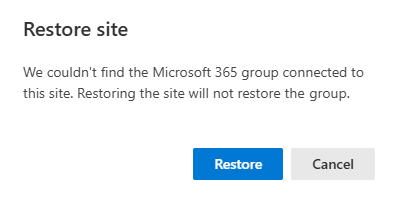
After 30 days the group is deleted permanently, including teams stuff, but SharePoint site is still retained. So we can go ahead and restore SharePoint site from the SharePoint admin center. It warns us that “We couldn’t find the Microsoft 365 group connected to this site. Restoring the site will not restore the group.”:
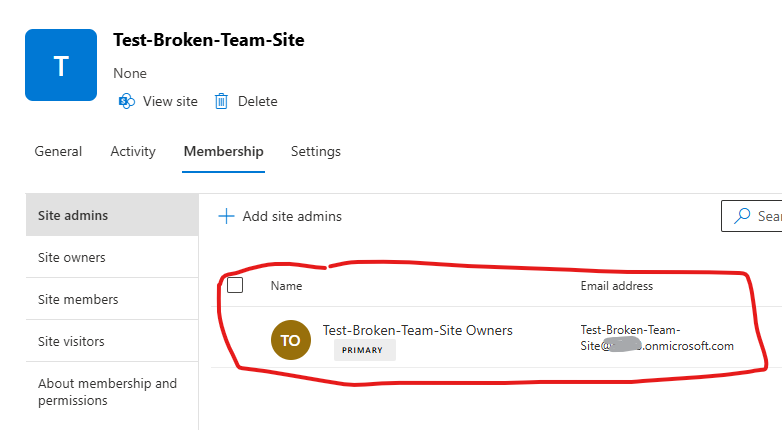
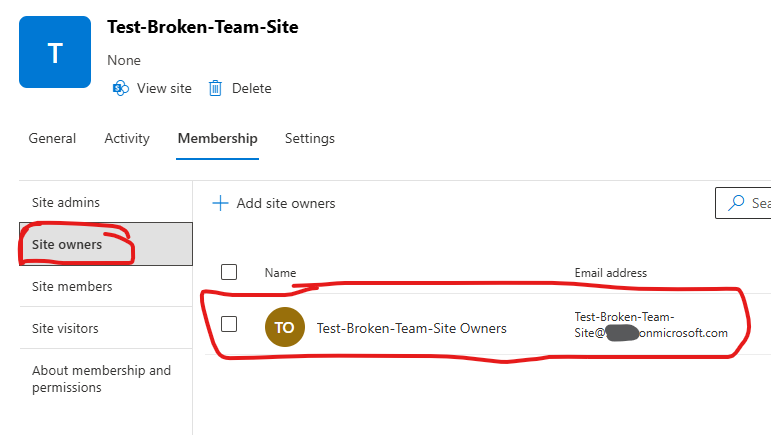
Ok, for the restored site – let us look at the site memberships. You’ll see the site is still owned by the Microsoft 365 group—but the group no longer exists. 🙁
That is the reason that users (team members) will not get access to the site automatically once the SharePoint site is restored. But let us get the SharePoint site PowerShell object:
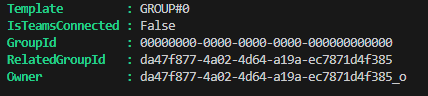
GroupId is zeroes, which is good, IsTeamsConnected if false, which is correct, but the RelatedGroupId is still the same (as if it is a channel site) and the owner is the same.
Note: the site’s status described above is not always lake that. I’m not sure why, but in my practice so far some sites are getting restored with GroupId specified (and running ahead, in such cases this solution does not work).
User experience
(I provided access for myself to this site as admin).
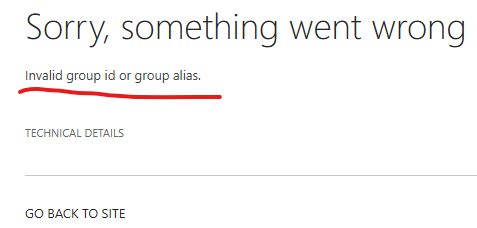
The home page (site root) looks like something in between a Teams-connected and standalone site. There is no Teams icon and no pop-up window when hovering over the site title. But there is a “Conversation” menu we usually have on group-based sites (by the way, it fails if you click on it, because it’s supposed to send you to the group in Outlook… so you’ll get “Sorry, something went wrong” – “Invalid group ID or group alias.”)
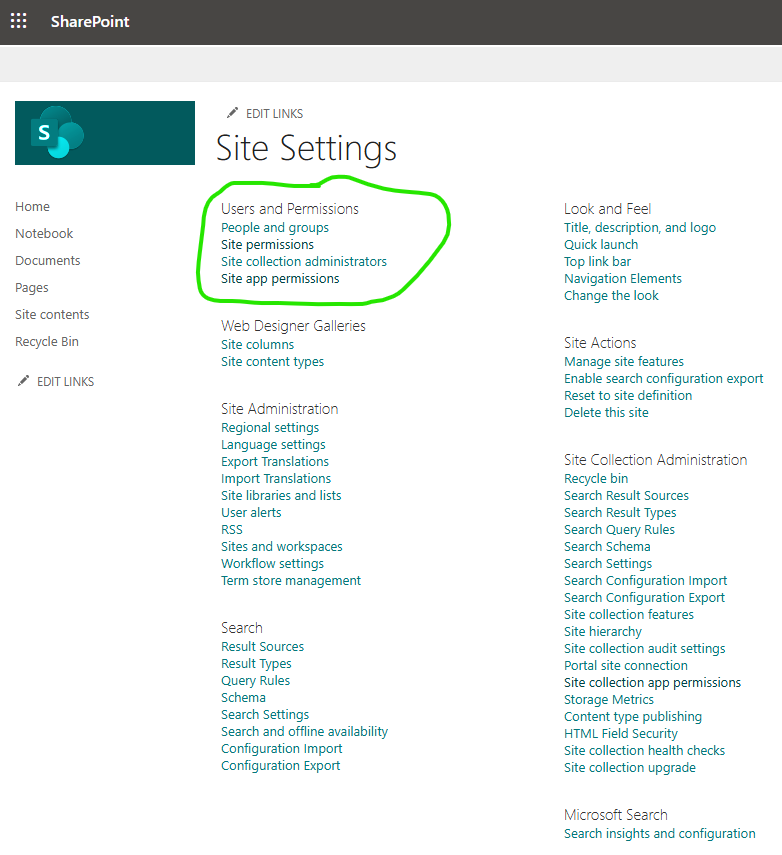
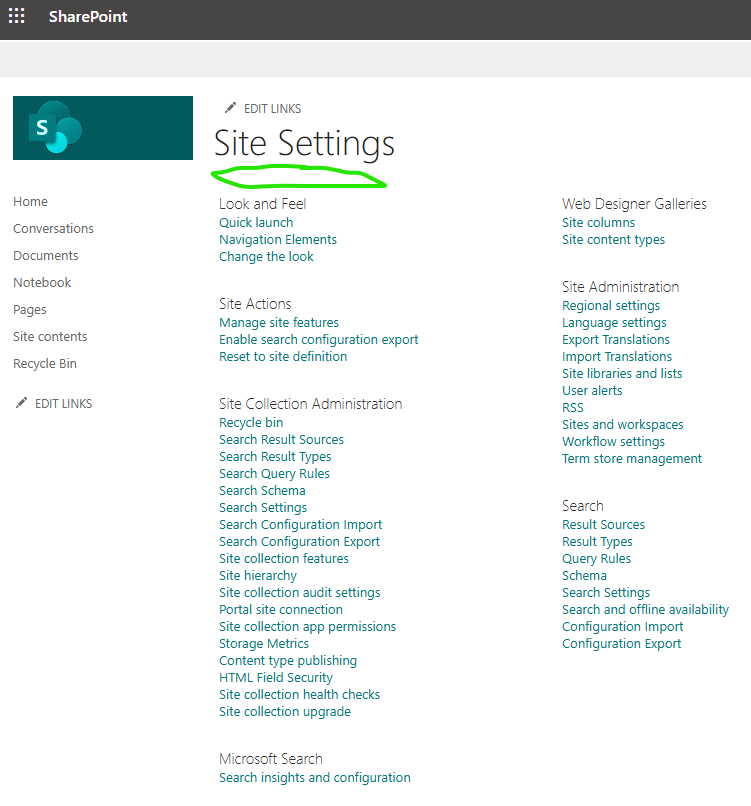
Site settings page looks like the group-based site settings page. Compare standalone site settings page:
and broken teams connection site settings page… Specifically, you still do not have the “Users and Permissions” section (as it is supposed to be handled via Teams and group membership).:
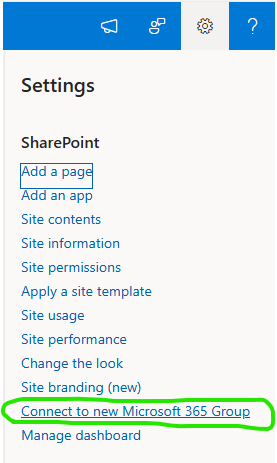
And here is one more difference. On a regular standalone site when you are clicking on a gearbox – you can see “Connect to new Microsoft 365 Group” link which would allow user to convert this standalone site to a teams-connected site. Unfortunately, there is no such option on the broken site.
So what should we do? Can we re-connect this site to teams or make it true standalone site? Would this broken site stay as broken forever?
Is there a fix for broken teams connection in SharePoint site
First of all, you can’t change GroupId or RelatedGroupId directly—they’re read-only.
Let us try to change site primary site owner (remember it was a group) and see what has changed:
The only 🙂 problem: it says the site is team-connected, but it’s not.
If you click on a Teams icon near to the site title – it’ll give you “We’re still setting up the Microsoft Team for this group” “Please come back in a few minutes”. This message might last forever…
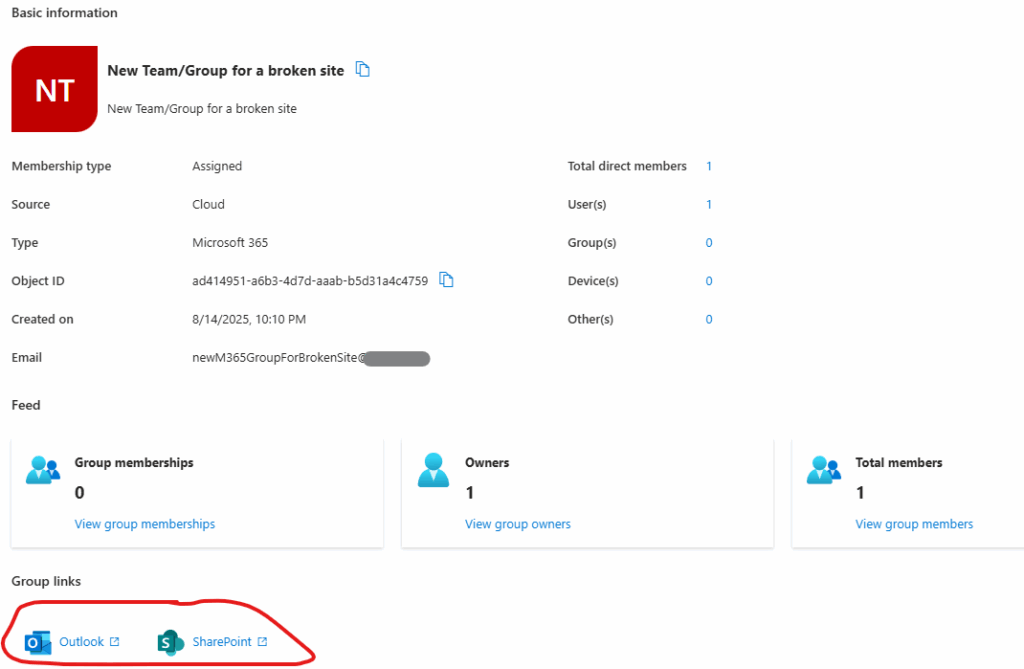
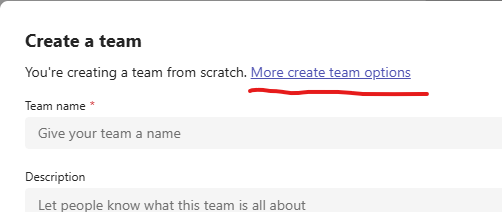
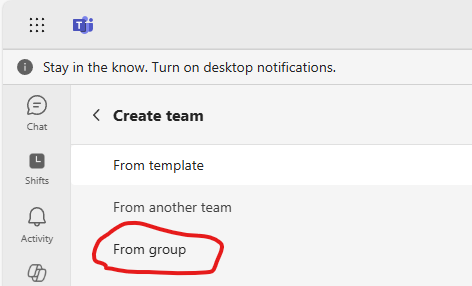
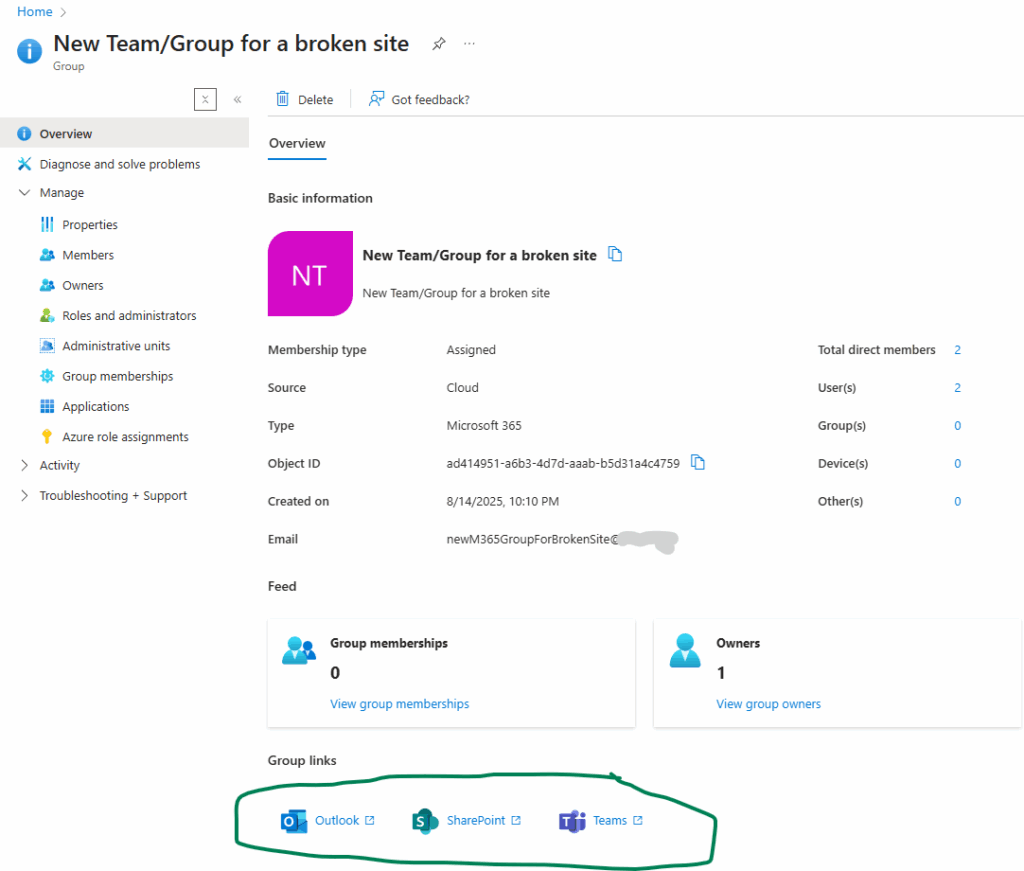
Ok, we have a m365 group and a group-based site without a team. Can we create a team from an existing group? Yes. Let us try it.
When you create a team – there is a link “More create team options”. It leads us to the list of options and one of them – create a team from group. There will be a list of groups and one of them would be our “New Team/Group for a broken site”. Select it. It say OK, a new team created.
Now let us see what we got.
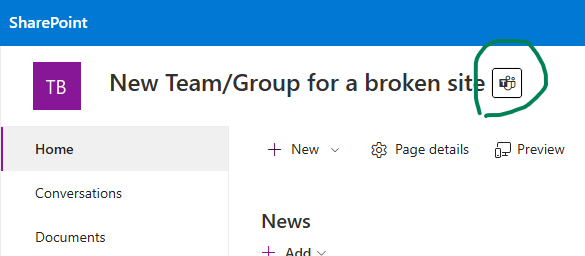
It seems like it worked! Now we have a consistent full-functioning group-based site connected to team.
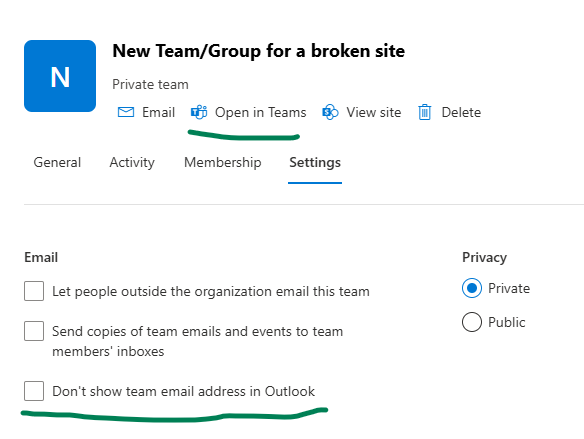
At the SharePoint site – teams icon redirects us to a team channel. In the teams app – the team is listed among other teams. Entra Id displays all the services correctly. Teams admin center can see the team and all the settings look good. SharePoint admin center also displays a team correctly. You might want to update “Don’t show team email address in Outlook”.
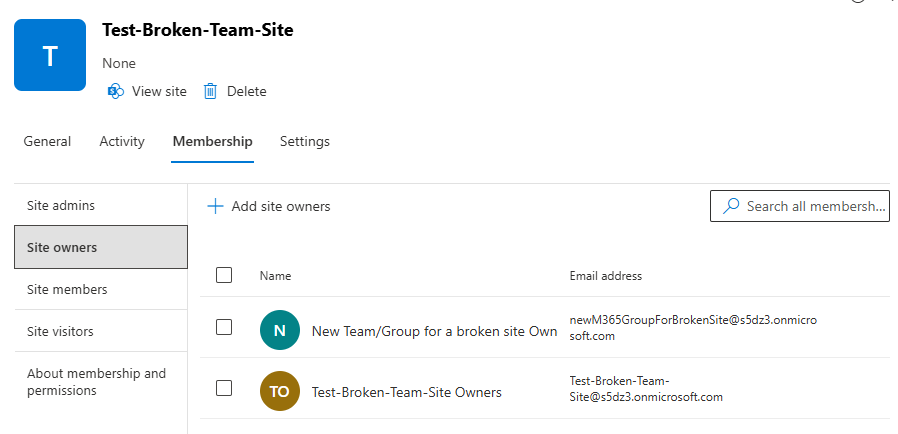
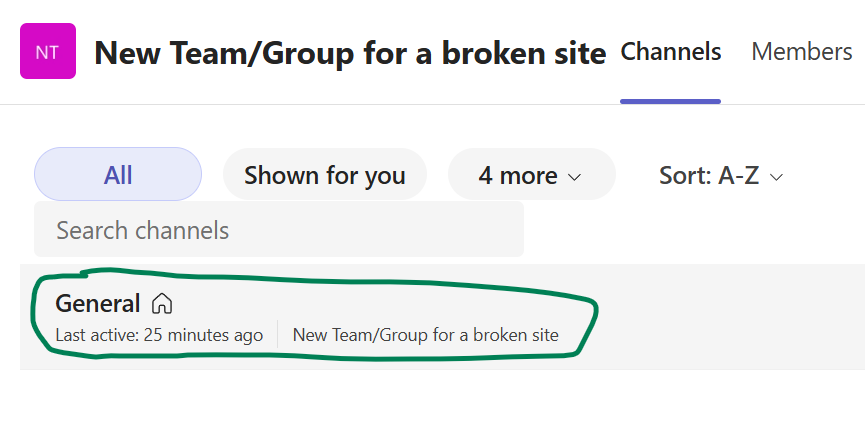
Standard Channels Confusion
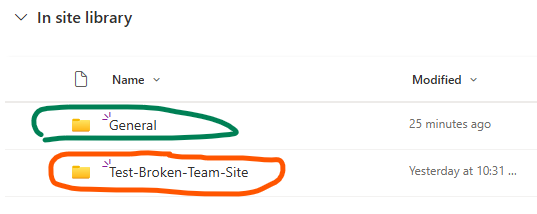
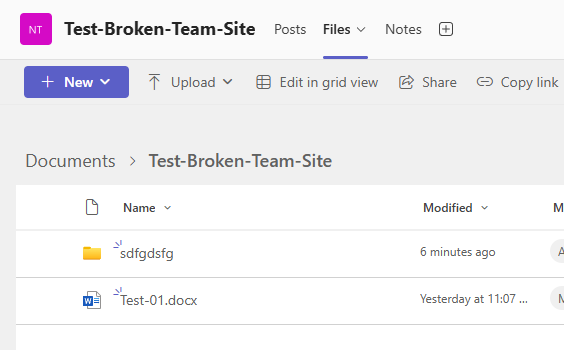
One thing that might confuse users is channels. Long ago when you create a team – a channel named “General” was created by default. Not far ago Microsoft changed creating team experience – now you need to provide a name for channel. As you know – channel is a folder in the default document library. So our “broken” site has a folder “Test-Broken-Team-Site” that used to be a sole channel. When we created a team from an existing group (group with site) – a new default main channel was created named “General”, so under SharePoint we can see two folders, and under teams we can see only “General” channel.
But all our data was under the old folder. Can we fix it? I think of two options.
Option 1 – add a tab to the channel – so we can see the existing folder under the main channel:
Option 2 – moving content of the “old” folder to a “new” folder, then you can delete the old folder and rename channel to the original name.
Private and Shared channels
The other thing that went wrong is private and shared channels. As you know, these channels are created as standalone sites related to team (site object has GroupId as zeroes, but RelatedGroupId would be an Id of the main site’s group id.). These sites are not getting restored automatically when a main site is restored. Moreover, in the SharePoint admin center those site are not visible under deleted sites.
The good news is these sites are visible with PowerShell. And you can restore the site with PowerShell:
The site will be restored, but, again, with broken connection to team. And I’m afraid it cannot be re-connected to a team, so it has to stay broken standalone site (or converted to a new-group-based which is a preferred option and if you like – with a team.
Summary
Quick Step-by-Step Recovery Guide
Restore the site via SharePoint Admin Center
Verify that the site connection is broken Check properties IsTeamsConnected, GroupId, and RelatedGroupId. Ensure group is permanently deleted.
Set yourself as a new primary site collection admin
Connect to a New Microsoft 365 Group via PowerShell “Add-PnPMicrosoft365GroupToSite”
Create a New Team from the Group. In Teams, go to Create Team > More Options > Create from Existing Group. Verify Everything Works.
Handle Folder/Channel Conflicts.
Option 1: Add it as a tab in the new “General” channel.
Option 2: Move content to “General” folder, delete old folder, and rename channel.
Channel sites (private channel, shared channel) are not restored and connected automatically.
In this article I will share what I would recommend to configure on every new Microsoft 365 Tenant.
The Challenge: Why Many Microsoft 365 Tenants Become Unmanageable and Inefficient Over Time
Many organizations adopting Microsoft 365 quickly discover that while the platform offers immense power, its default configuration often leaves crucial features disabled. These “dormant” functionalities, designed to enhance data governance, search capabilities, content management, and user experience, remain untapped. The real problem arises when a tenant matures: as users populate SharePoint sites and OneDrive accounts with vast amounts of information, and as collaboration intensifies, attempts to enable these critical features become incredibly complex, disruptive, and even risky. Retrofitting governance, re-indexing content, or restructuring information architecture on an existing, data-rich tenant can lead to compliance headaches, data inconsistencies, user frustration, and significant administrative overhead. SharePoint administrators frequently struggle with the technical debt accrued from these missed initial configurations, spending countless hours trying to bring order to an environment that could have been optimally set up from day one.
Consider the following.
Ownerless resources
Having an owner for every Microsoft 365 resource should be enforced from day one.
Relatability: It immediately speaks to the pain points experienced by many SharePoint admins (“unmanageable,” “inefficient,” “struggling with it,” “technical debt”).
Highlights the “Why”: It explains why these features are off and why it’s a problem to turn them on later.
Emphasizes Proactivity: It sets the stage for your solution, which is about proactive setup.
Strong Call to Action (Implied): It makes the reader understand that your KBA will provide the solution to avoid these common pitfalls.
SharePoint Site Ownership Policies comes with SharePoint Advanced management or Copilot and is part of Site Lifecycle Management. In a nutshell, it does 1) Identify sites that don’t meet organization’s ownership criteria, 2) send notifications to find new site owners or admins and 3) automatically mark sites in read-only (or just report). Below is my deep dive in this policy.
I will not retell what is already documented by Microsoft, but you can find some gotchas below.
Notification emails start coming in a few minutes after you activate the policy. From email address is SharePoint Online <no-reply@sharepointonline.com> .
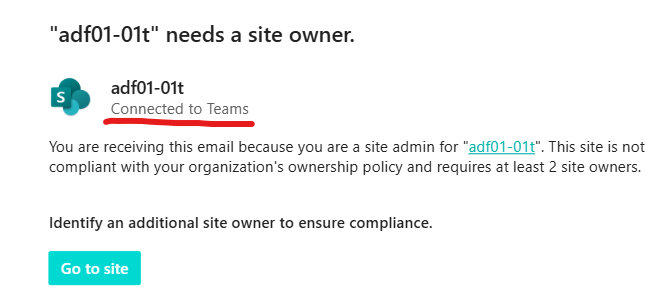
Here is how a notification email looks like (in case site has one owner and need another one):
Site Name (title) is mentioned 4 times. There are 3 links in the email (SharePoint logo, site title and “Go to site” button) – all lead you to the root of the site that needs an owner.
The email template is not customizable at the moment (June 2025) and might mislead a little, as it says “Site Name” needs a site owner. but site does have an owner. Policy want an existing single owner to assign as second owner, which is said further in smaller font and not much people are able to force themselves to read. (Update: we expect Microsoft released Site lifecycle management policies v 2 before Sep 2025).
What I really do not like here is that even for group-based sites (e.g. teams) the policy asks to add a “site owner“, though it should be “team owner”. The only difference is if the site is a teams-connected site – there is a subtitle “Connected to Teams”:
I’d also assume that some users will need additional instructions – how to add a second owner to the site. There might be a confusion in terminology – who is the site owner, like “there are plenty people in ‘My Site Owners’ group – why am I asked to add one more?”
In case the site does not have owners and the policy is configured to send messages to site members and/or manager, here is an example of the email notification:
Basically, the difference is it says “Would you like to be a site owner?” vs “Identify an additional site owner to ensure compliance.” and the button says “Become a site owner” vs “Go to site“.
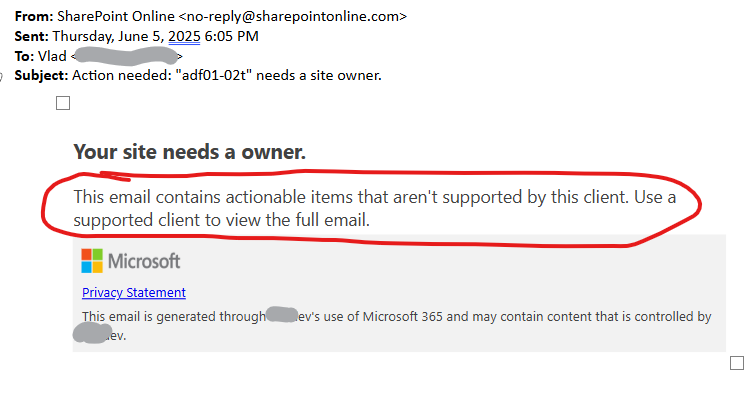
You cannot forward this email to other users (you can, but content will not be the same). Here is the example:
There are other cases an email comes as “This email contains actionable items that aren’t supported by this client. Use a supported client to view the full email.”
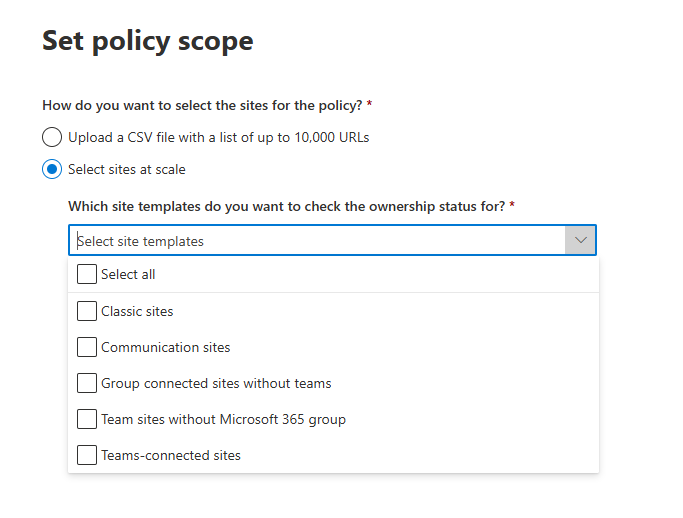
Policy scope
Sites regulated by policy
Configuring the policy, we can choose site template – e.g. Classic sites, Communication sites, Group connected sites without teams, Team sites without Microsoft 365 group and Teams-connected sites to scope down the policy with the kind of sites the policy will be applied to.
We know, that template site was created with does not actually guarantee the kind of site in it’s current state. E.g. we can convert classic site to a group-based site or we can create site with no team and later create a team for the site.
With that said, Question: what Microsoft means by “Sites regulated by policy” – template site was created with or current site category?
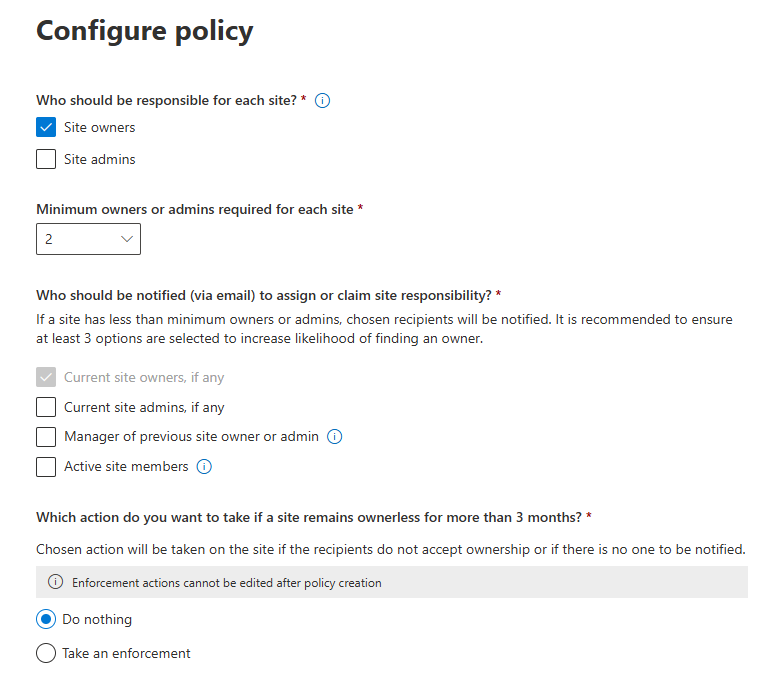
Policy configuration
Owners vs Admins
Another moment I’d like to clarify is what Microsoft means by owner and admin, as configuring the policy
Under the “Who should be responsible for each site?” we can specify “Site owners” and/or “Site admins”
Under the “Who should be notified (via email) to assign or claim site responsibility?” we can not only specify “Current site owners” and/or “Current site admins”, but also “Manager of previous site owner and admin” and “Active members”, which is really nice.
We know that for group-based sites “Group owners” of the Microsoft 365 group associated with site is actually goes to site collection administrators and nobody is added to SharePoint “site Owners” group by default. At the same time at the SharePoint site you can add users to site collection admins and/or to the default SharePoint “site Owners” group (the one with “Full Control” permissions. Moreover, nothing prevents us to create a SharePoint group “Site Business Owners” with e.g. read-only permissions to the site or e.g. create a SharePoint group “Board Members” with “Full Control” permissions to the site.
So, question: who according to Microsoft’s policy implementation are considered as site owners and site admins? Does it change for different types of sites?
Here is what I got from experience
“Who should be responsible for each site?” If “Site owners” selected – the policy will count members of the default site owners associated group for standalone (non group-based sites) towards the “Minimum owners or admins required for each site”. Also (NB!) – when a user who received a notification clicks “Become a site owner” – a user will be added to the default site owners group (not to site collection admins).
When “Site admins” selected – the policy will count site collection admins for standalone (non group-based sites) towards the “Minimum owners or admins required for each site”. When a user clicks “Become a site owner” – a user will be added to the site collection admins (not to default site owners group).
Does the policy count groups or disabled accounts? – TBC.
What if we select both – “Site owners” and “Site admins” under “Who should be responsible for each site”? Would that mean the policy would count both? I.e. one admin and one owner make the policy happy? Or there should be two admins and two owners? If a user accepts “Would you like to be a site owner – would the policy add user to admins ow owners? – TBC.
For the group-based sites this policy overlaps with the “Ownerless groups” policy (included in m365 subscription, configured under m365 admin -> Settings -> Org Settings -> Microsoft 365 Groups). What I noticed is in the case of two policies configured – this policy says “Message was already sent by another policy”.
“Who should be notified (via email) to assign or claim site responsibility?” If this is a group-based site – “active site members” are only Microsoft 365 group members. If there are users in the SharePoint site members group – they’d be ignored.
Microsoft Ownerless Groups policy vs Site Ownership policy
SharePoint Advanced Management includes Inactive Site Policies under Site lifecycle management. Effective content lifecycle management is a key pillar of SharePoint governance. It plays a vital role in optimizing storage, preserving data integrity, and ensuring regulatory compliance. By systematically removing inactive or outdated sites, it also enhances security. Additionally, it supports successful Copilot implementation by ensuring that the information accessed is both accurate and current. So, how exactly this Inactive site policy works and what is the difference between Entra Id groups expiration policy and SharePoint Inactive Site Policy.
SharePoint Inactive Site Policy vs m365 Groups Expiration Policy
The Groups Expiration Policy has been a feature of Azure AD (Entra ID) for quite some time. It is included at no additional cost. This policy automatically notifies group owners about upcoming expirations and provides options to renew or delete the group. Since all self-created Teams teams and Viva Engage communities are backed by SharePoint sites and managed through Microsoft 365 Groups, this policy also plays a significant role in SharePoint governance ensuring that information stored in SharePoint remains current and properly maintained. I have an article Microsoft 365 group expiration policy deep dive.
Inactive Site Policy is a feature of SharePoint Advanced Management (SAM), which is an add-on and require premium SharePoint license. It also Identifies inactive sites, Sends notifications to site owners and can automatically archive or make sites read-only. Sound like very similar to to groups expiration policy.
Key differences
Feature
Groups Expiration Policy
Inactive Site Policy
Where to configure Who can configure
Entra Id Groups Admin
SharePoint Admin center SharePoint Admin
Scope (policy is applied to)
Microsoft 365 Groups (including group-based sites, like teams, yammer)
SharePoint Sites (including both – group-based and non-group-based sites)
Who is notified
Group Owners
Site admin (group owner), site owners (*) TBC
Notifications come from email
msgroupsteam@microsoft.com
no-reply@sharepointonline.com
What if resource is active
group is automatically renewed, no emails sent
policy is not triggered against active sites
Can admin download report (list of inactive groups/sites)
No
Yes
Period of inactivity configuration
Configured in days, should be greater than or equal to 30 days
Options are: 1, 2, 3 or 6 months
Actions available (Options provided) to a resource owner
renew the group delete the group
certify site learn how to delete a site
What happens with resources owner did not take action (or with orphan resources).
Notifications is sent to a specific email address, group is deleted
site is archived or set to read-only or nothing
Inactive site policy user experience
Here is how the email notification looks like:
Note that
The email subject includes “Action required” and site title (name). It always says “… has been inactive for more than a month” even if the policy configured for “6 months”. It shows SharePoint logo, which might mislead “teams-oriented” users. Site title is not clickable, so site admin/owner cannot just click site link but have to navigate to site manually. When user clicks button “Certify site” – a message “The action completed successfully” pops up at the bottom of the email for a few seconds and then disappears. The email itself does not change, so when a user opens the same email again – there is no visual evidences the action was taken.
At the bottom of the email Microsoft mentions tenant name.
The email template is the same for all kinds of policies – it does not matter if the policy action is configured configured as “do nothing”, or to automatically enforce archive site or set it to read-only. I.e. email just says “Select Certify site to confirm if it’s still in use, or consider deleting it if the site is no longer needed.”. Email does not inform users that site will be set to read-only or archived.
Also there is no link where a user can get more info on the subject, but Microsoft says that inactive sites policy email template will be customizable – in the Site lifecycle management policies v2 expected summer 2025.
Admin – Inactive sites report
You can download a csv report of inactive sites generated by policy. Report includes fields: Site name, URL, Template, Connected to Teams, Sensitivity label, Retention Policy, Site lock state, Last activity date (UTC), Site creation date (UTC), Storage used (GB), Number of site owners, Email address of site owners, Number of site admins, Email address of site admins, Action status, Total notifications count, Action taken on (UTC), Duration in Read-Only.
There is no GUI to see the list of inactive sites (you can only download a csv file), but there is a magic button “Get AI insights”.
Get AI insights
Here are insights I have seen so far:
Inactive sites with significant storage usage
Multiple sites owned by the same account
Sites with Multiple Owners
Sites inactive for over a year
Inactive sites policy behavior
Policy sends emails immediately after policy activation. That means if you have thousands of inactive sites you might hit a 10k exchange limit of daily emails sent.
If a user owns multiple inactive sites – he/she will get multiple emails.
You can scope the policy down by site template, sensitivity label and creation source if you want different behavior for different types of sites, e.g. if you want to setup longer period of inactivity for one type of sites and shorter for others… not sure when it makes sense…
Implementing an Inactive sites policy
First of all – It is highly recommended to take care of ownerless sites (find owners) before triggering an Inactive sites policy.
If you have a relatively new tenant – you probably have not much inactive sites, so turning the policy on should not be a problem. The older your tenant is the more inactive sites you have. For older tenants you probably already have a lot of inactive sites – ant that could be a problem. So we’d need to take care of initial policy implementation, and after some time it will just work so we could forget about it.
There is no way to pilot this policy with pre-selected scope of sites or users. You can scope the policy down by site template, sensitivity label and creation source, but you cannot scope the policy down the way only sites or uses you want to be a testers or pilot project members will be the target of the policy.
In small orgs there should be no problems implementing this policy. Still I would start from just getting a report. There is a “How long after the last activity should a site be considered inactive?” configuration, so I’d start from the longest – 6 months, then move to the shortest you need. Medium orgs could get some ideas from recommendations to large orgs below.
In large orgs you might
trigger a spike in number of tickets submitted by users who needs help
hit a maximum sending limit with Exchange Online which is 10,000 email recipients per day
So it would be crucial for enterprises to avoid an initial surge and start from smaller number of recipients, and gradually let the policy work at a full strength. One of the options to achieve that would be
configure the policy for reports only, get inactive sites report
select sites owner and admins in a separate list – then select only unique ones – so every user will get only one email, split this list into small chunks
communicate to site owners (by chunks) – using enterprise-approved “send from” email and enterprise-branded email template saying that the policy is gonna be implemented, you might receive an email (like this one – screenshot), you can trust this email and click buttons. A list of site urls user owns must be included in the email, so user could visit these sites (Optionally) you can instruct users how they can delete sites if site is no longer needed or archive sites if they are not sure if it is still needed or not
If so – it’d
forewarn users so they would know to do and not be surprised and would create less tickets
users might choose to delete or archive sites which would also
users would visit their inactive sites and trigger sites activity, and that should dramatically decrease number of emails sent to users initially, on the day one of policy implementation ideally – if users visit all sites – you’d have no inactive sites, so you’d just turn the policy on with no fear
then you’d wait for a couple of weeks, get new report to ensure that you have much less inactive sites – and you’d just enable the inactive sites policy (starting from the longest period – 6 month of inactivity)