Found some really good articles:
Deploying Python FastAPI to Azure
Leave a reply
After many years working with SharePoint I wrote a lot of PowerShell scripts that help me support, troubleshoot, administer and secure SharePoint. So I’m sharing my scripts with you.
It’s here: https://github.com/VladilenK/Manage-m365-with-PowerShell
I will be saving my personal gotchas on Microsoft 365 External Access and Guest Access in SharePoint and Teams
We configure external/guest access in AAD, m365 Admin Center, Teams Admin Center, SharePoint Admin Center, specific Group, Team or SharePoint site.
We can configure external guest access directly, or can configure sensitivity labels and policies in Purview (Compliance Admin Center). Configuring sensitivity labels for sites/groups we configure external guest access settings. Configuring sensitivity labels policies we apply labels.
Be careful with “All users” group created as part of the process.
Microsoft: “The dedicated All Users group includes all users in the directory, including guests and external users.” And indeed, “All Users” group by default include external users.
So here is the scenario: we have a site where external sharing is enabled, and someone is sharing a specific file1 or folder1 with some external users. The other site/group member is sharing another file2/folder2 with “All Users” assuming All Users means all this group member. This gives external users access to file2/folder2.
Option 0: remove “All Users” group
Option 1: exclude External users or Guest users from “All Users” group:
(user.userPrincipalName -notContains "#EXT#@")
or
(user.userType -ne "Guest")
(explained here).
Option 2: schedule a job that removes “All Users” from all sites UIL. Optionally inform site owners not to use “All Users” but use “Everyone except external users”.
Let say, you have a public site and you indeed want to provide access to all internal users with the exception of specific relatively small group of people. E.g. 10,000 users in company and only 200 are not fully integrated yet and you do not want to consider as equals in rights to all others and you do not want to provide automatic access. Unfortunately, there is no “deny access” options in SharePoint. All the functionality is about to “allow access” to something. What are you options?
Option 1: Create a security group and include in the group 9,800 users.
In this case you’d need to review all sites with access provided to EEEU
Option 2: Change user type in AAD (Entra Id) from Member to Guest.
In this case those users will not be a part of EEEU. They will be “Internal Guests”.
You’ll still be able to provide direct access to sites and include such users in teams but they will be marked as Guests.
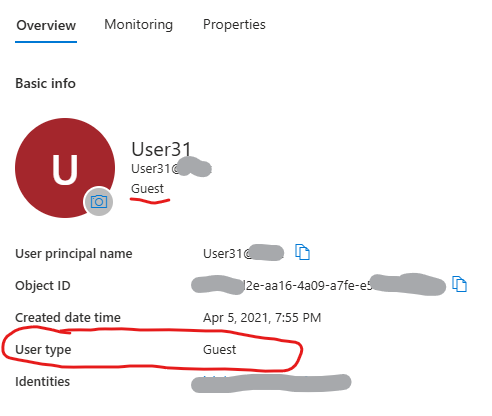
Think of it that there are internal and external users, and there are guests and members.
Typically all internal users are members, and all external users are guests. But that does not always reflect real life. And if you change a “User type” property for some internal user from Member to Guest – this users will be an Internal Guest. Check this MS article: Understand and manage the properties of B2B guest users
Note: When you follow instructions provided by Microsoft, beware that “Connect-AzureAD” works only in Windows .net framework – i.e. PowerShell 5.1.
if you try to run it in PowerShell 7 – you can get “Connect-AzureAD: One or more errors occurred. (Could not load type ‘System.Security.Cryptography.SHA256Cng’ from assembly ‘System.Core, Version=4.0.0.0, Culture=neutral, PublicKeyToken=b77a5c561934e089’.)” Error.
(check Connect-AzureAD Could not load type ‘System.Security.Cryptography.SHA256Cng’ from assembly)
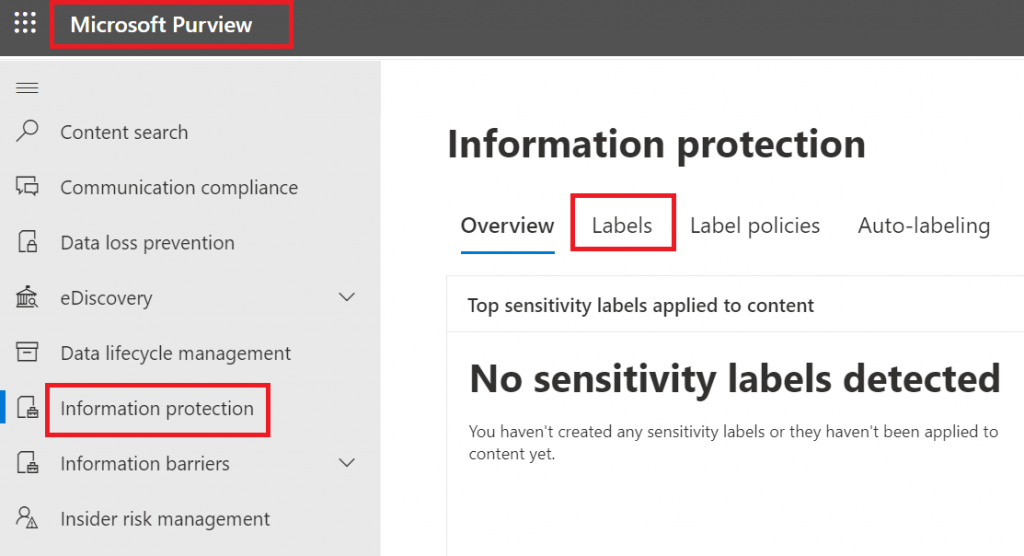
Sensitivity labels are configured under Microsoft Purview (Compliance Center), Solutions, Information Protection. You’d need a global admin or “Compliance Administrator” or “Azure Information Protection Administrator” (?) role:
Since we are talking sensitivity labels for SharePoint Sites (not documents), we define label scope as “Groups and Sites”: “Configure privacy, access control, and other settings to protect labeled Teams, Microsoft 365 Groups, and SharePoint sites.”
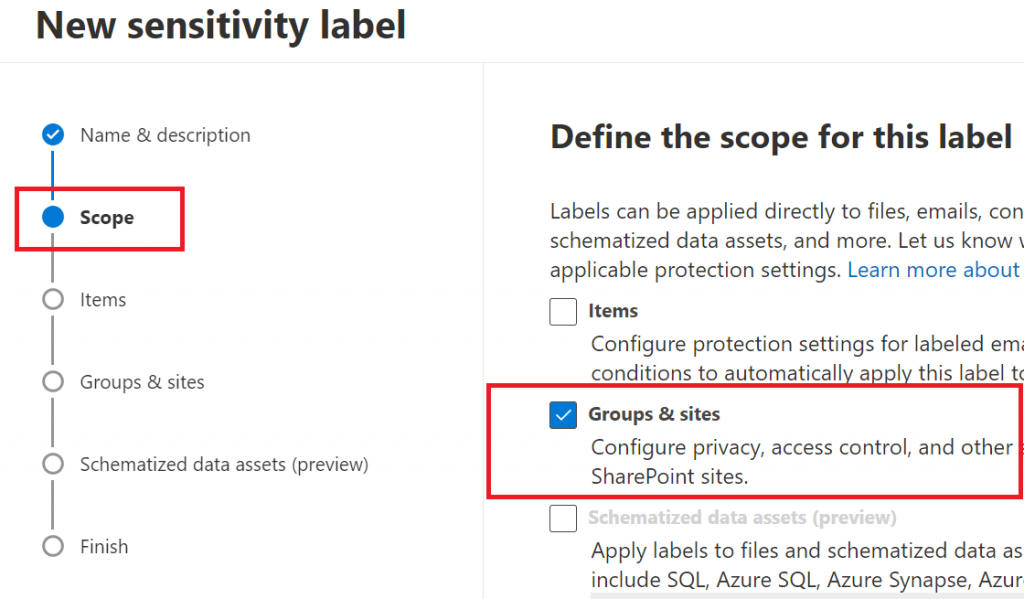
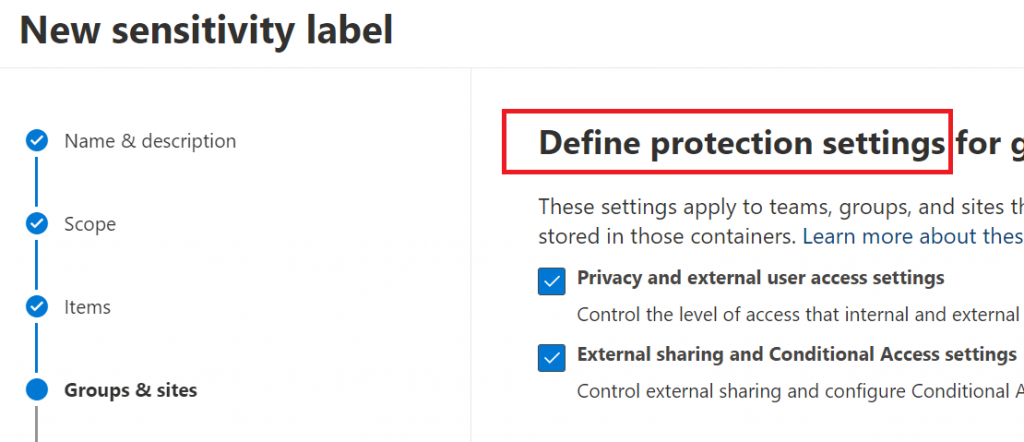
Then we define which protection settings for groups and sites we should configure on the next steps:
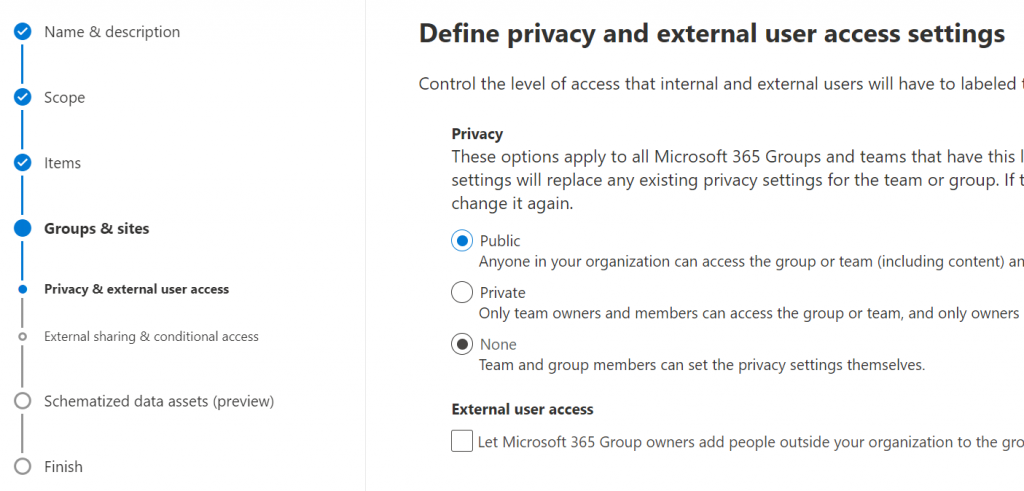
– Privacy and external user access settings – Control the level of access that internal and external users will have to labeled teams and Microsoft 365 Groups.
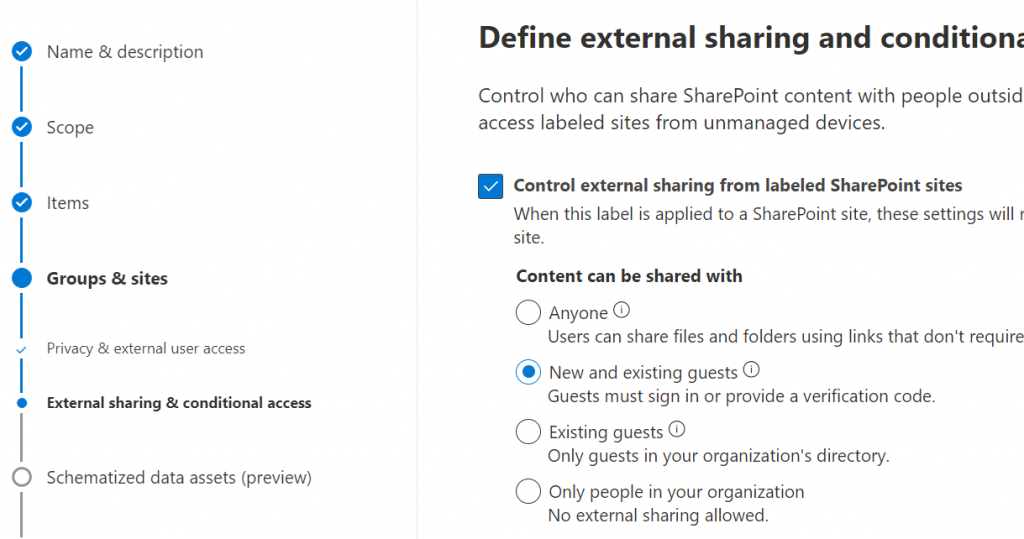
– External sharing and conditional access settings – Control external sharing and configure Conditional Access settings to protect labeled SharePoint sites.
If we selected previously “Privacy and external user access settings” – now we need to select group/team privacy (These options apply to all Microsoft 365 Groups and teams, but not standalone sites). When applied, these settings will replace any existing privacy settings for the team or group. If the label is removed, users can change privacy settings again. You can also allow external user access – if group owner will be able to add guests:
Next step – define external sharing and conditional access settings. Specifically, if the content of the SharePoint site can be shared with Anyone (anonymously) or with authenticated users (new or existing) or no external sharing is allowed:
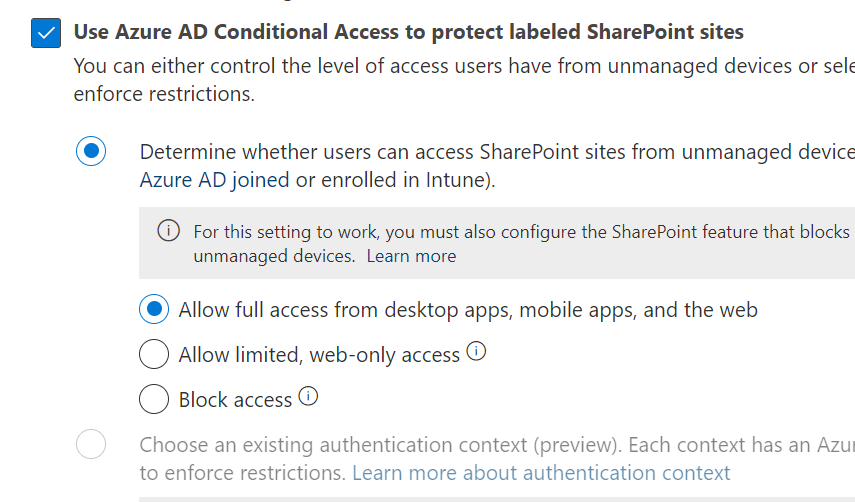
And you can either control the level of access users have from unmanaged devices or select an existing authentication context to enforce restrictions:
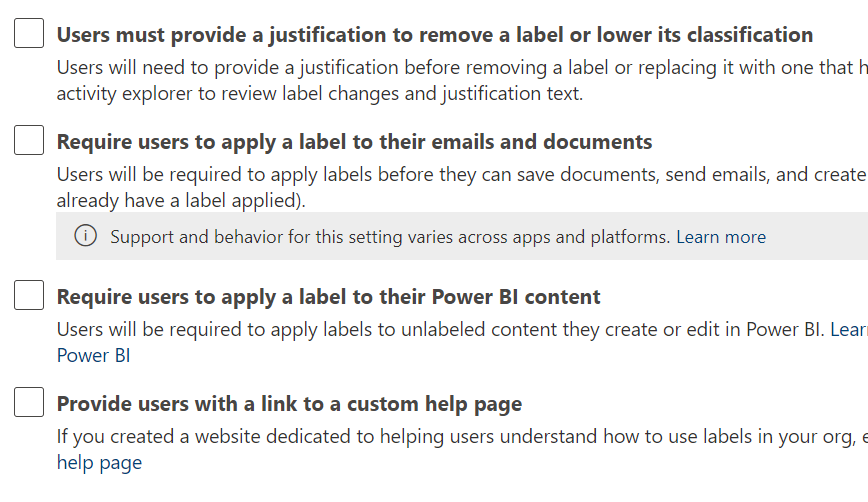
Sensitivity label policy is basically which label should be available to apply for what users and some other settings like
– do users need to provide justification before removing a label or replacing it with one that has a lower-order number or
– will users be required to apply labels and optionall the default label
“Global reader” role allows view existing sensitivity labels configuration:
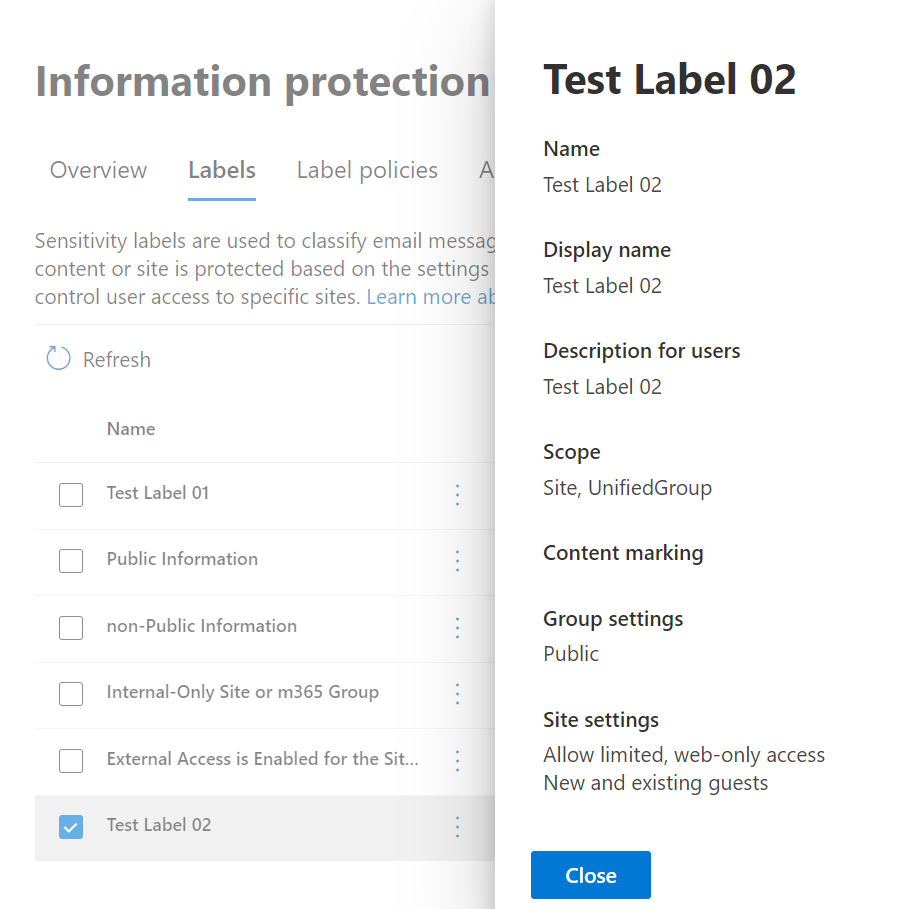
Wording would be a little different, but all aspects of the label configuration will be mentioned. E.g. when editing GUI says label scope is “Groups & sites”, read-only label summary defines Scope as “Site, UnifiedGroup”.
Site sensitivity label is applied to site collection only and cannot be applied to subsite (web object).
To apply a label to a m365 group or Teams site with a group behind: MS Graph API support only Delegated permissions.
“Set-PnPSiteSensitivityLabel” works in the current site context.
Description says “If the site does not have a Microsoft 365 Group behind it, it will set the label on the SharePoint Online site and will not require Microsoft Graph permissions and will work with both delegate as well as app only logins.”
In fact (7/22/2022) app permissions are not working. This cmdlet can assign label to a standalone or a group-based site only with delegated permissions.
“Set-PnPTenantSite” allows you to remove or apply site sensitivity label to both standalone and group-based sites with app permissions. Furthermore, group and team settings respect this. I.e. if you apply label to a group-based site – group will pick this up.
Channel sites should inherit sensitivity label from root site.
I’m not sure if it’s a bug but
– when you create a team and select sensitivity label as part of team creation process – all the channel sites you create after (Private or Shared) will inherit sensitivity label immediately
– when you apply sensitivity label to an existing team – with existing channel sites – in this case Private channel sites inherit team sensitivity label immediately, but with Shared channel sites it’s strange: GUI shows sensitivity label assigned, but site object model does not.


References
WIP
What if we provide Sites.Selected App permissions to SharePoint Admin Site?
TBP
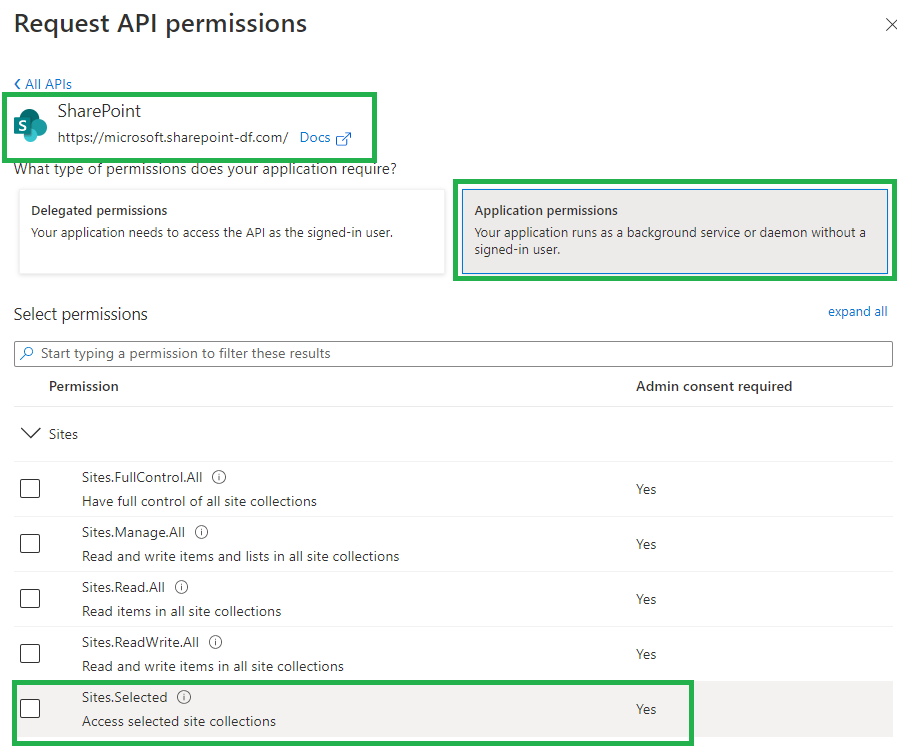
Sites.Selected MS Graph API permissions were introduced by Microsoft in March 2021. It was a good move towards site-level access for non-interactive (daemon) applications, but still developers were limited with only what MS Graph API provides for SharePoint. SharePoint CSOM and REST API still provides much more than MS Graph API.
So developers had to use AppInv.aspx at site level to provide ACS-based permissions to their apps to be able to use SharePoint CSOM and REST APIs. The bad news is ACS-based permissions have some downsides so some SharePoint/m365/security engineers consider them legacy and deprecated. But if we decide to disable SharePoint App-only service principals – all apps with ACS-based permissions provided via AppInv.aspx will stop working.
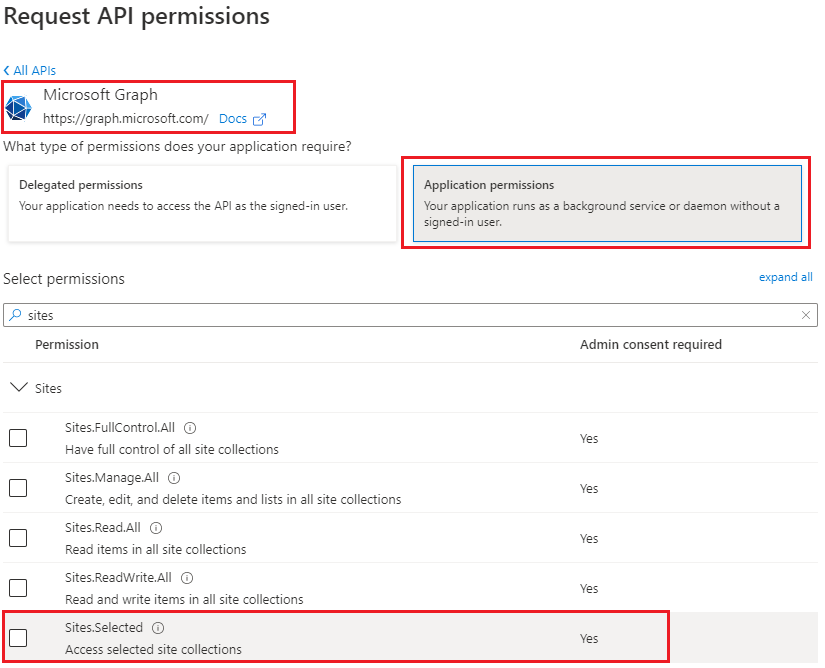
Recently Microsoft introduced Sites.Selected SharePoint API permissions for registered Azure Apps! So from now developers should be fully happy with API permissions provided in Azure (without SharePoint ACS-based permissions).
Why is this so important? Because this should allow us to be able to switch from ACS based permissions provided in SharePoint via AppInv.aspx to Azure-provided permissions and as a consequence – disable SharePoint-Apps only principal (‘set-spotenant -DisableCustomAppAuthentication $true’).
Why we are eager to disable Custom App Authentication in SharePoint? Simply say, SharePoint App-only service principals are not trackable (they all appeared as a “app@sharepoint.com” id in all logs) and hard to manage (there is no way to get list of existing/registered SP app-only service principals, sites and their owners) – see more in this article. (Update: there are tools – check Azure ACS retirement: Track down ACS apps).
So, SharePoint Sites.Selected application API permissions provided in Azure is a significant step to make Microsoft 365 SharePoint environment more secure and manageable.
Since Feb 2024 Microsoft supports also delegated Sites.Selected permissions. Delegated Sites.Selected permissions are assigned the same way as application Sites.selected permissions – through the /permissions endpoint. You still assign only the application id and role. When the call is made the permissions are calculated either as application or delegated, and assuming the request is authorized it will go through.
Microsoft implemented granular permissions ( e.g. to a list, item or file) alongside with Sites.Selected permissions. Original implementations of Sites.Selected allowed access to entire site collection only. With new ‘Lists.SelectedOperations.Selected’, ‘ListItems.SelectedOperations.Selected’ and ‘Files.SelectedOperations.Selected’ permissions it is possible to provide application permissions to list, library or list item or particular document (reference).
Details To Be Provided…
Since the beginning of 2024 Microsoft supports Delegated Sites.Selected API permissions. This is to support security best practices – the minimally possible access should be provided. I.e. the idea is: even Sites.FullControl.All delegated permissions allows access not to all sites, but to sites current user was provided access to, it would be a good idea to restrict access with only sites this specific app is required access to. That’s good.
Update: Sites.Selected API MS Graph permissions was introduced by Microsoft in 2021. It was a good move towards site-level development, but still developers were limited with only what MS Graph API provides for SharePoint dev.
So devs had to use AppInv.aspx at site level to provide ACS permissions to their apps to be able to use SharePoint CSOM and REST APIs.
Recently Microsoft introduced Sites.Selected SharePoint API permissions for registered Azure Apps! So now devs should be fully happy without ACS-based permissions.
You have an application that needs access to Microsoft 365 SharePoint Online site/list/documents. Application is running without interaction with users – e.g. unattended, as daemon job.
There are two options you can authenticate to Microsoft 365 – with the secret or with the certificate. Authenticating with certificate is considered more secure.
Note: we will use PowerShell 7.2 and PnP.PowerShell 1.9 to illustrate it.
If SharePoint-Apps only principal is disabled in your tenant
(i.e. ‘Get-PnPTenant | select DisableCustomAppAuthentication’ returns $true ), then the only way you work with SPO from code is:
In all other cases (even your Connect-PnPOnline command complete successfully) – you will be getting error 401 (unauthorized) when trying Get-PnPTenant or Get-PnPTenantSite or Get-PnPSite
If SharePoint-Apps only principals are enabled in your tenant
(i.e. ‘Get-PnPTenant | select DisableCustomAppAuthentication’ returns $false ), then you have three options to work with SPO from code:
Update (Feb 2025):
A new KBA: Azure ACS retirement: Track down ACS apps
Update (May 2023):
You can use Get-PnPAzureACSPrincipal to returns the lists of all Azure ACS principals installed in your Tenant including subsites.
Update: Sites.Selected API MS Graph permissions was introduced by Microsoft in 2021. It was a good move towards site-level development, but still developers were limited with only what MS Graph API provides for SharePoint dev.
So devs had to use AppInv.aspx at site level to provide ACS permissions to their apps to be able to use SharePoint CSOM and REST APIs.
Recently Microsoft introduced Sites.Selected SharePoint API permissions for registered Azure Apps! So now devs should be fully happy without ACS-based permissions.
Update: I’m not sure when Microsoft implemented that, but I recently found another Record Type – “SharePointAppPermissionOperation”. There is an Activity type – AppPermissionGrant…
To be explored…
After all the updates the original article below is probably obsolete…
Developers in the organization can use both – Azure Apps and SharePoint Apps to work with SharePoint sites in their “daemon” applications.
It is recommended to use Azure apps so, you want to know – what are SharePoint Apps registered and their owners, who registered SharePoint Apps. Eventually you would disable SharePoint Apps-only principal but before that you’d move Devs from SP-App-only to Azure App (see Disable Custom App Authentication).
(SharePoint App-only service principals aka SP-App-Only are SPN or App registered from within SharePoint using AppRegNew.aspx system page).
One of the approaches is to track Apps/Owners (or who register an app) with Unified Audit Log
The following PowerShell code:
$operations = 'Add service principal.'
$recordType = 'AzureActiveDirectory'
Search-UnifiedAuditLog -StartDate $start -EndDate $end -ResultSize $resultSize -Formatted -Operations $operations -RecordType $recordType
returns events with operation = ‘Add service principal.’ Nice, but…
if an app was registered in Azure – event contains an UPN under UserIds property:
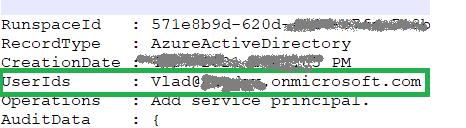
Unfortunately, in case with registering app in SharePoint, an audit log event will be like:
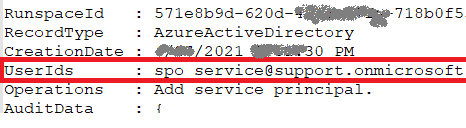
i.e. UserId registered is “spo_service@support.onmicrosoft.com”, so we do not know who registered a SharePoint-only app
In theory – we could use events recorded immediately before and after “Add service principal” event to track a user and site who has registered a SharePoint-only app… But for me it seems like too complicated for automation.

Instead we can do simple search through audit log for events “AppRegNew.aspx page visited”. This gives us a good approximation of who registered SP-App-only principal. Worst scenario – we reach more people than we really need (including those who started registering sp-app-only but did not complete) but all of them would be definitely our target auditory.
Consider the following code:
$freeText = "appregnew"
$operations = 'PageViewed'
$recordType = 'SharePoint'

$results = Search-UnifiedAuditLog -StartDate $start -EndDate $end -ResultSize $resultSize -FreeText $freeText -Operations $operations -RecordType $recordType
this would give you all users who loaded “/_layouts/15/appregnew.aspx” page
You are a developer or power user in a company with Microsoft 365 tenant.
You need to connect to Microsoft Graph and then call Microsoft Graph API to consume some MS Graph resources on behalf of authenticated user programmatically with PowerShell – e.g. add/remove documents or list items, search for sites or documents content etc. – whatever available with Graph API.
You do not have tenant admin permissions or any tenant-level admin permissions (SharePoint, Teams, Exchange etc. ). But you can register an Azure App and request tenant admin consent.
$AppId = ""
$TenantId = ""
$connectionDetails = @{
    'TenantId'    = $AppId
    'ClientId'    = $TenantId
    'Interactive' = $true
}

$token = Get-MsalToken @connectionDetails
# or
$token = Get-MsalToken -TenantId $TenantId -ClientId $appId -Interactive

$Headers = @{
    'Authorization' = "bearer $($token.AccessToken)"
}

Invoke-RestMethod -Uri 'https://graph.microsoft.com/v1.0/me' -Headers $Headers
You can find the code sample here: https://github.com/VladilenK/
Connect-AzAccount -Tenant ""
$azAccessToken = Get-AzAccessToken -Resource "https://graph.microsoft.com"

$Headers = @{
  'Authorization' = "$($azAccessToken.Type) $($azAccessToken.Token)"
}

Invoke-RestMethod -Uri 'https://graph.microsoft.com/v1.0/me' -Headers $Headers
As I understand we need somehow let Azure know API permissions we want (e.g. via app registerd)…
$url = "https://orgname.sharepoint.com"
Connect-PnPOnline -ClientId "" -Url $url -Interactive
$pnpToken = Get-PnPGraphAccessToken
$Headers = @{
    'Authorization' = "bearer $($pnpToken)"
}
Invoke-RestMethod -Uri 'https://graph.microsoft.com/v1.0/me' -Headers $Headers

# did not work as well:
$pnpToken = Get-PnPAppAuthAccessToken
$pnpToken = Get-PnPAccessToken
the error message was (maybe I missed something – please let me know):

References
You run some PnP PowerShell code unattended e.g. daemon/service app, background job – under application permissions – with no user interaction.
Your app needs to connect to SharePoint and/or Microsoft Graph API. Your organization require authentication with a certificate (no secrets). You want certificate stored securely in Azure Key Vault.
Here is the sample PowerShell code to get certificate from Azure Key Vault and Connect to SharePoint with PnP (Connect-PnPOnline):
# ensure you use PowerShell 7
$PSVersionTable

# connect to your Azure subscription
Connect-AzAccount -Subscription "<subscription id>" -Tenant "<tenant id>"
Get-AzSubscription | fl
Get-AzContext

# Specify Key Vault Name and Certificate Name
$VaultName = "<azure key vault name>"
$certName = "certificate name as it stored in key vault"

# Get certificate stored in KeyVault (Yes, get it as SECRET)
$secret = Get-AzKeyVaultSecret -VaultName $vaultName -Name $certName
$secretValueText = ($secret.SecretValue | ConvertFrom-SecureString -AsPlainText )

# connect to PnP
$tenant = "contoso.onmicrosoft.com" # or tenant Id
$siteUrl = "https://contoso.sharepoint.com"
$clientID = "<App (client) Id>" # Azure Registered App with the same certificate and API permissions configured
Connect-PnPOnline -Url $siteUrl -ClientId $clientID -Tenant $tenant -CertificateBase64Encoded $secretValueText

Get-PnPSite
The same PowerShell code in GitHub: Connect-PnPOnline-with-certificate.ps1
References: