Fixing SharePoint User ID Mismatch Issue with PowerShell

There is a known problem in SharePoint called “User ID Mismatch”. It happens if a user account is deleted from the Entra Id, and then a new account is created with the same UPN (e.g. rehired person or a person with common name like John Smith). In other words – re-used user principal name in the directory causes SharePoint User ID Mismatch issue. Symptoms are: a user is provided with the access to the resource, but still cannot open it and gets “Access denied” error.

SharePoint User ID Mismatch Issue Explained

The reason behind it is that SharePoint caches users data in it’s own database, including not only UPN, but also local AD SID and Entra Id user id. So when a re-used UPN tries to access the site – SharePoint does not allow access, and this makes sense as we do not know if the user is the same person (rehired) or different (same name). Rehired person might be re-hired with a different role. Different person with the same name definitely should not get access to the site for automatically. So access needs to be re-provided. And this is where the actual issue appears.

Here is what happens

There is a hidden system list at every SharePoint site called User Information List (UIL) where all users who visited the site or was explicitly provided with access are stored. Let say, the site was accessed by the “old” user in the past. So UIL contains information about that “old” user. Now the site owner shares the site with the “new” user (or this new user requests access to the site resource, then site owner approves request). Once a site owner shares the resource or approves new user’s request to the site – Microsoft does dot update the UIL with the new user ids. So for the user and for the site owner it looks like access was provided, but in fact it’s not.

Microsoft’s “fix”

Microsoft knows about the issue. But instead of fixing it in the product itself (e.g. instead of removing the root cause of the issue) – Microsoft developed a separate “fix” (details are below). Actually what is needed to “fix” the issue is to remove the old user from the UIL. E.g. once the old user id is removed from the site – the site works for this user normally, e.g. once access provided (request approved) – user will actually have access to the site.

Notes:

  • Deleting user from UIL does not actually clears everything related to the user. User information stays in a hidden SQL databases behind (e.g. if you go to document history on the site – you still should be able to see user name etc.). Let say, if an old and new users have the same UPN but different display names – this information will be preserved, e.g. in a document history updates made by old user will be shown with old user display name and updates made by new user will be shown with new user display name.
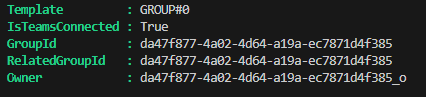
  • Every user or group on the site has “site user id” – it’s an integer number, e.g. first user/group added to site would have id:1. So deleting and re-adding the same user would keep user’s site id. In the case with the re-used UPN it’d be different number.
  • Can a user facing the issue differentiate if it’s a user id mismatch issue or it’s a regular access denied page due to lack of permissions? Yes (please see below).

Solutions to fix the SharePoint User ID Mismatch Issue

So there are 3 possible solutions:

  • by admin, via Microsoft 365 Admin Center, using Diagnostics tools
  • by site owner or SharePoint admin, via site settings and “MembershipGroupId=0” trick
  • by site owner or SharePoint admin, with PowerShell

Fixing the SharePoint User ID Mismatch Issue with Microsoft Diagnostic

So Microsoft knows about the User Id Mismatch issue and offers the following solutions:

  • SharePoint Admin: run the “Site User Mismatch” diagnostic
    The diagnostic performs a large range of validations for internal users and guests who try to access SharePoint and OneDrive sites
  • SharePoint Admin: run the “Check User Access” diagnostic
    “The diagnostic performs a large range of verifications for internal users and guests who try to access SharePoint and OneDrive sites

  • What exactly Microsoft’s diagnostics do?

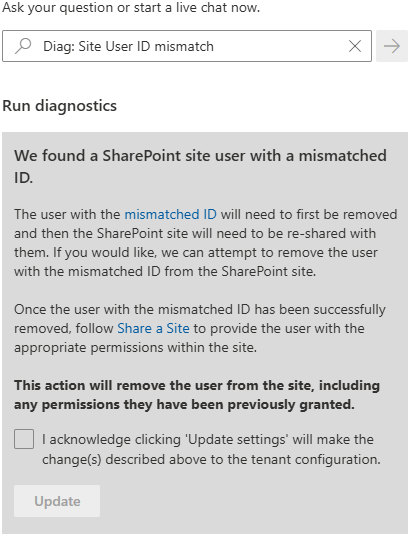
Diag: Site User ID mismatch

When you run this, it asks for a site Url and UPN, then it says:

We found a SharePoint site user with a mismatched ID.

The user with the mismatched ID will need to first be removed and then the SharePoint site will need to be re-shared with them. If you would like, we can attempt to remove the user with the mismatched ID from the SharePoint site.

Once the user with the mismatched ID has been successfully removed, follow Share a Site to provide the user with the appropriate permissions within the site.

This action will remove the user from the site, including any permissions they have been previously granted.

We found a SharePoint site user with a mismatched ID.
The user with the mismatched ID will need to first be removed and then the SharePoint site will need to be re-shared with them. If you would like, we can attempt to remove the user with the mismatched ID from the SharePoint site.

Once the user with the mismatched ID has been successfully removed, follow Share a Site to provide the user with the appropriate permissions within the site.

This action will remove the user from the site, including any permissions they have been previously granted.

Diag: Check SharePoint User Access

This diag does the same:
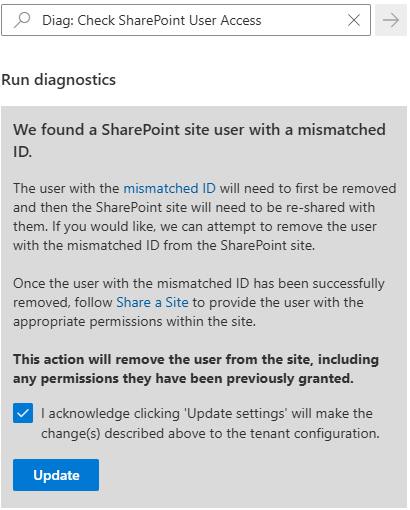
Diag: Check SharePoint User Access
We found a SharePoint site user with a mismatched ID.
The user with the mismatched ID will need to first be removed and then the SharePoint site will need to be re-shared with them. If you would like, we can attempt to remove the user with the mismatched ID from the SharePoint site.

Once the user with the mismatched ID has been successfully removed, follow Share a Site to provide the user with the appropriate permissions within the site.

This action will remove the user from the site, including any permissions they have been previously granted.

Let us run it.

Success!
Now that the user with the mismatched ID has been removed, you may need to Share a Site with them; depending on the permissions set for your organization and for the specific site.


Diag: Check SharePoint User Access
Success!
Now that the user with the mismatched ID has been removed, you may need to Share a Site with them; depending on the permissions set for your organization and for the specific site.

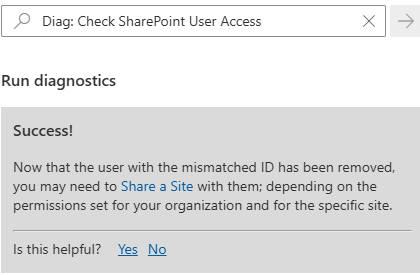
Actually Microsoft not only removes user from UIL, but adds a new one (without permissions).

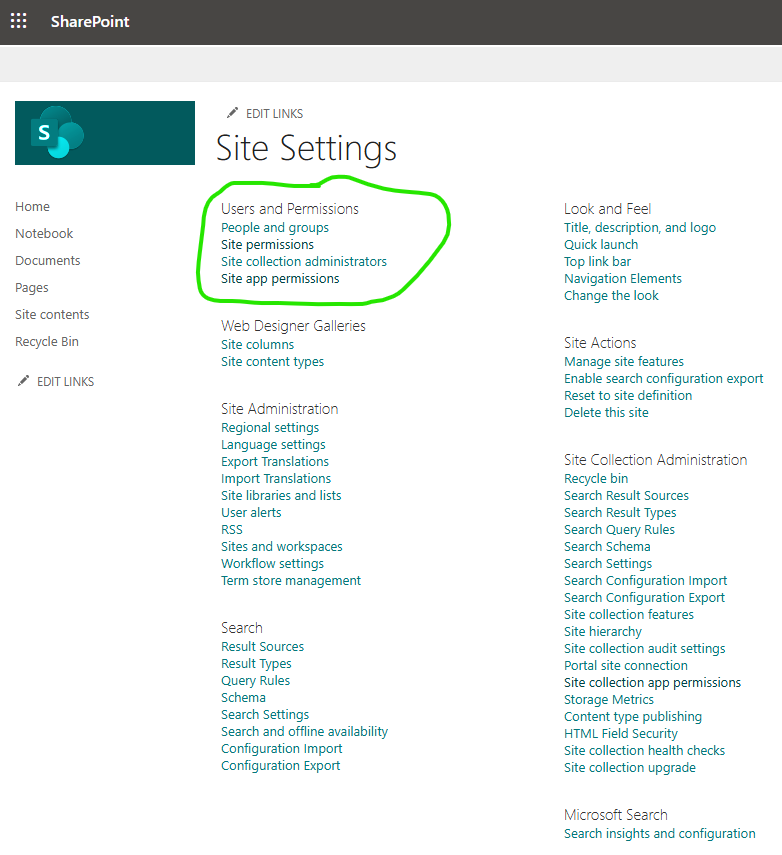
Fixing the SharePoint User ID Mismatch Issue with Site Settings

This option is available for site owners or site collection admins, but only in cases there are not many site users. If you have thousands user in the site – it might be difficult to find a user in the UIL.

Site owner or admin – navigate to Site Settings -> Site Permissions -> Advanced Permissions -> Select any group, then update group id number in the browser address bar (Url) to “0”, so it’ll look like:
https://domain.sharepoint.com/teams/mySite/_layouts/15/people.aspx?MembershipGroupId=0
then find the user in the list and delete it (Actions -> Delete User from site collection).

Here is what Microsoft says: remove account from the UserInfo list

Detecting and Fixing the issue with PowerShell

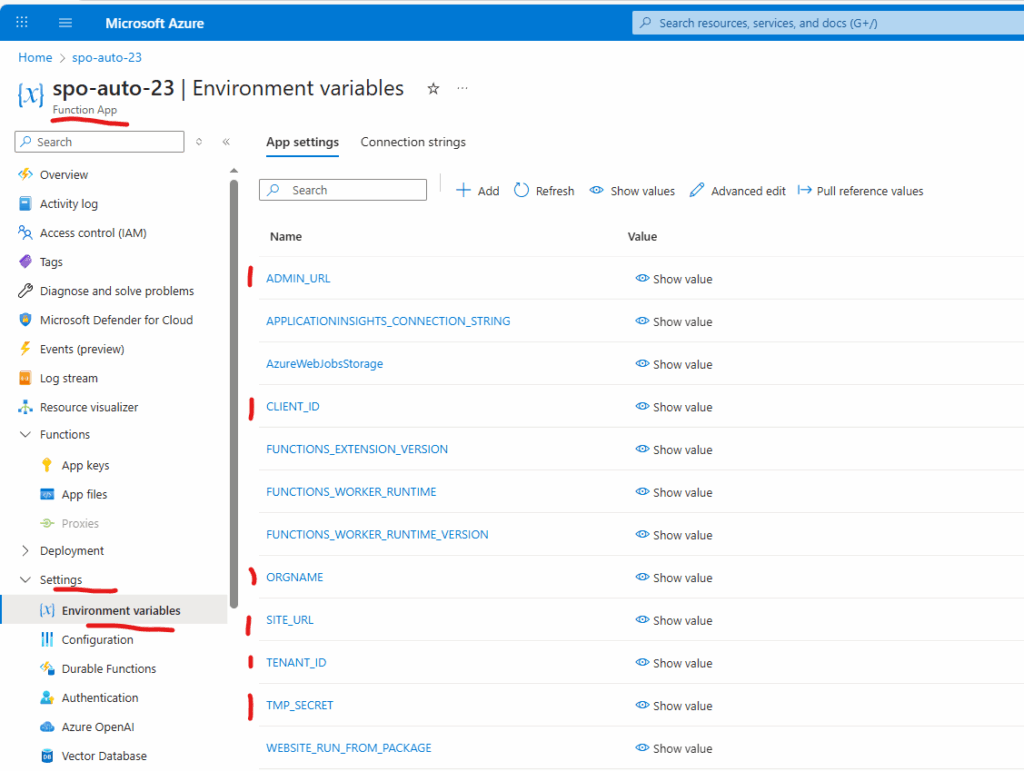
You can use PowerShell to detect if the issue with user’s permissions is actually user id mismatch issue and Fix the issue. Specifically I will use PnP.PowerShell module v 3.1. Here is what you’d do:

# this script 
# 1) detects if there is a User id Mismatch Issue on the site
# 2) if yes - deletes User Id from the site and adds it again (with no permissions)
# NB! removing User from the UIL also removes all user's permissions, so user needs to request permissions again - but this time it should work
# NB! dew to nature of user id mismatch issue - these could be two different users - removing user's permissions is OK

# parameters
# specify User email and site url here:
$userEmail = "John.Smith.qerdgfq@$orgname.onmicrosoft.com"
$userEmail = "John.Smith@$orgname.onmicrosoft.com"
$siteUrl = "https://$orgname.sharepoint.com/teams/UserIDMismatchTest01"
$siteUrl = "https://$orgname.sharepoint.com/sites/UserIDMismatchTest02"
$siteUrl = "https://$orgname.sharepoint.com/teams/UserIDMismatchTest03"

# end of parameters section
# 

# authenticate
$connectionAdmin.Url

# let's find a user in entra id:
# try to get user by email (in most cases email equals upn)
$adUser = Get-PnPAzureADUser -Connection $connectionAdmin -Identity $userEmail
if ($adUser) {
    # Found user in entra id
} else {
    # otherwise (in case upn -ne email) let us try to find user by email
    $filter = "Mail eq '" + $userEmail + "'"
    $adUser = Get-PnPAzureADUser -Connection $connectionAdmin -Filter $filter    
}

if ($adUser) {
    $upn = $adUser.UserPrincipalName
    Write-Host "Found user in entra id: " $adUser.DisplayName
    if ($adUser.AccountEnabled) {        
    } else {
        Write-Host "Note that user's account entra id is disabled." 
    }
} else {
    Write-Host "Could not find user in entra id." -ForegroundColor Yellow
    Write-Host "Please double-check email specified: " $userEmail -ForegroundColor Yellow
    exit 1
}

# now we need to pull user profile from UPSA
$userProps = $null
$userProps = Get-PnPUserProfileProperty -Connection $connectionAdmin -Account $upn
if ($userProps) {
    Write-Host "Found user in SharePoint User Profiles Service: " $userProps["AccountName"]
} else {
    Write-Host "Could not find user in SharePoint User Profiles Service." -ForegroundColor Yellow
    exit 1
}

# let's connect to site
$connectionToSite = Connect-PnPOnline -ReturnConnection -ClientId $ClientId -Thumbprint $Thumbprint -Tenant $tenantId -Url $siteUrl 
if ($?) {
} else {
    Write-Host "Could not connect to site:" $siteUrl -ForegroundColor Yellow
    exit 1
}

# let's get site
$site = Get-PnPSite -Connection $connectionToSite
if ($?) {
    Write-Host "Connected to site:" $siteUrl 
} else {
    Write-Host "Could not connect to site:" $siteUrl -ForegroundColor Yellow
    exit 1
}

#  let's get site user
# Get-PnPUser -Connection $connectionToSite 
$siteUser = $null
$siteUser = Get-PnPUser -Connection $connectionToSite -Identity ("i:0#.f|membership|$upn") -Includes AadObjectId
if ($siteUser) {
    Write-Host "Found user in the site: " $siteUser.Title
} else {
    Write-Host "Could not find user in the site: " $siteUser.Title
}


# now we detect if there is a user id mismatch issue
# normally user id and sid should be the same in all 3 user objects from entra id, upsa and site
$userIdMismatch = $false

# compare SID from site and UPSA
$upsaSID = ($UserProp["SID"].split("|") | Select-Object -Last 1).split("@") | Select-Object -First 1
if($upsaSID -eq $siteUser.UserId.NameId) {
} else {
    Write-Host "SID mismatch found." -ForegroundColor Yellow
    Write-Host "SID from User Profile:" $upsaSID
    Write-Host "SID from Site User   :" $siteUser.UserId.NameId
    $userIdMismatch = $true
}

# compare User Id from site and UPSA
if ($UserProp["msOnline-ObjectId"] -eq $siteUser.AadObjectId.NameId) {
} else {
    Write-Host "User directory object Id mismatch found." -ForegroundColor Yellow
    Write-Host "User Id from User Profile:" $UserProp["msOnline-ObjectId"]
    Write-Host "User Id from Site User   :" $siteUser.AadObjectId.NameId
    $userIdMismatch = $true
}

# compare User Id from site and directory
if ($adUser.Id -eq $siteUser.AadObjectId.NameId) {
} else {
    Write-Host "User directory object Id mismatch found." -ForegroundColor Yellow
    Write-Host "User Id from Directory:" $adUser.Id
    Write-Host "User Id from Site User:" $siteUser.AadObjectId.NameId
    $userIdMismatch = $true
}

if ($userIdMismatch) {
    Write-Host "The User Id Mismatch Issue was found on the site for the user."
    Write-Host "We'll remove User from the UIL which also removes all user's permissions."
    Write-Host "User will need to request permissions again - but this time it should work."
} else {
    Write-Host "We did not find User Id Mismatch Issue on the site." -ForegroundColor Green
    Exit
}

# Next, we'll ask for confirmation then delete user id from site and add it back

$confirmation = Read-Host "Please confirm (y/n)"
if ($confirmation.ToLower() -eq "y") {
} else {
    Write-Host "User deletion was not confirmed. The Issue is not fixed." 
    Read-Host "Press any key to exit"
    Exit
}

# Fix the issue by removing the user and re-adding
# remove
Remove-PnPUser -Connection $connectionToSite -Identity ("i:0#.f|membership|$upn") -Force
if ($?) {
    Write-Host "Successfully removed user from site." 
} else {
    Write-Host "Something went wrong... Could not remove user from site."  -ForegroundColor Yellow
    exit 1
}
# add
$web = Get-PnPWeb -Connection $connectionToSite
$web.EnsureUser("i:0#.f|membership|$upn") 

# Validate
$newSiteUser = Get-PnPUser -Connection $connectionToSite -Identity ("i:0#.f|membership|$upn") -Includes AadObjectId
if ($newSiteUser) {
} else {
    Write-Host "Something went wrong... Just added user was not found on the site..."  -ForegroundColor Yellow
    Exit 1
}
if ($newSiteUser.Id -ne $siteUser.Id) {
    Write-Host "Added user to the site with no permissions."
} else {
    Write-Host "Something went wrong... Just added user got the same site user Id..."  -ForegroundColor Yellow
    Exit 1
}

Write-Host "Finished."
Read-Host "Press any key to exit"
Exit
 

Fix the issue “everywhere” at once

The “fix” provided by Microsoft and my PowerShell script above resolves the issue for one specific user at one specific site. But usually the issue is not isolated to one site… All sites accessed by “old” user are impacted. How can we fix all sites for the user?

Also, usually it’s not the only one reused Id in tenant. The older your tenant is the more reused Ids you have. How can we fix all sites for the all user with reused UPNs?

When the UPN is reused – we already know that the user sooner or later will be facing the SharePoint user id mismatch issue. From the user perspective the issue is not an easy to detect. It might take time for user to realize that something is wrong and submit ticket and get a solution. Is it possible to take care of the issue proactively, for all sites and all user?

Here is my article: Preventing SharePoint User ID Mismatch: a Tenant‑Wide Approach

References

My code samples at GitHub: Detect and Fix User Id Mismatch issue with PowerShell

Restoring Connection to Teams for a SharePoint Site

Sometimes a restored SharePoint site looks like it’s connected to a Microsoft 365 group (and Teams), but it’s actually a standalone site. So just restoring a deleted SharePoint site that was previously connected to team is not enough, there is some more work to be done. This article explains (from SharePoint admin standpoint) how that could happen and how to fix the broken SharePoint site to restore it’s lost connection to group and teams (the right way).

Scenario

A Teams-connected SharePoint site was deleted by one of the team owners during a cleanup. They didn’t see any useful content in Teams channels or files, so they deleted the team—along with the connected SharePoint site.

However, some team members had been using the SharePoint site directly (not through Teams). Two months later, they tried to access the site and received a 404 error. They contacted IT support to ask what happened and whether the data could be restored.

IT support found that the team was deleted by someone who had already left the company. Fortunately, the SharePoint site was still in the recycle bin (retained for 90 days), so it could be restored. But the Microsoft 365 group and the team (with chat messages, etc.) were already permanently deleted (retention is only 30 days).

After restoring the site, it appeared to be group-connected, but the group no longer existed.

Symptoms of a Broken Connection

  • Site permissions show ownership by a group, but clicking the group name does nothing.
  • Searching for the group in Microsoft 365 returns no results.
  • PowerShell shows a RelatedGroupId, but that group ID doesn’t exist in Entra ID.
  • The site behaves like it’s group-connected but lacks full functionality.

Normal Teams-Connected Site vs. Standalone Site

Let us test it from scratch. I will create a new team called “Test-Broken-Team-Site”.

Here is how the normal teams-connected SharePoint site looks like. When you hover your mouse over the site name, a pop-up window appears showing team details.

When you go to the site permissions – you can see that the site is owned by group “SiteName Owners”:

If you click the group name, another pop-up window appears with more information, including group members:

Let us get site object with PnP PowerShell:

$pnpTenantSite = Get-PnPTenantSite -Connection $connectionAdmin -Identity $siteUrl -Detailed
$pnpTenantSite | select Url, Template, IsTeamsConnected, GroupId, RelatedGroupId,  Owner | fl

Results:

You can see that IsTeamsConnected property is true and GroupId and RelatedGroupId are specified and the site owner is the same group Id with “_o” suffix.

Compare this with the same request against a standalone site:

IsTeamsConnected property is false, Group id is “00000000-0000-0000-0000-000000000000” and the site owner is the real user id.

Deleting the team and the site

I also posted some messages in the general team channel and created some test documents. Now let me delete the team. Any team owner can do this via:

What users will see after the team deletion:

“404 FILE NOT FOUND” error upon any attempt to go to the SharePoint site via browser:

The deleted group under “https://myaccount.microsoft.com/groups/deleted-groups”:

From the admin standpoint the deleted resource looks like.

The group appears under “Deleted Groups” in Entra ID and Microsoft 365 Admin Center (note that the group can be restored within 30 days):

The site appears under “Deleted Sites” in SharePoint Admin Center (retained for 93 days and marked as group-connected with a team), and the site is marked as Microsoft 365 group connected and with a team:

Restoring SharePoint site

After 30 days the group is deleted permanently, including teams stuff, but SharePoint site is still retained. So we can go ahead and restore SharePoint site from the SharePoint admin center. It warns us that “We couldn’t find the Microsoft 365 group connected to this site. Restoring the site will not restore the group.”:

Ok, for the restored site – let us look at the site memberships. You’ll see the site is still owned by the Microsoft 365 group—but the group no longer exists. 🙁

That is the reason that users (team members) will not get access to the site automatically once the SharePoint site is restored. But let us get the SharePoint site PowerShell object:

GroupId is zeroes, which is good, IsTeamsConnected if false, which is correct, but the RelatedGroupId is still the same (as if it is a channel site) and the owner is the same.

Note: the site’s status described above is not always lake that. I’m not sure why, but in my practice so far some sites are getting restored with GroupId specified (and running ahead, in such cases this solution does not work).

User experience

(I provided access for myself to this site as admin).

The home page (site root) looks like something in between a Teams-connected and standalone site. There is no Teams icon and no pop-up window when hovering over the site title. But there is a “Conversation” menu we usually have on group-based sites (by the way, it fails if you click on it, because it’s supposed to send you to the group in Outlook… so you’ll get “Sorry, something went wrong” – “Invalid group ID or group alias.”)

"Sorry, something went wrong" - "Invalid group id or group alias."

Site settings page looks like the group-based site settings page. Compare standalone site settings page:

and broken teams connection site settings page… Specifically, you still do not have the “Users and Permissions” section (as it is supposed to be handled via Teams and group membership).:

And here is one more difference. On a regular standalone site when you are clicking on a gearbox – you can see “Connect to new Microsoft 365 Group” link which would allow user to convert this standalone site to a teams-connected site. Unfortunately, there is no such option on the broken site.

So what should we do? Can we re-connect this site to teams or make it true standalone site? Would this broken site stay as broken forever?

Is there a fix for broken teams connection in SharePoint site

First of all, you can’t change GroupId or RelatedGroupId directly—they’re read-only.

Let us try to change site primary site owner (remember it was a group) and see what has changed:

Set-PnPTenantSite -Identity $siteUrl -PrimarySiteCollectionAdmin $adminUPN

Hmm… primary site owner is a user, but SharePoint admin center still thinks the site is owned by non-existing group:

Changing the site owner from a group Id to a user id doesn’t help. SharePoint admin center still shows the deleted group as owner.

Let us try “Add-PnPMicrosoft365GroupToSite” to connect site to a new group via PowerShell.
Hooray! This did work!!!

The command worked perfectly:

Add-PnPMicrosoft365GroupToSite -Url $SiteURL -Alias "newM365GroupForBrokenSite" -DisplayName "New Team/Group for a broken site"  -KeepOldHomePage

Note: sometimes this does not work. The PowerShell cmdlet says “The site is already connected to group”…

Group was created in Entra Id and connected to SharePoint site:

SharePoint site is owned by a new group (the old one we will delete):

PnP PowerShell object contains correct information:

The only 🙂 problem: it says the site is team-connected, but it’s not.

If you click on a Teams icon near to the site title – it’ll give you “We’re still setting up the Microsoft Team for this group” “Please come back in a few minutes”. This message might last forever…

Ok, we have a m365 group and a group-based site without a team. Can we create a team from an existing group? Yes. Let us try it.

When you create a team – there is a link “More create team options”. It leads us to the list of options and one of them – create a team from group. There will be a list of groups and one of them would be our “New Team/Group for a broken site”. Select it. It say OK, a new team created.

Now let us see what we got.

It seems like it worked! Now we have a consistent full-functioning group-based site connected to team.

At the SharePoint site – teams icon redirects us to a team channel.
In the teams app – the team is listed among other teams.
Entra Id displays all the services correctly.
Teams admin center can see the team and all the settings look good.
SharePoint admin center also displays a team correctly. You might want to update “Don’t show team email address in Outlook”.

Standard Channels Confusion

One thing that might confuse users is channels. Long ago when you create a team – a channel named “General” was created by default. Not far ago Microsoft changed creating team experience – now you need to provide a name for channel. As you know – channel is a folder in the default document library. So our “broken” site has a folder “Test-Broken-Team-Site” that used to be a sole channel. When we created a team from an existing group (group with site) – a new default main channel was created named “General”, so under SharePoint we can see two folders, and under teams we can see only “General” channel.

But all our data was under the old folder. Can we fix it? I think of two options.

Option 1 – add a tab to the channel – so we can see the existing folder under the main channel:

Option 2 – moving content of the “old” folder to a “new” folder, then you can delete the old folder and rename channel to the original name.

Private and Shared channels

The other thing that went wrong is private and shared channels. As you know, these channels are created as standalone sites related to team (site object has GroupId as zeroes, but RelatedGroupId would be an Id of the main site’s group id.). These sites are not getting restored automatically when a main site is restored. Moreover, in the SharePoint admin center those site are not visible under deleted sites.

The good news is these sites are visible with PowerShell. And you can restore the site with PowerShell:

Get-PnPTenantDeletedSite | ft SiiteId, Url, Title, DeletionTime, DaysRemaining
$siteUrl = "https://contoso.sharepoint.com/teams/Team-PrivateChannel"
Restore-PnPTenantSite -Identity $siteUrl 

The site will be restored, but, again, with broken connection to team. And I’m afraid it cannot be re-connected to a team, so it has to stay broken standalone site (or converted to a new-group-based which is a preferred option and if you like – with a team.

Summary

Quick Step-by-Step Recovery Guide

  • Restore the site via SharePoint Admin Center
  • Verify that the site connection is broken
    Check properties IsTeamsConnected, GroupId, and RelatedGroupId. Ensure group is permanently deleted.
  • Set yourself as a new primary site collection admin
  • Connect to a New Microsoft 365 Group via PowerShell “Add-PnPMicrosoft365GroupToSite”
  • Create a New Team from the Group.
    In Teams, go to Create Team > More Options > Create from Existing Group. Verify Everything Works.
  • Handle Folder/Channel Conflicts.
    • Option 1: Add it as a tab in the new “General” channel.
    • Option 2: Move content to “General” folder, delete old folder, and rename channel.
  • Channel sites (private channel, shared channel) are not restored and connected automatically.

References

Securing Azure Function App for Full Compliance

WIP: Work In Progress

There are several assertion regarding how an Azure Function App should be configured according to security best practices. Think of each one as a requirement or policy Azure Function App should be compliant with. Azure Function App setup usually includes other Azure services – like Storage account, Key Vault, Networking etc. Some of the requirements contradict others. Blindly following remediation steps might break function app. Let us think of it holistically and propose an ideal Azure Function App configuration.

Highly recommended policies (configurations) are:

Recommended policies (configurations) are:

  • Azure function app should use latest HTTP version
  • Azure geo-redundant storage should be enabled for storage accounts
  • function apps should only be accessible over https
  • function apps should have client certificates (incoming client certificates) enabled
  • storage account public access should be disallowed
  • versioning for Azure Storage should be enabled
  • storage account should use private link
  • storage accounts should restrict network access using virtual network rules
  • storage accounts should prevent shared key access
  • managed identity should be enabled on function apps
  • Azure key vaults should have purge protection enabled
  • Azure key vaults should use private link
  • Azure key vaults should use RBAC permission model
  • Azure app service diagnostics logs should be enabled
  • Azure app should use private link
  • Azure function app should have authentication enabled

Our ideal Azure Function App configuration.

Step-by-step guide securing Azure Function App

Create an OotB Function App

Let us first build a working function app created “as is”, with all settings left by default, so we could apply best practices later. First, we’d need a new resource groups, then we’d create a function with “App Service” (aka Dedicated) hosting plan:

“App Service” (Dedicated) hosting plan is required as it is the only one that will allow us to satisfy all security best practices under Windows. Alternatives might be (tbc) Container or Flex Consumption – both Linux-based.

I will use PowerShell – so I have selected Code (not container) under Windows and PowerShell 7.4. runtime stack. All the other settings are by default – new auto-created storage, “Enable public access” – On, “Enable virtual network integration” – Off, new auto-created application insights etc.

You can use whatever runtime stack you are comfortable with – C#, Python etc. As this is what we need to ensure function is working before and after we applied all the security best practices. Actual steps to secure the function app are not depending on runtime stack chosen.

Create a simple Function and deploy it to Function App

We`d need a fully working function that access SharePoint. Ideally, I’d create a key vault and save credentials in the key vault. I’d provide access to the key vault for my function app so my code would pull credentials when needed and access Microsoft 365 (you can refer to “Connect to SharePoint via Graph API from Azure Function App” for the detailed step-by-step process), but since we are going to get rid of key vaults and use Managed Identities – I’ll save app secret in the environment variable for now.

Import modules

So, I created a simple OotB PowerShell timer-triggered function and deployed it to My function app. Then I updated requirements.psd1:

# requirements.psd1
@{
    'PnP.PowerShell' = '3.*'
}

and I updated function code itself (run.ps1)

# run.ps1
param($Timer)
$currentUTCtime = (Get-Date).ToUniversalTime()
if ($Timer.IsPastDue) {
    Write-Host "PowerShell timer is running late!"
}
Write-Host "PowerShell timer trigger function ran! TIME: $currentUTCtime"
Write-Host "##############################################"
Write-Host "Check modules installed:"
Import-Module PnP.PowerShell 
Get-Module PnP.PowerShell
Write-Host "Check command available:"
Get-Command -Name Connect-PnPOnline -Module PnP.PowerShell | select Version, Name, ModuleName
Write-Host "##############################################"

Check function invocations, ensure function is running correctly – PnP.PowerShell module is imported and ready to use.

Credentials to access SharePoint

As I mentioned, we will temporary be using environment variables to keep secrets – so we ensure the function does have access to SharePoint. For this we need

  1. register a new application under Entra Id and configure it to access SharePoint
    here is the guide: “Authentication to Microsoft Graph: Azure Registered Apps Certificates and Secrets
  2. put secret in an environment variable
    you can use vscode local.settings.json or update environment variables manually under Azure Function App

VSCode local.settings.json:

{
  "IsEncrypted": false,
  "Values": {
    "AzureWebJobsStorage": "",
    "FUNCTIONS_WORKER_RUNTIME_VERSION": "7.4",
    "FUNCTIONS_WORKER_RUNTIME": "powershell",
    "ORGNAME": "contoso",
    "TENANT_ID": "your-tenant-id",
    "CLIENT_ID": "your-client-id",
    "TMP_SECRET": "This is a secret",
    "ADMIN_URL": "https://admin.microsoft.com",
    "SITE_URL": "https://contoso.sharepoint.com"
  }
}

Finally you should have something like this under environment variables of you Function App:

environment variables under Azure Function App

Access SharePoint from function

Now let us update the function code with actual connections to SharePoint tenant and to Specific site.
I will try to connect to SharePoint via PowerShell module PnP.PowerShell and via plain web-requests calls to Microsoft Graph API.

Add the following (PnP part) to your function code run.ps1:

$orgName = $env:ORGNAME
$tenantId = $env:TENANT_ID
$clientID = $env:CLIENT_ID
$clientSc = $env:TMP_SECRET
$adminUrl = $env:ADMIN_URL
$siteUrl = $env:SITE_URL

#############################################################################################
Write-Host "Let us connect to SharePoint via PnP:"
$connectionToTenant = Connect-PnPOnline -Url $adminUrl -ClientId $clientID -ClientSecret $clientSc -ReturnConnection
Write-Host "Connected to admin site:" $connectionToTenant.Url
$tenantSite = Get-PnPTenantSite -Url $siteUrl -Connection $connectionToTenant
Write-Host "Tenant site title:" $tenantSite.Title
$connectionToSite = Connect-PnPOnline -Url $siteUrl -ClientId $clientID -ClientSecret $clientSc -ReturnConnection
Write-Host "Connected to regular site:" $connectionToSite.Url
$site = Get-PnPSite -Connection $connectionToSite
Write-Host "Site title:" $site.Title

The the direct calls to MS Graph API:


#############################################################################################
Write-Host "##############################################"
Write-Host "Let us get token to connect to Microsoft Graph:"
# Construct URI and body needed for authentication
$uri = "https://login.microsoftonline.com/$tenantId/oauth2/v2.0/token"
$body = @{
    client_id     = $clientid
    scope         = "https://graph.microsoft.com/.default"
    client_secret = $clientSc
    grant_type    = "client_credentials" 
}
$tokenRequest = Invoke-WebRequest -Method Post -Uri $uri -ContentType "application/x-www-form-urlencoded" -Body $body -UseBasicParsing
Write-Host "Token request status:" $tokenRequest.StatusDescription
$token = ($tokenRequest.Content | ConvertFrom-Json).access_token
$headers = @{Authorization = "Bearer $token" }

Write-Host "Let us connect to SharePoint via Microsoft Graph:"
$apiUrl = "https://graph.microsoft.com/v1.0/sites/$orgname.sharepoint.com"
$rootSite = Invoke-RestMethod -Headers $Headers -Uri $apiUrl -Method Get
Write-Host "Root site Url:" $rootSite.WebUrl
Write-Host "Root site display name:" $rootSite.displayName
#############################################################################################

Check function invocations, ensure function is working good getting SharePoint site via Microsoft Graph, but failing trying to get SharePoint site via PnP. The reason is PnP use SharePoint API under the hood, and calling SharePoint API require authentication with a certificate (but we have a secret here), though it’s OK to call Microsoft Graph API being authenticated with secret.

We will solve the SharePoint API secret/certificate problem below. Now it’s time to secure function according to the best practices.

Securing Azure Function App

Azure key vaults should have firewall enabled

If you are using key vaults to keep secrets or certificates – it is highly recommended to enable and configure the key vault firewall, so your secrets will not be accessible to any public IPs, but to only selected IP addresses/services. More details: Microsoft Network security for Azure Key Vault

Alternatively you can use environment variables for secrets (considered as valid option, but less secure).

Another option (considered as more secure) is to use managed identities (system-assigned or user-assigned). This option works if your workload is fully hosted by Microsoft – in Azure or Microsoft 365.
More details on using MI:
Connecting Azure Function to Microsoft 365 with Managed Identity
Securing Storage Account in Azure Function
Azure Function Storage accessed with Microsoft Entra Id Managed Identity

Azure network peering restrict to same subscription

It is highly recommended to prevent the creation of vNet peerings outside of the same subscription.
Check Microsoft Azure virtual network peering for details.

TBC

Proactive SharePoint: Essential Initial Configurations for Every New Microsoft 365 Tenant

In this article I will share what I would recommend to configure on every new Microsoft 365 Tenant.

The Challenge: Why Many Microsoft 365 Tenants Become Unmanageable and Inefficient Over Time

Many organizations adopting Microsoft 365 quickly discover that while the platform offers immense power, its default configuration often leaves crucial features disabled. These “dormant” functionalities, designed to enhance data governance, search capabilities, content management, and user experience, remain untapped. The real problem arises when a tenant matures: as users populate SharePoint sites and OneDrive accounts with vast amounts of information, and as collaboration intensifies, attempts to enable these critical features become incredibly complex, disruptive, and even risky. Retrofitting governance, re-indexing content, or restructuring information architecture on an existing, data-rich tenant can lead to compliance headaches, data inconsistencies, user frustration, and significant administrative overhead. SharePoint administrators frequently struggle with the technical debt accrued from these missed initial configurations, spending countless hours trying to bring order to an environment that could have been optimally set up from day one.

Consider the following.

Ownerless resources

Having an owner for every Microsoft 365 resource should be enforced from day one.

Sensitivity labels

This step is an essential prerequisite for the other governance features. I have an article explaining ownerless Microsoft 365 groups policy in details and more KBAs regarding ownerless SharePoint resources.

Oversharing in SharePoint

Oversharing in SharePoint is a serious problem. The earlier you start addressing it – the easier you life as SharePoint engineer. Here are some thought: Control Oversharing in SharePoint Online: Smarter Access Management in Microsoft 365

User profiles to Term Store mapping

There is an OotB misconfiguration in Microsoft 365 User Profiles mapping to Term Store Metadata. Here is the KBA how to configure User Profiles correctly.


WIP


Why this approach?

  • Relatability: It immediately speaks to the pain points experienced by many SharePoint admins (“unmanageable,” “inefficient,” “struggling with it,” “technical debt”).
  • Highlights the “Why”: It explains why these features are off and why it’s a problem to turn them on later.
  • Emphasizes Proactivity: It sets the stage for your solution, which is about proactive setup.
  • Strong Call to Action (Implied): It makes the reader understand that your KBA will provide the solution to avoid these common pitfalls.

Controlling Oversharing in SharePoint Online: Smarter Access Management in Microsoft 365

Oversharing remains one of the most persistent challenges in SharePoint Online. With the introduction of Microsoft Copilot and its AI-powered search capabilities, the issue has become even more visible—and more urgent to address. Microsoft has acknowledged this by introducing the SharePoint Advanced Management suite, aimed at helping administrators to bolster content governance throughout the Microsoft Copilot deployment journey.

Why Does Oversharing Happen?

In most cases, oversharing is unintentional. Based on my experience, the root causes typically fall into four categories:

  1. Unaware Sharing: A user shares a site, library, or folder without realizing it contains sensitive information.
  2. Unaware Uploading: A user uploads sensitive content to a location that is already broadly shared.
  3. Human Error: Mistakes like selecting the wrong group or sharing a folder instead of a file.
  4. Convenience: Users opting to share with “Everyone” to avoid the hassle of managing individual permissions.

Why It’s a Bigger Problem Today

In the past, search in Microsoft 365 was content-driven—you had to know what you were looking for. Today, search is context-driven. Microsoft 365 proactively surfaces content with suggestions like “Here’s what might be interesting to you” or “Here’s what others are working on.” This increases the risk of oversharing content being exposed.

Separate issue, non-technical, but related to the subject – not every user knows that search in Microsoft 365 is security-trimmed, i.e. provides results from only what this specific user has access to. Sometimes people might think of Microsoft 365 search the same way as general internet search (If a can see it – then everyone can see it, or why my private documents appear under Bing search?).

The Admin Dilemma

As SharePoint administrators, we’re caught in a classic catch-22:

  • Complex Microsoft products
  • Users prone to mistakes
  • Management demanding simple, fast solutions

What seemed like straightforward fixes for oversharing actually concealed the true issue, generating new problems, increasing admin burden, perplexing users, and ultimately hurting company productivity. Examples are (I would never do that):

  • Exclude sites from search indexing (Set “Allow this site to appear in search results?” to No)
  • Turn off Item insights, turn off People insights (turn off Delve)
  • Truncate enterprise search with “official” sites only (via query)

Microsoft offers two solutions: “Restrict discovery of SharePoint sites and content” and “Restricted SharePoint search”. Both solutions aimed to exclude content from search and from Copilot. Microsoft: “Restricted SharePoint Search allows you to restrict both organization-wide search and Copilot experiences to a curated set of SharePoint sites of your choice… and content users own or that they have previously accessed in Copilot.”. “With Restricted Content Discovery, organizations can limit the ability of end users to search for files from specific SharePoint sites.”

Microsoft clearly says that “limit the ability of end users to search” is a temporary measure that “gives you time to review and audit site permissions”… “to help you maintain momentum with your Copilot deployment while you’re implementing comprehensive data security”. Also: “Sites identified with the highest risk of oversharing can use Restricted Content Discovery to protect content while taking time to ensure that permissions are accurate and well-managed”.

Microsoft highlights that “Overuse of Restricted Content Discovery can negatively affect performance across search, SharePoint, and Copilot. Removing sites or files from tenant-wide discovery means that there’s less content for search and Copilot to ground on, leading to inaccurate or incomplete results”.

And finally “Restricted Content Discovery doesn’t affect existing permissions on sites. Users with access can still open files on sites with Restricted Content Discovery toggled on.”. I.e. solutions “Restricted SharePoint Search” and “Restricted Content Discovery” do not solve the root cause of the problem (oversharing), but make the problem less visible.

With over 15 years of experience in SharePoint and more than a decade working with Microsoft 365 and Azure—including large-scale tenants—I’ve seen this problem evolve. Now, with Copilot in the mix, it’s more critical than ever to implement a robust access management strategy.

Controlling Oversharing in SharePoint Online: Smarter Access Management in Microsoft 365

How to solve the real oversharing problem
(My Ideal “No-Oversharing” Tenant Configuration)

Here’s what I would recommend for minimizing oversharing in a Microsoft 365 environment (think of it as SharePoint Governance):

1. Remove “Everyone” and “Everyone Except External Users”

Disable these groups in the people picker to prevent broad, indiscriminate sharing. Instead, provide other options for sharing content with larger audiences (see below).

2. Implement Sensitivity Labels for Sites

  • Enforce mandatory sensitivity labels for all sites.
  • Labels should control site visibility (e.g., Private, Public) and be clearly named

The label is visible across all interfaces—Teams, SharePoint, libraries, lists, folders—so users always know how wide the content is shared from the sensitivity label.

3. Empower Users with Guardrails

  • Allow users to create Teams and communities, but enforce sensitivity labels.
  • Enable requests for standalone sites (Team or Communication) with required labels.
  • Disallow private or shared channels under public Teams to avoid label mismatches (e.g., a private channel labeled “Public”).

Benefits of This Approach

Once implemented:

  • Users will always know whether a site is private or public.
  • Sharing with “Everyone” on private sites will be technically impossible.
  • Users needing broad access can request public sites, e.g.
    • Public Teams for collaboration with everyone (allows read/write access)
    • Communication site for publishing information (allows read only access)

Yes, this may lead to more sites and Teams. Yes, this may lead to more tickets from users who at private site wanted to break permissions as usual and share list or library or folder with everyone. Yes, we would need to develop automation that can help manage the scale. But that’s a worthwhile trade-off for reducing oversharing!

More to consider

Large Custom Security Groups

There might be Large Custom Security Groups in tenant. What if the user wants to share site with one of these Large Custom Security Groups? What kind of site that would be? Private? Public?

Consider the following. When a team owner adds a security group to team members – it’s not a group added, but individual users. That makes sense – all team members can clearly see who are the other team members. That makes the team private. Private team should not be additionally shared at SharePoint site level. Only permissions should be provided through team.

Public team – as well as public standalone site – can be shared with EEEU. But what if the requirements are not to share the site with “Everyone…” but share with some other Large Custom Security Group – e.g. “All employee” or “All Central Office Users”? Can we do it? Should site be private or public in this case?
My opinion: site should be labelled as public. Site owner can request a public standalone site or create a team self-service, then site owner can remove “Everyone…” group from permissions and add a custom security group at any level.

Some orgs choose to recommend providing access to the standalone SharePoint sites via security groups vs SharePoint groups. So it is possible we have a private standalone site with access provided to security group (or m365 group). This is where an or should have their own policy – how big the group should be to be considered as large group and trigger site label as public. There are also dynamic security groups.

Automation Requirements

To support this model, we’ll need (at least) the following custom-designed solutions:

  • Automated Site Provisioning: A request-and-approval process for creating labeled standalone sites.
  • Channel Monitoring: A custom solution to detect and flag private/shared channels under public Teams, since there’s no out-of-the-box enforcement.
  • Large Custom Security Groups Monitoring: make a list of large custom security groups users can share information with – and check on scheduled bases – if the site is shared with large custom security group – site must be labelled as public.
  • Sharing site with “Everyone except external users” : If user accidentally removes “Everyone except external users” from public site – there must be an option for user to add “Everyone except external users” with permissions Read or Edit. Site can be shared with “Everyone except external users” only at the root site level and only if site labelled as Public.

Environment Clean-Up

To prevent oversharing, we should not only “from now on” follow the strategy described above, but also make sure our existing sites are compliant with our governance. This would be another challenge.

References

Removing a user from the Everyone Except External User group in SharePoint Online

A common question in SharePoint Online is: How can we block access for a specific user to all sites? In SharePoint Server (On-Premises), this was relatively simple—we could apply a “Deny” policy at the web application level. However, SharePoint Online doesn’t expose web application settings, so there’s no direct way to say, “Block this user from accessing SharePoint.”

In SharePoint Online, access is granted—not explicitly denied. To prevent a user from accessing SharePoint content, you must ensure they are not granted access in the first place. This becomes tricky due to the built-in group “Everyone except external users”, which automatically includes all internal users. If a site or resource is shared with this group, the user in question will also gain access—there’s no way to exclude them from this group.

Despite this limitation, there is a workaround. While you can’t remove a user from the “Everyone except external users” group, there are strategies to restrict their access effectively. Consider the following options (and we’ll deep dive in all options, discussing pros and cons):

  1. Stop Using “Everyone except external users” for Permissions and
  2. Block Access via Conditional Access
  3. Make the user “Internal Guest”

(bonus) Validate the user does not access SharePoint

1. Stop Using “Everyone except external users” for Permissions

To exclude (hide) “Everyone Except External Users” claim in People Picker – you’d use

Set-SPOTenant -ShowEveryoneExceptExternalUsersClaim $false

Though this option looks simple at first – it would require some extra work, because

  • you’d need to deal with existing shares with “Everyone Except External Users”
    should you remove all shares with “Everyone Except External Users”? What to replace it with?
  • you’d need to deal with “public” groups, teams, sites
    Public group-based site (team) will have “Everyone Except External Users” in members by default and even if you remove it – it’ll be added again automatically (?)
  • you’d need to provide an alternative for scenarios where sharing with everyone is a requirement
    what alternative? See below.

Assign Permissions Using Custom Groups

The idea is to create a custom security group (e.g. “All internal users”) or a couple of custom security groups (e.g. “All employee” and “All contractors”) and include in these groups all users who we want to have access to SharePoint except those who we want to keep out of SharePoint. Again, sounds simple, but I anticipate the following challenges.

You do not want to manually add every new account to these groups. So these groups must be dynamic – if so – you’d need to figure out criteria – consequently you’ll end up creating a custom user property and you’d have to setup this property. Alternatively – you’d need to automate assigning users to these groups as part of onboarding.

If you are a part of enterprise with on-prem directory synced to cloud – you’d told by Identity management that this is a very bad idea – to sync 99,900 accounts out of 100,000 total accounts to a custom group.

So, this option – using custom security group as an alternative to “Everyone Except External Users” would work well in small tenants, but in medium and large – would require some extra work.

2. Block Access via Conditional Access

You can create a Conditional Access Policy to block access for specific users to SharePoint Online from Microsoft Entra Admin Center -> Security > Conditional Access. You’d create a new policy, select the user(s) to exclude, select app – Office 365 SharePoint Online, choose Block access. Once the policy enabled, the selected user(s) will be blocked from accessing SharePoint Online and OneDrive.

First of all this option might cost you some money, as it requires Azure AD Premium P1 or P2 (or
Microsoft 365 Business Premium or Microsoft 365 E3 or E5).

Second, as it says, your user in question will be fully blocked from accessing SharePoint Online and OneDrive. But what if they still need access a few sites while being removed from ‘Everyone Except External User’ group?

3. Make the user “Internal Guest”

This option is not so obvious, but in many cases might work better than all others. Here is the idea. Actually it is not always external users are guests and internal users are members. You can have internal guests and external members (see this Microsoft’s article). There is a property in Entra Id – “User type” and usually it’s a “Member” for internal users – users created in Entra Id or synced from on-prem AD. External users are usually have User type as “Guest”. Only users with type “Member” are included in the built-in “Everyone Except External User” group.

So you’d need to change user type in Entra Id from Member to Guest – and in a couple of hours this user will loose all access to SharePoint provided via “Everyone Except External User” group. But, at the same time – you’ll be able to provide access for this user on individual basis.

Note: changing user type from Member to Guest comes with important implications and limitations. In a nutshell, a user becomes a Guest, e.g. a user cannot browse the full directory, have restricted access to Microsoft 365 Groups and Teams features. Changing the user type may affect audit trails, compliance policies, and conditional access rules that differentiate between internal and external users.

Validate the user does not access SharePoint

This is not an answer to question “How to remove a user from “Everyone Except External User” group”, but answer to question “How to ensure a user is not a part of “Everyone Except External User” group” or “How to ensure a user does not have access to SharePoint if access is provided via “Everyone Except External User” group”.

  • site admin can check user’s permission via Site settings – Advanced – Permissions – Check Permissions
  • SharePoint admin can check audit log

Note: Removing a user’s SharePoint license does not remove their access if permissions are still granted via this group

SharePoint Site Ownership Policies Deep Dive

SharePoint Site Ownership Policies comes with SharePoint Advanced management or Copilot and is part of Site Lifecycle Management. In a nutshell, it does 1) Identify sites that don’t meet organization’s ownership criteria, 2) send notifications to find new site owners or admins and 3) automatically mark sites in read-only (or just report). Below is my deep dive in this policy.

I will not retell what is already documented by Microsoft, but you can find some gotchas below.

Notification emails start coming in a few minutes after you activate the policy. From email address is
SharePoint Online <no-reply@sharepointonline.com> .

Here is how a notification email looks like (in case site has one owner and need another one):

SharePoint Site Ownership Policies Notification email example (in case site has one owner and need another one)

Site Name (title) is mentioned 4 times. There are 3 links in the email (SharePoint logo, site title and “Go to site” button) – all lead you to the root of the site that needs an owner.

The email template is not customizable at the moment (June 2025) and might mislead a little, as it says “Site Name” needs a site owner. but site does have an owner. Policy want an existing single owner to assign as second owner, which is said further in smaller font and not much people are able to force themselves to read. (Update: we expect Microsoft released Site lifecycle management policies v 2 before Sep 2025).

What I really do not like here is that even for group-based sites (e.g. teams) the policy asks to add a “site owner“, though it should be “team owner”. The only difference is if the site is a teams-connected site – there is a subtitle “Connected to Teams”:

I’d also assume that some users will need additional instructions – how to add a second owner to the site. There might be a confusion in terminology – who is the site owner, like “there are plenty people in ‘My Site Owners’ group – why am I asked to add one more?”

In case the site does not have owners and the policy is configured to send messages to site members and/or manager, here is an example of the email notification:

SharePoint Site Ownership Policies Notification email example (in case site does not have an owner and needs one to be assigned)

Basically, the difference is it says “Would you like to be a site owner?” vs “Identify an additional site owner to ensure compliance.” and the button says “Become a site owner” vs “Go to site“.

You cannot forward this email to other users (you can, but content will not be the same). Here is the example:

SharePoint Site Ownership Policies Notification email example (in case something is not configured correctly at the Exchange level, or network or computer etc. ) and the message is rendered as "This email contains actionable items that aren't supported by this client. Use a supported client to view the full email."

There are other cases an email comes as “This email contains actionable items that aren’t supported by this client. Use a supported client to view the full email.”

Policy scope

set policy scope (SharePoint site ownership policy)

Sites regulated by policy

Configuring the policy, we can choose site template – e.g. Classic sites, Communication sites, Group connected sites without teams, Team sites without Microsoft 365 group and Teams-connected sites to scope down the policy with the kind of sites the policy will be applied to.

We know, that template site was created with does not actually guarantee the kind of site in it’s current state. E.g. we can convert classic site to a group-based site or we can create site with no team and later create a team for the site.

With that said,
Question: what Microsoft means by “Sites regulated by policy” – template site was created with or current site category?

Policy configuration

SharePoint Advanced Management -  Site Lifecycle management - site ownership policy - Configuration

Owners vs Admins

Another moment I’d like to clarify is what Microsoft means by owner and admin, as configuring the policy

  • Under the “Who should be responsible for each site?” we can specify “Site owners” and/or “Site admins”
  • Under the “Who should be notified (via email) to assign or claim site responsibility?” we can not only specify “Current site owners” and/or “Current site admins”, but also “Manager of previous site owner and admin” and “Active members”, which is really nice.

We know that for group-based sites “Group owners” of the Microsoft 365 group associated with site is actually goes to site collection administrators and nobody is added to SharePoint “site Owners” group by default. At the same time at the SharePoint site you can add users to site collection admins and/or to the default SharePoint “site Owners” group (the one with “Full Control” permissions. Moreover, nothing prevents us to create a SharePoint group “Site Business Owners” with e.g. read-only permissions to the site or e.g. create a SharePoint group “Board Members” with “Full Control” permissions to the site.

So, question: who according to Microsoft’s policy implementation are considered as site owners and site admins? Does it change for different types of sites?

Here is what I got from experience

Who should be responsible for each site?”
If “Site owners” selected – the policy will count members of the default site owners associated group for standalone (non group-based sites) towards the “Minimum owners or admins required for each site”.
Also (NB!) – when a user who received a notification clicks “Become a site owner” – a user will be added to the default site owners group (not to site collection admins).

When “Site admins” selected – the policy will count site collection admins for standalone (non group-based sites) towards the “Minimum owners or admins required for each site”.
When a user clicks “Become a site owner” – a user will be added to the site collection admins (not to default site owners group).

Does the policy count groups or disabled accounts? – TBC.

What if we select both – “Site owners” and “Site admins” under “Who should be responsible for each site”? Would that mean the policy would count both? I.e. one admin and one owner make the policy happy? Or there should be two admins and two owners? If a user accepts “Would you like to be a site owner – would the policy add user to admins ow owners? – TBC.

For the group-based sites this policy overlaps with the “Ownerless groups” policy (included in m365 subscription, configured under m365 admin -> Settings -> Org Settings -> Microsoft 365‎ Groups). What I noticed is in the case of two policies configured – this policy says “Message was already sent by another policy”.

“Who should be notified (via email) to assign or claim site responsibility?”
If this is a group-based site – “active site members” are only Microsoft 365 group members. If there are users in the SharePoint site members group – they’d be ignored.

Microsoft Ownerless Groups policy vs Site Ownership policy

tbp…

References, helpful links:

Connecting Azure Function App to Microsoft 365 via Graph API with Managed Identity

There is a well-known and well-documented way of connecting to Microsoft 365 SharePoint and Graph API from Azure Function App via keeping credentials (Client id and client secret) in the Azure Key Vault. In this article I explained how to configure Azure Key Vault so Azure Function can get credential and use them to access Microsoft 365 SharePoint and call Graph API. For this to work we need an App registration with permissions provided. But what if we assign permissions directly to the Function App?
As per Microsoft, managed identities enable Azure resources to authenticate to cloud services (e.g. Azure Key Vault) without storing credentials in code. Is it possible to use function managed identity to access Microsoft 365 SharePoint via PnP or Graph API? Follow me.

I assume we already have an Entra Id, a Microsoft 365 subscription in it and an Azure subscription in the same tenant.

Create a User Assigned Managed Identity

There are two types of managed identities in Azure – System assigned and user assigned.
If you go to Azure Function app -> Settings -> Identity – you’ll see these two options:

  • System assigned Managed Identity will be created automatically if you select Status:On and Save. Having System-assigned Managed Identity you can provide permissions to Azure resources (e.g. storage, key vault) to this specific instance of function app. If you create another function app that’d need the same access – you’d need to enable system assigned Managed Identity again, for this new instance and again provide permissions.
  • User assigned managed identity is created as standalone Azure resource, and will have it’s own lifecycle. A single Azure resource (e.g. Function App) can utilize multiple user assigned managed identities. Similarly, a single user assigned managed identity can be shared across multiple resources. So if you deploy another Function App that need the same permissions as your existing function app – you’d just assign the same managed identity to this new function app.

So before we assign a user-assigned managed identity to a resource, we need to create a user-assigned managed identity:

For the Name of your User Assigned Managed Identity consider something that would uniquely identify you (your team) and your project/app at tenant level, e.g. “m365-Enterprise-SharePoint-Engineering-Managed-Identity-Demo”:

Create and Configure a Function App

Create your function app as you usually do that. (If you want to kill two birds with one stone – create a function app with “App Service” – aka Dedicated plan – you’ll see how to secure your function app storage account access with Managed Identity).

I use PowerShell Core as runtime stack and Windows.

Once Function App is created – we need to create a function. I’ll do it via Azure Portal for simplicity and I’ll select timer-triggered function:

Ensure that this function works ootb correctly by triggering test run:

Then we’d need to assign a managed identity earlier created to this function app.
Navigate to Function App -> Settings -> Identity, select “User Assigned” and managed identity:

Disable Az

Navigate to Function App -> Functions -> App Files. Select “profile.ps1”.
Remove or comment out part that use Az module cmdlets:

Update function dependencies

Since I use PowerShell and PnP for this demo, I need PnP module loaded.
Navigate to Function App -> Functions -> App Files. Select “requirements.psd1”. Update your code by adding ‘PnP.PowerShell’ = ‘2.12.0’ to the required modules. Do not enable Az module:

It takes time for the function app to download and install PnP module so you can use it in functions.

Update function code

Add the following code to function:

# My custom code
Write-Host "My custom code started"
$siteUrl = "https://contoso.sharepoint.com/sites/Test101/"
$adminUrl = "https://contoso-admin.sharepoint.com"
$UserAssignedManagedIdentityObjectId = "b0bfe72c-73a9-4072-a78b-391e9670f4b9"

Write-Host "Connecting as admin..."
$connectionAdmin = Connect-PnPOnline -Url $adminUrl -ManagedIdentity -UserAssignedManagedIdentityObjectId $UserAssignedManagedIdentityObjectId -ReturnConnection -ValidateConnection
Write-Host "ConnectionAdmin:" $connectionAdmin.Url
Write-Host "Getting tenant site as admin..."
$site = Get-PnPTenantSite -Identity $siteUrl -connection $connectionAdmin
Write-Host "Got site:" $site.Url
Write-Host "Getting admin site..."
$site = Get-PnPSite -connection $connectionAdmin
Write-Host "Got site:" $site.Url

Now you can Test/run the function or wait 5 minutes, then check what is in logs. You should see, that

  1. connection ran successfully, but
  2. getting site failed with “ERROR: The remote server returned an error: (401) Unauthorized.”

And that is ok, as

  1. With Connect-PnPOnline we are authenticating. And since managed id exist – we were recognized
  2. Our managed Id does not have any permissions yet, so any request will fail

Now it’s time to provide actual permissions for the managed identity to the site.

Grant permissions for the managed identity to access SharePoint via Graph API

Here is the most interesting part – somehow we need to provide our user assigned managed identity with permissions to access SharePoint (or any other Microsoft 365 service) via Microsoft Graph API and/or SharePoint API. We already know how to grant permissions to an App Registration in Azure – there is a GUI for that. But with respect to managed identity – there is no GUI. It’s done via Microsoft Graph API or PowerShell. And we need admin permissions to assign roles to a managed identity.

Who can grant roles to a managed identities

It says a Global Admin permissions required to provide roles to a managed identity.

As usual, there are two options: delegated permissions and application permissions (here is where differences explained). In both cases you’d need an App Registration with the following API permissions assigned and consented :

  • Application.Read.All (or higher)
  • AppRoleAssignment.ReadWrite.All

If you have an app with delegated permissions – you’d need a Global admin role to be activated. Or you need an app with application permissions configured as below:

If you are getting something like this:

That means you configured an app incorrectly.

Assigning permissions with Microsoft Graph API:

tbp…

Assigning permissions with PnP PowerShell

Here is the code:

$Id = "..." # User Assigned Managed Identity Object Id = Principal Id
Get-PnPAzureADServicePrincipalAssignedAppRole -Principal $Id 
$role = "Sites.FullControl.All"
Add-PnPAzureADServicePrincipalAppRole -Principal $Id -AppRole $role -BuiltInType MicrosoftGraph
Add-PnPAzureADServicePrincipalAppRole -Principal $Id -AppRole $role -BuiltInType SharePointOnline

Issues found

What I found is that connection to a specific site does not work, .i.e. the following code:

$siteUrl = "https://jvkdev.sharepoint.com/sites/Test101/"
$UserAssignedManagedIdentityObjectId = "b0bfe72c-73a9-4072-a78b-391e9670f4b9"
Write-Host "Connecting to a specific site..."
$connectionSite = Connect-PnPOnline -Url $siteUrl -ManagedIdentity -UserAssignedManagedIdentityObjectId $UserAssignedManagedIdentityObjectId -ReturnConnection
Write-Host "ConnectionSite:" $connectionSite.Url
Write-Host "Getting site..."
$site = Get-PnPSite -connection $connectionSite
Write-Host "Got site:" $site.Url

returns [Error] ERROR: The remote server returned an error: (401) Unauthorized.

Update: it’s probably just a matter of time… After some hours the same code started working well.
Though here Microsoft says “To ensure that changes to permissions for managed identities take effect quickly, we recommend that you group Azure resources using a user-assigned managed identity with permissions applied directly to the identity”

Sites.Selected

Would everything above work if we need to provide access for the function app user assigned managed identity to a specific SharePoint site via Sites.Selected?

It works! I used a separate user-assigned managed identity, provided it with Sites.Selected API permissions, provided access for the managed identity to a specific site and it worked!

PnP.PowerShell version

Is there a difference in behavior of PnP.PowerShell v2 and v3? Let us see…

As for now, it works with both versions – PnP.PowerShell 2.12.0 and PnP.PowerShell 3.1.0

References

SharePoint Inactive Site Policies Deep Dive

SharePoint Advanced Management includes Inactive Site Policies under Site lifecycle management. Effective content lifecycle management is a key pillar of SharePoint governance. It plays a vital role in optimizing storage, preserving data integrity, and ensuring regulatory compliance. By systematically removing inactive or outdated sites, it also enhances security. Additionally, it supports successful Copilot implementation by ensuring that the information accessed is both accurate and current. So, how exactly this Inactive site policy works and what is the difference between Entra Id groups expiration policy and SharePoint Inactive Site Policy.

SharePoint Inactive Site Policy vs m365 Groups Expiration Policy

The Groups Expiration Policy has been a feature of Azure AD (Entra ID) for quite some time. It is included at no additional cost. This policy automatically notifies group owners about upcoming expirations and provides options to renew or delete the group. Since all self-created Teams teams and Viva Engage communities are backed by SharePoint sites and managed through Microsoft 365 Groups, this policy also plays a significant role in SharePoint governance ensuring that information stored in SharePoint remains current and properly maintained. I have an article Microsoft 365 group expiration policy deep dive.

Inactive Site Policy is a feature of SharePoint Advanced Management (SAM), which is an add-on and require premium SharePoint license. It also Identifies inactive sites, Sends notifications to site owners and can automatically archive or make sites read-only. Sound like very similar to to groups expiration policy.

Key differences

Inactive site policy user experience

Here is how the email notification looks like:

Note that

The email subject includes “Action required” and site title (name).
It always says “… has been inactive for more than a month” even if the policy configured for “6 months”.
It shows SharePoint logo, which might mislead “teams-oriented” users.
Site title is not clickable, so site admin/owner cannot just click site link but have to navigate to site manually.
When user clicks button “Certify site” – a message “The action completed successfully” pops up at the bottom of the email for a few seconds and then disappears. The email itself does not change, so when a user opens the same email again – there is no visual evidences the action was taken.

At the bottom of the email Microsoft mentions tenant name.

The email template is the same for all kinds of policies – it does not matter if the policy action is configured configured as “do nothing”, or to automatically enforce archive site or set it to read-only. I.e. email just says “Select Certify site to confirm if it’s still in use, or consider deleting it if the site is no longer needed.”. Email does not inform users that site will be set to read-only or archived.

Also there is no link where a user can get more info on the subject, but Microsoft says that inactive sites policy email template will be customizable – in the Site lifecycle management policies v2 expected summer 2025.

Admin – Inactive sites report

You can download a csv report of inactive sites generated by policy.
Report includes fields:
Site name, URL, Template, Connected to Teams, Sensitivity label, Retention Policy, Site lock state, Last activity date (UTC), Site creation date (UTC), Storage used (GB), Number of site owners, Email address of site owners, Number of site admins, Email address of site admins, Action status, Total notifications count, Action taken on (UTC), Duration in Read-Only.

There is no GUI to see the list of inactive sites (you can only download a csv file), but there is a magic button “Get AI insights”.

Get AI insights

Here are insights I have seen so far:

  • Inactive sites with significant storage usage
  • Multiple sites owned by the same account
  • Sites with Multiple Owners
  • Sites inactive for over a year

Inactive sites policy behavior

Policy sends emails immediately after policy activation. That means if you have thousands of inactive sites you might hit a 10k exchange limit of daily emails sent.

If a user owns multiple inactive sites – he/she will get multiple emails.

You can scope the policy down by site template, sensitivity label and creation source if you want different behavior for different types of sites, e.g. if you want to setup longer period of inactivity for one type of sites and shorter for others… not sure when it makes sense…

Implementing an Inactive sites policy

First of all – It is highly recommended to take care of ownerless sites (find owners) before triggering an Inactive sites policy.

If you have a relatively new tenant – you probably have not much inactive sites, so turning the policy on should not be a problem. The older your tenant is the more inactive sites you have. For older tenants you probably already have a lot of inactive sites – ant that could be a problem. So we’d need to take care of initial policy implementation, and after some time it will just work so we could forget about it.

There is no way to pilot this policy with pre-selected scope of sites or users. You can scope the policy down by site template, sensitivity label and creation source, but you cannot scope the policy down the way only sites or uses you want to be a testers or pilot project members will be the target of the policy.

In small orgs there should be no problems implementing this policy. Still I would start from just getting a report. There is a “How long after the last activity should a site be considered inactive?” configuration, so I’d start from the longest – 6 months, then move to the shortest you need. Medium orgs could get some ideas from recommendations to large orgs below.

In large orgs you might

  • trigger a spike in number of tickets submitted by users who needs help
  • hit a maximum sending limit with Exchange Online which is 10,000 email recipients per day

So it would be crucial for enterprises to avoid an initial surge and start from smaller number of recipients, and gradually let the policy work at a full strength. One of the options to achieve that would be

  1. configure the policy for reports only, get inactive sites report
  2. select sites owner and admins in a separate list – then select only unique ones – so every user will get only one email, split this list into small chunks
  3. communicate to site owners (by chunks) – using enterprise-approved “send from” email and enterprise-branded email template saying that the policy is gonna be implemented, you might receive an email (like this one – screenshot), you can trust this email and click buttons. A list of site urls user owns must be included in the email, so user could visit these sites
    (Optionally) you can instruct users how they can delete sites if site is no longer needed or archive sites if they are not sure if it is still needed or not

If so – it’d

  • forewarn users so they would know to do and not be surprised and would create less tickets
  • users might choose to delete or archive sites which would also
  • users would visit their inactive sites and trigger sites activity, and that should dramatically decrease number of emails sent to users initially, on the day one of policy implementation
    ideally – if users visit all sites – you’d have no inactive sites, so you’d just turn the policy on with no fear

then you’d wait for a couple of weeks, get new report to ensure that you have much less inactive sites – and you’d just enable the inactive sites policy (starting from the longest period – 6 month of inactivity)

References