Adaptive scopes are good, but what if both policies are implemented? Which one wins? The scenario for two policies might be: static retention policy is implemented as default retention policy for all sites, and if site require different retention or deletion – it should fall under one of the adaptive scopes and an adaptive retention policy will be applied.
This post is dedicated to one specific subject: implementing Microsoft 365 groups lifecycle (expiration) policy in large Microsoft 365 environments.
But this post is also a part of a bigger problem – dealing with ownerless resources in Large Microsoft 365 environments. Please refer to the umbrella post.
Scenario
You administer a large Microsoft 365 environment. Let say you have 100k users or more, 50K or more sites. Environment is not new, so after some years you have a lot of ownerless groups and sites (thousands probably), and a lot of inactive groups and sites (probably tens of thousands). You are getting more and more ownerless groups – hundreds each month. You are thinking of stopping bleeding and cleaning this up…
Implementing Microsoft 365 groups expiration policy
If you are thinking of activating in an existing environment – you would probably have a spike – all the old groups will be subject to policy. The ide is to avoid situation when a specific person – group owner will get dozens of email. It would be better if a person will receieve, let say one email per week.
Here is my 4 possible approaches to avoid this spike, distribute notifications evenly across the time and ease the pain:
By changing Group Lifetime
You would need to change the policy every, e.g. week or month, specifying group lifetime in days starting with maximum period. Consider – calculate number of days between the oldest group created an today, plus 35 days – it’ll be your first “group lifetime” – activate the policy with this number of days in “group lifetime” – and within a week you will get notifications on the oldest group/groups – after a week or two – change the “group lifetime” decreasing it by e.g. 30-60 days and reactivate the policy… and so on
You can easily calculate it all and choose your pace depending on how many groups you have to renew, how much time you need to clean-up. You got the idea.
Downside – in the email notification it will be said “otherwise the group will be deleted on …”, but you joggling with lifetime period – so these dates might confuse users
By renewing groups as admin
As an admin, you can use PowerShell “Reset-PnPMicrosoft365GroupExpiration” or graph API “POST /groups/{id}/renew“ to renew any group.
So depending on total number of groups, number of active/inactive groups, number of ownerless groups in your organization – you can come up with a strategy, using one or more of the following techniques:
renew all active and known and important groups (build list of groups to re-activate based on your own criteria) and then trigger the policy
build list of definitely inactive groups and renew all other groups
split groups into chunks and every day or week (depending on numbers) renew groups in a chunk… after that you can activate groups expiration policy, the policy will be triggered against small number of groups every day/week (with this trick you would avoid policy triggering against large number of groups and sending thousands of emails at one)
By sending customized e-mails to users
Another technique to avoid surge in your e-mail system (and most importantly – avoid sudden influx of support requests) – you can send emails to group owners with a link to renew a group. Surely you’d need to build your custom solution for that, but this does not seem like a complicated task. Some PowerShell scripting – and you are good.
“Renew group” link would look like: https://account.activedirectory.windowsazure.com/Group/RenewGroup?tenantId=<tenantId>&id=<groupId> where <tenantId> is tenant id and <groupId> is group Id. So with PowerShell you’d just pull groups in question, their owners and send email with the link dynamically built. Consider spreading this activity across the time to avoid spikes.
By sending users to the groups page
Probably the easies option to smooth the expiration policy implementation is to send group owners to a Microsoft “Groups I own” page – where they could renew or delete their groups. The page is:
Groups I Own (https://myaccount.microsoft.com/groups/groups-i-own)
The downside is – the policy should be in active state (otherwise owners will not see when the group is expiring and option to renew it). So consider a maximum lifetime period in policy, then you’d decrease this period).
Nobody likes garbage, including Microsoft 365 administrators. If any user can create a team or yammer community – they create, but then they leave company and we are getting more and more abandoned groups, teams and SharePoint sites. So we need a way to clean up environment. There is a Microsoft 365 groups expiration policy that can help remove unused groups from the system, but since all Teams and Yammer sites are group-based – it also helps SharePoint admins make things cleaner. In a nutshell what this policy does is it sends notifications to group owners so a group owner can renew the group, otherwise the group will expire and be deleted.
Update (May 2025): Microsoft introduced SharePoint Advanced Management – set of features to help govern SharePoint content for smooth implementation of Copilot. SAM includes Inactive Sites Policy under Site Lifecycle Management. The key differences as I see are: 1) this policy can work not only against group-based sites, but against all sites, including standalone sites. 2) it does not delete sites, but allows to set site to read-only mode and archive. See SharePoint Inactive Site Policies deep dive.
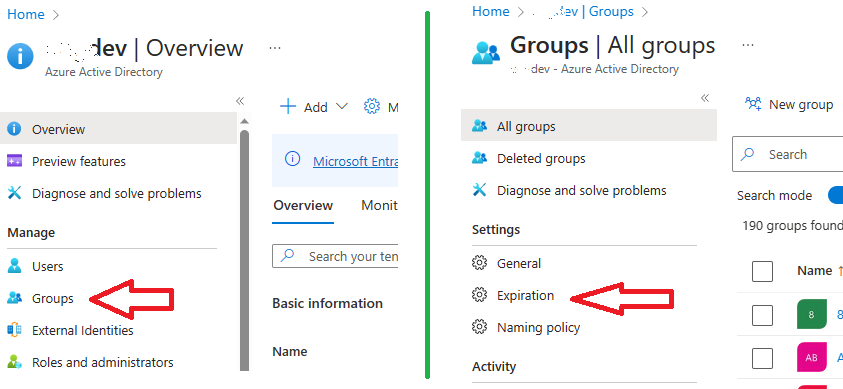
Who can configure the policy and how
The policy lives under Azure Portal, Azure Active Directory, Groups, Expiration:
Microsoft 365 groups expiration policy can be configured by Groups Admin or Global Admin (tenant admin) only. Microsoft 365 Teams or SharePoint admin cannot configure it. Microsoft says that User administrator can do it – so I need to verify it.
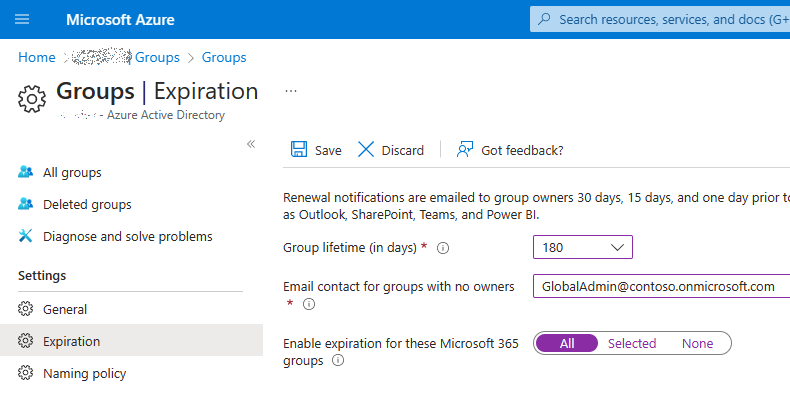
Here is the policy config screen:
Microsoft documented it well in the “Microsoft 365 group expiration policy“, but I completed some tests in my lab environment and here is what I found and what is not covered by Microsoft. Let me share it with Questions and Answers format:
Questions and Answers
General questions
Q: How long it takes for policy to start generating notification emails after activation? A: Immediately, i.e. minutes, maybe up to one hour (in case there groups that are subject for the policy).
Q: Can I customize email that is send to group owners? A: No, there is no such option at the moment.
Q: What is the email address notifications come from? A: It’s “msgroupsteam@microsoft.com” with the display name “Microsoft Groups Team”
Q: What does a notification email look like? A: Please find some examples below, in the end of this article.
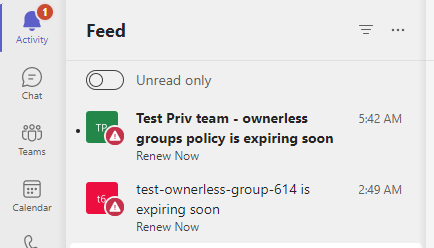
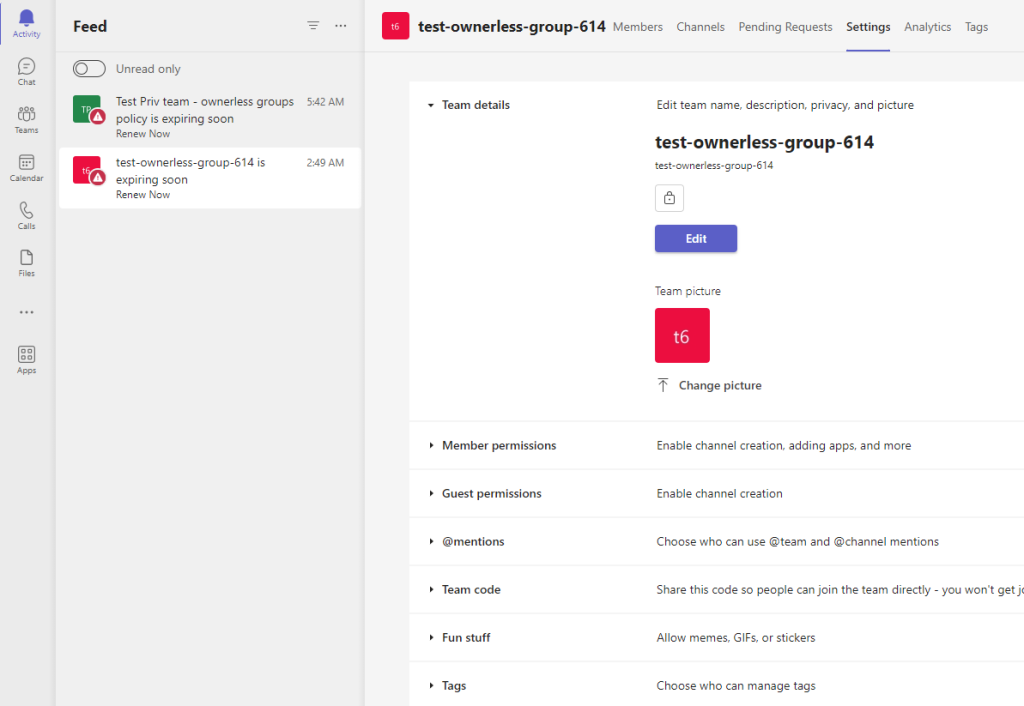
Q: Are there other ways to get notifications? Teams? A: I have not seen any official Microsoft’s documentation on this, but yes – notifications are coming via Teams too: “TeamName is expiring soon. Renew now”:
though it is not clear what exactly should used do to renew the group, as after clicking on that alert a regular teams settings page is opened:
and I got just a few notification in teams, though e-mails notifications I got many.
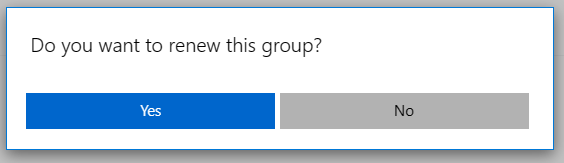
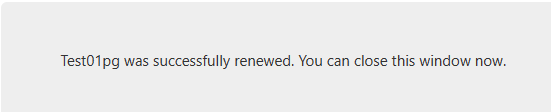
Q: What happens when a user clicks “Renew group” button in the email notification? A: User will be sent to a Microsoft’s page and the following “Do you want to renew the group?” window will be shown:
On Yes, it says”<groupName> was successfully renewed. You can close this window now”:
And the group expiration date will be set up as current date. On “No” it says “Group was not renewed. You can close this window now.”:
And an expiration day will not be changed. No more notifications will be generated. The group will be active until expiration date. Then the group will be deleted.
Q: What if two owners choose opposite? A: The last action will take effect.
Q: what if one user choose “delete group” but the other one later decided “Renew group”? A: The one who click “Renew group” will see “<Group Name> successfully renewed. Because the group was deleted, it might take up to 24 hours to be fully restored. You can close this window now.”
Q: What if the group does not have owners? A: If the group is orphan (ownerless), the expiration emails will go to the email specified in policy configuration. Usually it is a distribution list with admins or other responsible team.
Q: What if the group does have a non-mail-enabled owner? A: I have tested 2 types of entities with no email: – just a contact in Outlook – user with no Exchange license assigned Results are: Outlook contact cannot be added to team, so there should be no contacts as teams/groups owners; a user with no Exchange licens can be added to team/group and Microsoft does not consider this group ownerless, so notification should be sent to group owners, but since there is no email associated to a group owner – e-mail are not sent, so we are having an issue here.
Q: What if I deactivate the policy – will email notifications sent earlier still be actionable? In other words, would users still be able to renew the group clicking on the “Renew group” button? A: Yes. Actually “Renew group” button is just a link to the Url: https://account.activedirectory.windowsazure.com/Group/RenewGroup?tenantId=<tenantId>&id=<groupId> where a group owner can renew group.
Q: If one of the owners renewed the group – what will happen with notifications sent to other owner? What if other owner click “Renew group” or “delete group”? A: Notifications sent will stay. Since buttons in the email are just links (not actionable buttons) – user will be redirected to a web-page where he/she will be able to renew or delete the group.
Q: As per MS: “Groups that are actively in use are renewed automatically around 35 days before the group expires. In this case, the owner does not get any renewal notifications. Any of the following actions will automatically renew a group…<list of actions>”. So, what exactly does “Groups that are actively in use” mean? A: This is not disclosed by Microsoft. They only say “Azure Active Directory (Azure AD), part of Microsoft Entra, uses intelligence to automatically renew groups based on whether they have been in recent use. This renewal decision is based on user activity in groups across Microsoft 365 services like Outlook, SharePoint, Teams, Yammer, and others.” Btw, <list of actions> includes almost all user actions – so basically any action – even just visit site/team is considered as activity.
Q: Can I track the policy in action via audit log? A: There is no “activity type” for this policy’s specific actions… You also cannot specify user “msgroupsteam@microsoft.com” to get all activities. So no tracks on the policy “before action” – i.e. at the detection and e-mailing stage. If a user clicks “renew” button or “delete group” link – this should be logged as this user action with Category “GroupManagement” and activity: “Update group” and “RenewedDateTime” as property modified. If it happens that the group is deleted by policy – this should be logged under policy’s account – see below.
Automatically renewed group appears as audit log event with – Workload: AzureActiveDirectory – RecordType: 8 “AzureActiveDirectory” – Activity: “Update group” – Properties modified would be “RenewedDateTime”
Automatically deleted group appears as audit log event with – Workload: AzureActiveDirectory – RecordType: 8 “AzureActiveDirectory” – Activity: “Delete group.”
Microsoft groups lifetime policy operates on behalf of Actor (first-party Microsoft service principal):
Q: After the group is deleted, who can restore it? A: MS says: “A deleted Microsoft 365 group can be restored within 30 days by a group owner or by an Azure AD administrator”. In fact, SharePoint admin (and maybe some other roles like Teams admin or Exchange admin) can restore group. SharePoint admin can restore site from recycle bin – and the group will be restored as well.
Q: My org is using retention policies. Will the lifecycle policy delete site if it contradicts with retention policy? A: Lifecycle policy respects retention policy, so if the site should not be deleted according to retention policy or legal hold – the site will not be deleted (TBC – need to be validated).
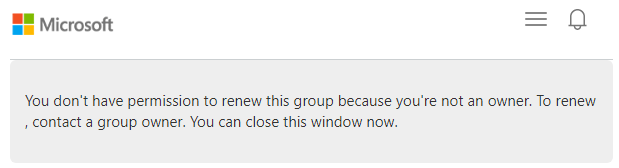
Q: What if a user forward this e-mail notification to other user? Can this other user renew or delete the group? A: When a user receive a notification email forwarded, and he/she click “Renew group” button – his/her experience will be the same if he/she is also a group owner. If a user is not a group owner – he/she will get “You don’t have permission to renew this group because you’re not an owner. To renew , contact a group owner. You can close this window now.”:
Note: if a user with active groups administration permissions receives email and try to renew or delete the group – he/she will also be able to do that.
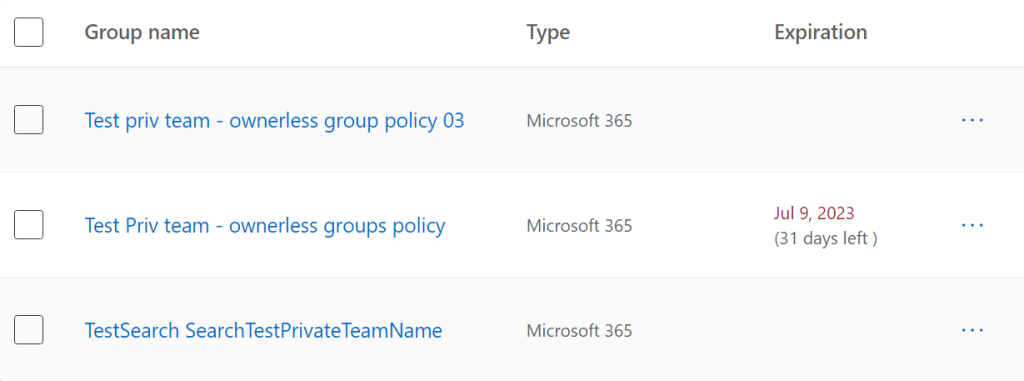
Q: Can user get information on groups he/her owns, groups expiration data? Can user renew the group before the policy trigger email notification? A: yes, all that can be done from the page: https://myaccount.microsoft.com/groups/groups-i-own
Q: What if I activate m365 groups lifecycle policy for the selected groups only? Any insight on policy behavior? A: The policy will work as usual, but for the selected groups only. Separate from the policy – under “my groups” users will be able to see “Expiration date” and “Renew” option for groups in policy’s scope only:
Scenario with many existing inactive groups
Let say we have a large Microsoft 365 environment with many inactive groups, some of them are inactive for a long time – e.g. 1 or 2 years. We want to implement groups expiration policy, but we want to understand better the policy behavior.
Microsoft says: “The expiration period begins when the group is created, or on the date it was last renewed” and “When you change the expiration policy, the service recalculates the expiration date for each group. It always starts counting from the date when the group was created, and then applies the new expiration policy.” So in case we implement the policy first time, we know that Renewal Date for all groups is just a Group Creation Date.
Q: What will happen if I activate the policy – will the policy start generating emails immediately for all groups? A: Yes. Once activated – policy starts detecting expired groups and sending notifications to groups owners. So if you have 3k expired groups with 6k owners in it – expect policy will generate 6k e-mail notifications.
Q: Which groups the policy will be triggered against? All or Inactive only? A: As per Microsoft, if at around 35 days before expiration it will be determined that group is actually active, the policy can renew the group automatically. But definition of this activity is not disclosed and might be not the same as group activity status 90 days based on MS Graph data you can see at CA. (I got notifications for groups that were not active recently but with Active status).
Q: In the case above – what would be the deadline? When the policy will delete the group? A: If the group expiration period is passed, but the policy was just activated – it does not delete the group immediately. Policy allows ~30-35 days for owners to renew the group. E.g. My test policy was activated May 3 and I got message for old group immediately, but it said that the group will be deleted on June 7.
Q: What if there are more than 10K emails – will it trigger Exchange throttling? A: Most likely emails not sent will be sent next day.
Q: Can I specify a distribution list in the policy as an “Email contact for groups with no owners”? A: Yes
Q: Can I specify an external e-mail address as an “Email contact for groups with no owners”? A: TBC
Q: Can admin ask user to renew or delete the group by some other custom solution (skipping the policy)? A: yes. Actually, “Renew group” button is just a link to the following Url: https://account.activedirectory.windowsazure.com/Group/RenewGroup?tenantId=<tenantId>&id=<groupId> where <tenantId> is tenant id and <groupId> is group Id. So basically anyone
Microsoft 365 Groups object model
Let me explain the policy behavior in m365 group object model terms.
There is a group property “RenewedDateTime”. When group is created – this property is set up to group created date/time (same as group CreatedDateTime property value). For the notification purposes the policy calculates “Expected Expiration DateTime” as RenewedDateTime plus “Group LifeTime” (number of days specified in policy, e.g. 180). First notification is triggered about 30 days before “Expected Expiration DateTime”, so the policy simply selects groups with RenewedDateTime property value less then current DateTime minus “Group LifeTime days” minus 30 days and sends notification starting from oldest group:
RenewedDateTime < Today - GroupLifeTime -30
When owner confirms group is still needed – RenewedDateTime is setup to current DateTime.
Q: When a user chose to “Renew group” – will it impact group activity? A: No. If a user did not visit group – but just clicked “Renew group” – it will not trigger group last activity date. E.g. inactive group will still be inactive.
Q: Is there an API to configure Microsoft 365 groups expiration policy programmatically? A: Yes, in MS Graph API it is called Group Lifecycle Policy: groupLifecyclePolicy.
Q: Can I programmatically renew the group (all groups) as an admin? A: Yes, consider using Microsoft Graph API or PowerShell 7 with PnP.PowerShell module. PnP Doc says Reset-PnPMicrosoft365GroupExpiration command “Renews the Microsoft 365 Group by extending its expiration with the number of days defined in the group expiration policy set on the Azure Active Directory” – but that does not seem accurate. This command sets up “RenewedDateTime” group property to the current datetime, not related to current policy settings (the policy might even not have been activated). Microsoft Graph API entry point: “POST /groups/{id}/renew“ Group.ReadWrite.All permissions required.
Q: Is it possible to setup “RenewedDateTime” property to another date/time of my choice (not the current date)? A: Apparently that is not possible. I could not find a way so far… It says Property 'renewedDateTime' is read-only and cannot be set.
Q: What permissions are required to renew the group with Reset-PnPMicrosoft365GroupExpiration? A: Group.ReadWrite.All – delegated or application
Q: What exactly is behind the automatic groups renewal? A: Actually, the is a separate process in parallel with groups expiration policy – and this process starts monitoring groups activity ~35 days before expiration and once activity is detected – the process resets group RenewedDateTime property. And the moment this date is reset – the group is excluded from policy.
Q: If I activate the policy not for all but for a selected groups only, will I still be able to renew other groups programmatically? A: Yes, as an admin – you can resets group RenewedDateTime property programmatically all alone. It does not matter – whether this policy is activated or not.
Screenshots
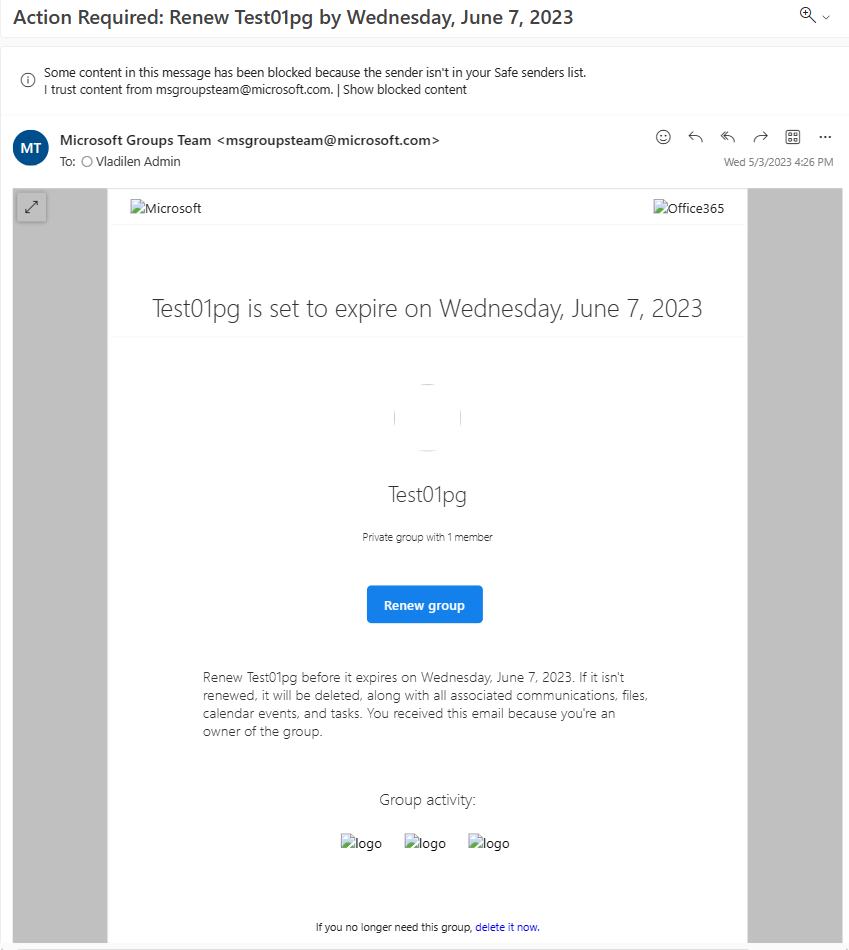
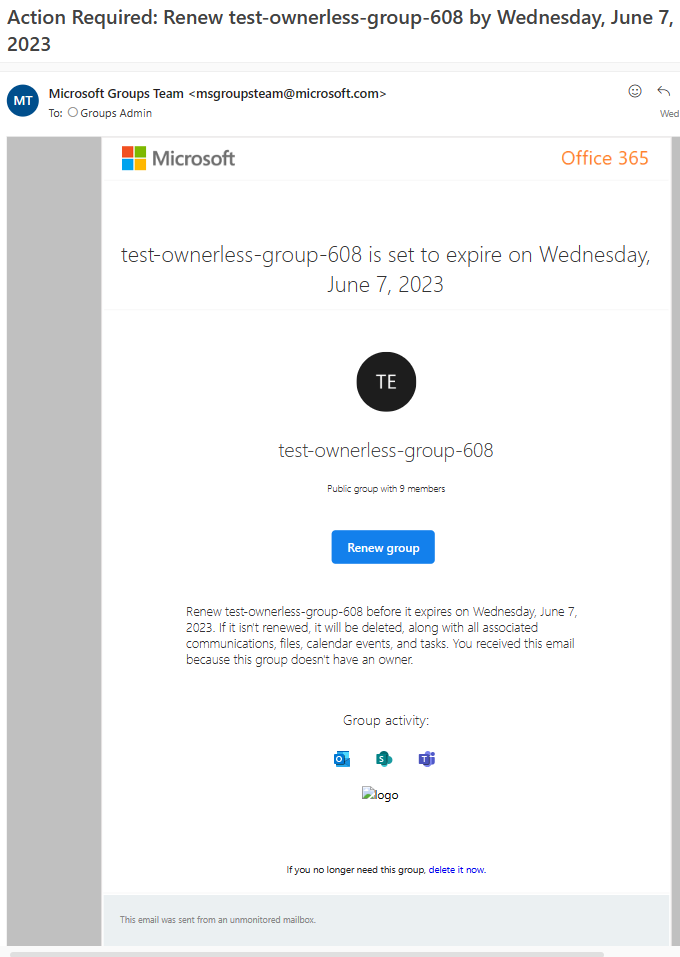
Notification e-mail that comes to group owners “as is” – web outlook view:
Notification e-mail that comes to group owners when content is unblocked (web outlook):
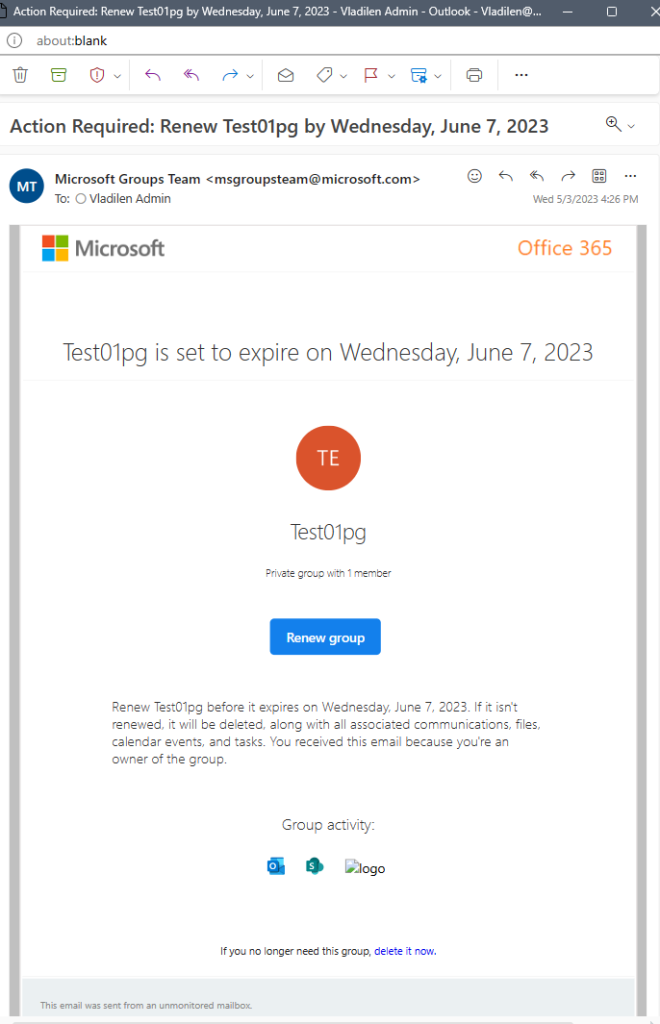
Notification e-mail that comes to group owners when pictures are loaded (desktop Outlook):
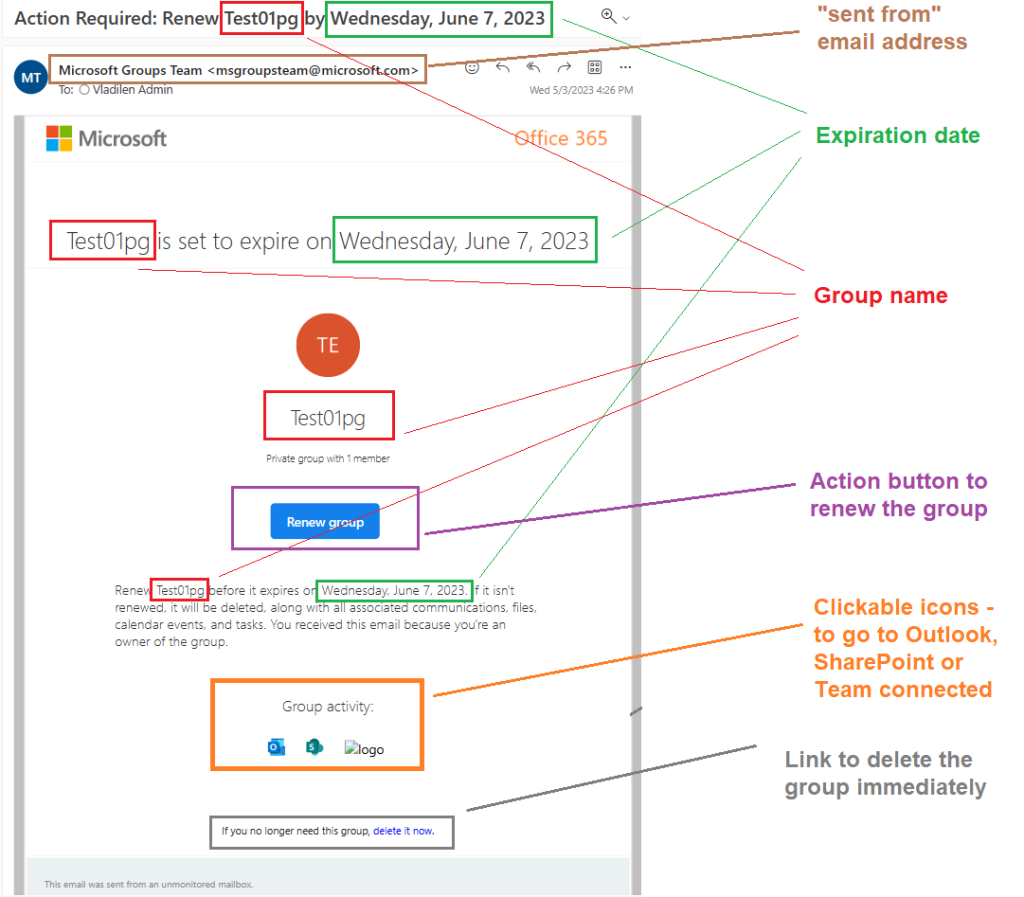
Notification e-mail that comes to group owners some key areas:
And I’d add that e-mail says how many members in this group (number of members, not including owners… i.e. if you are the only owner – it’ll be zero members). Correction: “Renew group” is not an actionable button – it is just a html button with a link.
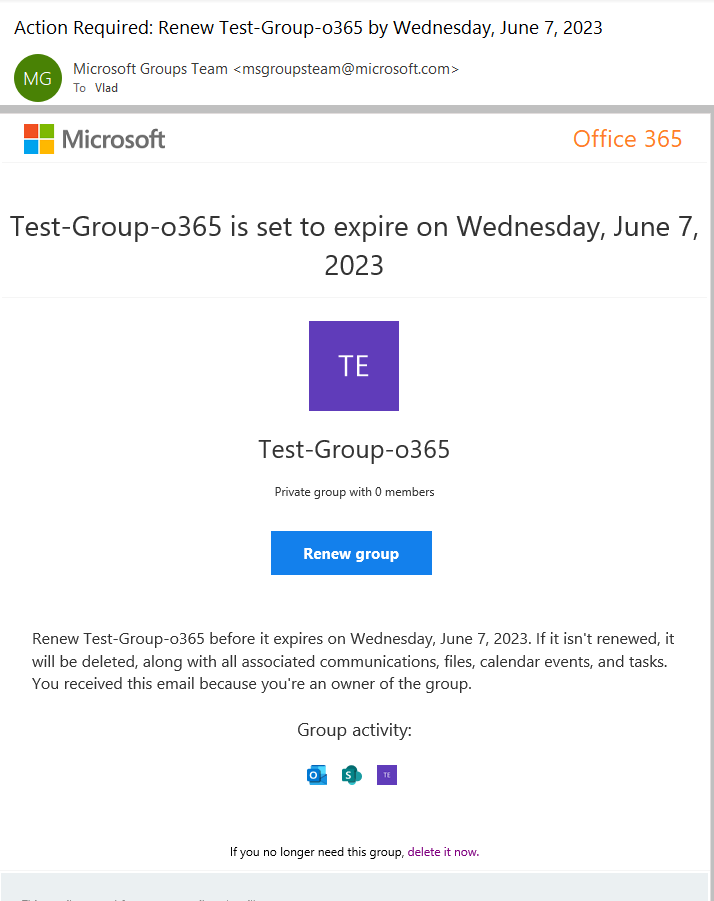
Screenshot of the notification that comes to email specified in policy for the groups that does not have owners:
Outlook icon link sends user to group mailbox
SharePoint icon is the link to the associated SharePoint site
Clicking on Teams icon will transfer user to a default team channel chat page
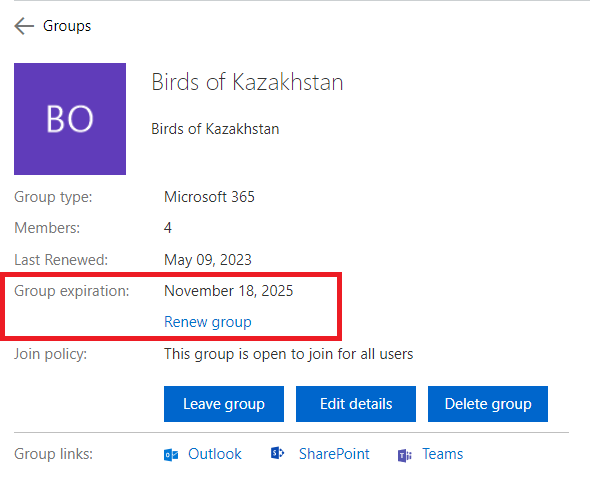
the last one – group icon – is the link to a Microsoft’s groups management page where user can edit group, manage membership, renew group or delete group (see screenshot below):
Renew group button is visible if the expiration policy is activated:
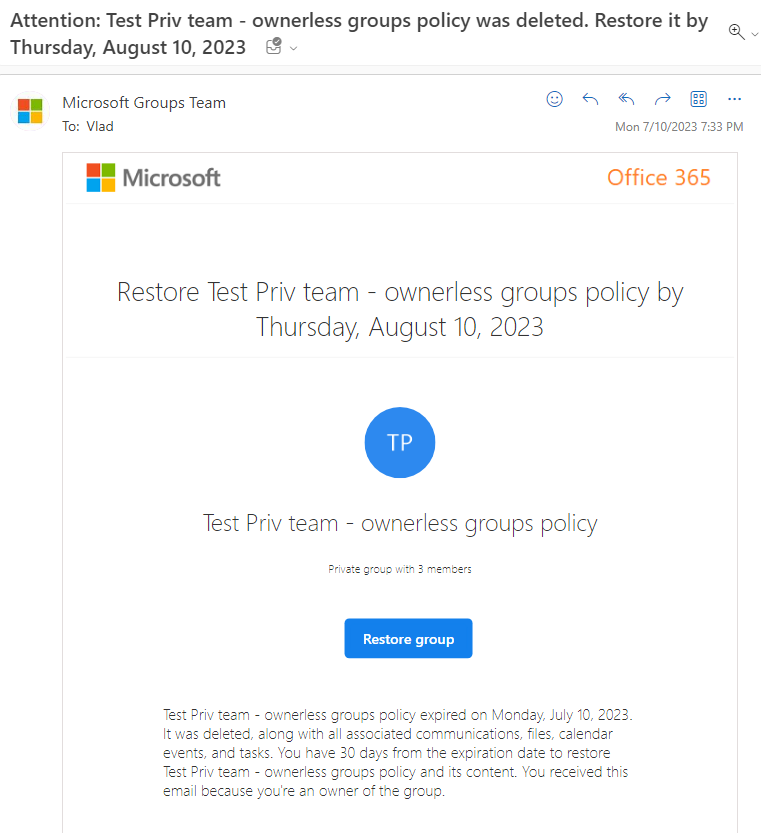
Deleted group
When the not renewed group reaches expiration date – the policy deletes the group and group owners get an e-mail notification like this:
Email subject would be “Attention: <group name> was deleted. Restore it by Thursday, August 10, 2023” and in the body “
<group name> expired on Monday, July 10, 2023. It was deleted, along with all associated communications, files, calendar events, and tasks. You have 30 days from the expiration date to restore Test Priv team – ownerless groups policy and its content. You received this email because you’re an owner of the group”.
Owner can restore group within 30 days by simply clicking “Restore group” button. Then owner would be redirected to the “https://myaccount.microsoft.com/groups/action?groupId=<groupId>&action=Restore” and get a message “The group was successfully restored. It might take up to 24 hours before you can access all associated content. You can close this window now.”
In Microsoft 365 any users create teams, private/public channels, yammer communities with SharePoint sites behind, as well as standalone SharePoint sites, so in time we – SharePoint engineers – are getting more and more inactive/abandoned groups, teams and SharePoint sites. Dealing with inactive Teams and SharePoint content – as part of Microsoft 365 governance – is a cumbersome, ungrateful and demanding, but necessary and also challenging work, especially in large organizations.
To keep growing content under control – Orgs can use:
There is a “Microsoft 365 groups expiration policy” that comes with every tenant and can help remove unused groups from the system, but since all Teams and Yammer sites are group-based – it also helps SharePoint admins make things cleaner.
This policy does a very simple job: on a regular basis it sends notifications to group owners so a group owner can renew the group, otherwise the group will expire and be deleted. Active groups are renewed automatically.
Although it looks simple, there are some tricks and gotchas, so I highly recommend to check this article, especially if you are going to enable the policy in an existing environment.
3-rd party tools
There are many 3-rd party tools on the market that helps with Microsoft 365 administration, information management and governance, e.g. ShareGate, AvePoint, Quest ControlPoint, SysKit Point etc.
Obviously, these 3-rd party tools exist because they can do what Microsoft ootb cannot do or they can do it better then Microsoft. For example
Archive teams, SharePoint sites (this is a smart idea, because for instance, a site owner feels like content is not relevant anymore, but cannot take a risk to delete the site – so site owner can choose to archive the site – i.e. keep it for a while but not use it.
Delegate tasks to managers or to assigned groups. This is another example of careful attitude to content – e.g. if site owner fails to respond (there might be many reasons) – a tool can reach out to user’s manager or to dedicated resolution group (vs deleting resource blindly) – so somebody can act responsibly and keep the resource or archive or delete it.
Custom solutions – PowerShell scripts, MS Graph API
PowerShell is your best friend when it comes to automation or repeated work or massive updates or ad-hoc reports etc. And PowerShell is your last resort to do something unique, what no other tools can do. PowerShell is very capable and allows to build pretty complex custom solutions.
Microsoft Graph API is a rapidly developing by Microsoft API to manage and work with data in all Microsoft 365 services. You can call MS Graph API from any popular programming language, including PowerShell. Consider Microsoft Graph PowerShell SDK.
PnP – community-based project (not officially supported, but backed by Microsoft). They are doing a really good job providing us with knowledge, guides, tools and SDKs to code against Microsoft 365, including – Microsoft Graph SDK – Microsoft Graph Toolkit – PnP Core SDK – PnP.PowerShell – PnPjs
You can use PowerShell to (just a few examples, but there are more scenarios):
find and protect resources that you do not want to be a part of policies, but want to deal with manually, on individual basis, e.g. – sites or teams owned by top management – sites or teams with extremely large content – sites or teams with sensitive or other kind of important content
implement Microsoft 365 group expiration policy graciously, e.g. step-by-step, via small batches (e.g. updating RenewedDateTime group property would allow you to control when this group will expire and Microsoft start sending notification)
deal with non-group-based resources (standalone SharePoint sites), etc.
Solution stack might include VS Code, Microsoft Graph API, Azure Functions, Azure Key Vault, PowerShell, C#, PnP.PowerShell etc.
Microsoft SharePoint Premium (SharePoint Advanced Management)
This is a new, announced in April 2024 and available in 2025 functionality (licensed separately, as Microsoft SharePoint Premium aka SharePoint Advanced Management). Among other benefits, it allows:
Manage site lifecycle policies – an inactive site policy that automatically detects inactive sites and sends notifications to site owners. Sounds familiar? Yes, it resembles the “group expiration policy” but applied to standalone also and there are some more important differences. See my deep dive into SharePoint Inactive Site Policies.
Some more things to consider on the subject
Remediate ownerless SharePoint/Teams resources.
It’s obvious that when you are trying to clean-up inactive resources – you are working with resources owners. Inactive ownerless resource will be simply deleted. That means that before implementing any kind of inactive resources policies – you’d make all efforts to find an owner for every resource to ensure that no important information will be lost in your environment.
Though retention policy is something that lives under Purview center (out of SharePoint scope), you should always be aware of it and consider retention configuration, so your settings do not conflict with retention settings.
Microsoft 365 Archive
Again, new functionality. MS says: “Keep your SharePoint content in Microsoft 365 with cost-effective, long-term cold tier storage – without sacrificing manageability, security, and compliance.” In fact, archived sites are no longer accessible by anyone in the organization outside of Microsoft Purview or admin search. Learn more…
Microsoft will be hiding inactive channels.
To keep users channels list relevant, Teams will automatically detect inactive channels user haven’t interacted with in a while, and automatically hide them. Users will have an option to review the list of channels and unhide some or all of them, opt out of automatic hiding from settings, or initiate this process on demand. Feature ID: 325780
The idea is to deploy FastAPI to Azure Functions the way auto-generated interactive documentation would be public, but actual API would be protected. Pamela solved it with Azure API Management and subscription keys:
“One of my goals was to have the documentation be publicly viewable (with no key) but the FastAPI API calls themselves require a subscription key. That split was the trickiest part of this whole architecture, and it started at the API Management level.”
Usually, a Microsoft 365 group can be created by anyone in your organization as part of creating a Team, a Yammer community, an Outlook group, a SharePoint site, etc. If the group owner leaves the company and the account gets deleted, the group becomes ownerless.
It would be a nightmare to reach out to ownerless group members one by one, trying to figure out who is the actual data owner and who should become the group owner. So we need some kind of automated solution.
There is a Microsoft ownerless groups policy that detects ownerless groups and sends emails to the most active group members, asking if they want to become group owners. If a member accepts ownership, the policy automatically elevates that person from group member to group owner. The policy does not cover standalone SharePoint sites, but the majority of orphaned resources in an organization are usually Microsoft 365 groups, so this policy should still help a lot.
The policy was designed with the idea of preventing ownerless groups, meaning it handles them gradually over time as they become ownerless. Because of that, it’s recommended to activate the policy as soon as you set up the tenant. Configuration is done through the GUI, and it’s intuitive and straightforward. Microsoft documented it well, but if you still have questions about how the policy behaves, here is my Q&A covering what is not included in Microsoft’s FAQ, along with some tips, tricks, and gotchas.
The problem is that Microsoft introduced this feature relatively recently, and if you’ve owned your tenant for years, you probably already have some ownerless groups. In small or medium environments with a few dozen ownerless groups, this isn’t a big issue. But in a large Microsoft 365 or SharePoint Online environment, you might end up with hundreds or even thousands of ownerless (or orphaned) resources that you have to deal with.
One of the challenges is how to implement the policy correctly when you already have many ownerless groups, and then how to manage the groups that will become ownerless in the future. In other words, we need to solve two consecutive issues:
Remediate vast amount of existing ownerless groups
Prevent groups to become ownerless
Obviously we’d need two different strategies and policies configurations.
There are also 3-rd party tools – like SysKit Point that can help with orphaned resources by enforcing minimum number of owners. There is also “Orphaned resources” policy under SysKit that allows multiple workflow options to resolve the issue – but there is no “fully automated” option -all SysKit options require an interaction from admin/manager.
Microsoft 365 built-in feature – “Ownerless groups policy” allows fully automated process:
detects ownerless groups, and for every group found
generate e-mail invitations to most active group members
assigns users as group owners if they accept invitation
Another problem in large environments is that we have strict requirements we need to satisfy:
end-users to get a limited number of emails in a certain period so they can process
end-users get only relevant messages so they will not ignore further notifications
high percentage of acceptance and (ideally) no orphaned resources
We want the policy to be piloted or tested in production against a small group and then we want phased implementation – so we could have a chance to get a feedback on phase 1 and adjust our approach at phase 2 etc.
The policy allows limiting the policy scope in two ways:
by limiting “who can receive” messages – it’s done by specifying a security group – so only this security group members will be eligible to get invitation and accept or decline it
by limiting Microsoft 365 groups that would be in scope for the policy – it’s done by specifying group names
Two options can be specified in the same policy and effective eligible members would be those who satisfy both requirements.
Configuration is done using GUI – i.e. there is no PowerShell commands known on the subject at the moment.
But the most important gotcha for me is that we cannot reconfigure the policy or reactivate it to trigger additional messages for groups that already had messages generated earlier. In other words, if email notifications were already sent for a group and the policy stopped working after the defined time period, it’s done for good. No more emails can be generated for that same group.
The other limit is you can only specify no more than 50 Microsoft 365 groups in policy under “Apply policy to Specific groups” option. And we’d keep in mind exchange’s limit of 10,000 emals per account per day.
So, having this said, what would be the proper approach to do phased implementation in terms of configuring policy to scope it down for each step?
First – know your data. Get full report on ownerless groups, analyze it and come up with approach. Let’s assume we have an org with ~100K users and ~5000 ownerless groups. I bet you will find out that you have
large m365 groups (100+ members): <1%, i.e. 10-20 groups
medium m365 groups (10-100 members): ~25%, i.e. ~1000-2000 groups
small m365 groups (1-10 members): ~50%, i.e. ~2500 groups
null m365 groups (0 members): ~25%, i.e. ~1000-2000 groups
You’d might have your own classification, but I would propose the following approach to each category.
large groups: configure policy with “Apply policy to Specific groups” option and specify all or several of your large groups (the limit if 50 allowed groups in this field)
medium groups: configure policy not scoped down (e.g. apply to all groups, all users)
small groups: skip the policy, use PowerShell to elevate all group members to owners optionally – elevate specific titles (manager, lead) or salary grade members to owners
null groups: consider deleting these groups optionally – delete only inactive no-members groups or groups with no or small amount of storage/files.
You’d also come up with the ideas on
desired min and max number of owners
deleting groups/sites phased approach
archiving groups/teams/sites
Remember – this is production, so at this moment you should test the policy in non-prod an be fully comfortable with all aspects of configuring the policy and formatting e-mail template etc.
As a remediation part plan I would propose the following:
Wave 0 – piloting
select a few (3-5) ownerless m365 groups, preferably your colleagues from IT – whose members will be your pilot team, so you could finalize all settings and polish notification message etc.
Implement the policy with settings: – All active members, 5 members to notify, 2 weeks – Sender – Subject and message – clean-up oriented – Specified groups – select these pilot groups
In parallel, while you are waiting weeks for the policy to pause, start developing PowerShell scripts that will 1) delete null (no members) groups and 2) elevate members to owners (get how many members can be elevated if elevate only certain members)
Track user’s response – % of declines and accepts
Get feedback from users – how well the notification message is understandable etc.
Wave 1 – large groups and small groups
Implement the policy for large with settings: – All active members, 5 members to notify, 5 weeks – Sender – specially created m365 group with the name you need as sender – Subject and message (polished at wave 0, clean-up oriented) – Specified groups – select large groups
For small groups – run PowerShell script that elevates members to owners.
Wave 2 – medium groups and null groups
For null groups – run PowerShell script that removes groups with no owners and no members (optionally only inactive groups and/or no content groups).
At this moment number of ownerless groups should be decreased significantly. So we should be good to start implementing policy for all groups. But we are getting new ownerless groups permanently – during all the waves of policy implementation.
Get the report again. In case you have e.g. up to 2,000 orphan groups – you can reconfigure policy and “Apply this policy to” All groups.
If you have more than 2k ownerless groups left – consider the following: create a few service accounts in Entra ID. Add these account to ownerless groups as owners (distribute equally). That’d make groups not ownerless. Then you’d configure the policy. Than delete these service accounts from entra id one by one, so it’d make groups ownerless again, but not all at once, but gradually.
Wave 3 – all groups left ownerless
After a few months you configured ownerless groups policy for all groups – get reports on your orphan groups again – there should be some % of remediated groups, and some % of groups that are still ownerless after all notifications sent to most active members (nobody volunteered to be a group owner). But you still need to deal with these ownerless groups. Consider the following approach based on groups activity (this would require PowerShell):
active groups – elevate most active members to owners
groups with no recent activities – rename group, remove all members, configure “request access” email and let the group stay for a few more months/years – then delete groups not reclaimed
Wave 4 – permanent policy and custom deletion
After you completed clean-up (policy + your custom solution), consider policy re-configuration. Specifically, you might want to update the notification Subject and Message.
Questions and Answers
Q: Isn’t it a security risk if we elevate members to owners? Would a member get access to more information that he/she did have access to before. A: 1) Elevating members is the same risk as implementing the ownerless policy, as policy does the same – it elevates member to group owner. 2) When a member is elevated to group owner – a member does not get access to more information, as a) for standard channels – he/she did have access as a member b) private channels stays private – new group owner does not get access to private channels automatically c) shared channels stays with the same permissions also
I have been involved in a birdwatching community web project for a long time. At the moment it has 250k pictures, 2500 blog posts from community members.
The site is a custom development – written by Askar Issabekov with php and MySQL and hosted under Dreamhost dedicated server.
Initially the migration plan was
get and configure new hosting
copy php scripts and media files
backup/restore MySQL databases
update hosts files and ensure everything works good
set source site in “maintenance” mode
put notification on the site header
set databases in read-only mode
backup/restore MySQL databases again
copy media files delta
set databases in r/w mode
ensure everything works good
change DNS from old host to new host
Some more data:
MySQL database: 120 MB
It turned out that
Source host uses Apache and target host uses Nginx
phpMyAdmin cannot import database from SQL backup
So we ended up the following
backup and document existing environment
get and configure new hosting
ensure php version is the same
copy php scripts and media files
remove all .htaccess and update nginx config files accordingly, e.g. Index etc.
fix files permissions (chmod)
backup/restore MySQL databases
if the database is big
– consider splitting database – a few tables each backup/restore
– consider zipping database while export-import
if phpMyAdmin fails – use command-line mysql
update database connections (user names, passwords, database names and hosts) as temporary measure – it is possible to allow access to old host databases from new host ip
update hosts files and ensure everything works good
set source site in “maintenance” mode
put notification on the site header
set databases in read-only mode
backup/restore MySQL databases again
set databases in r/w mode
copy media files delta
ensure everything works good
change DNS from old host to new host
Question: to avoid hassles with hosts files – is it possible to use a different real target name, then after verifying everything works good – change name
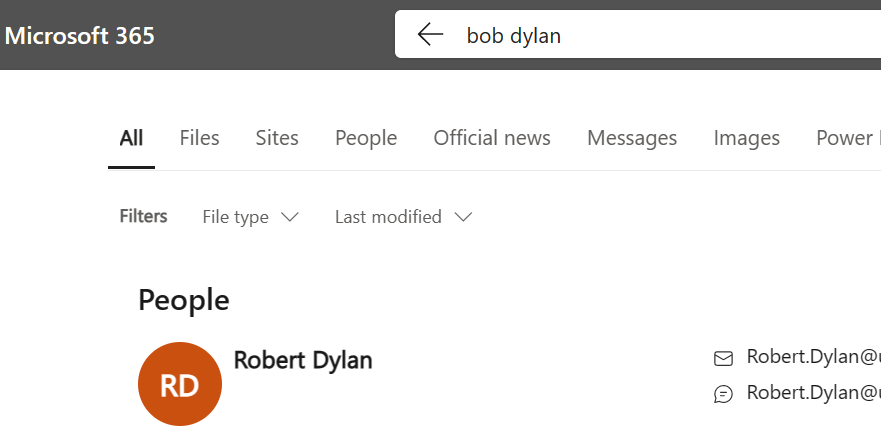
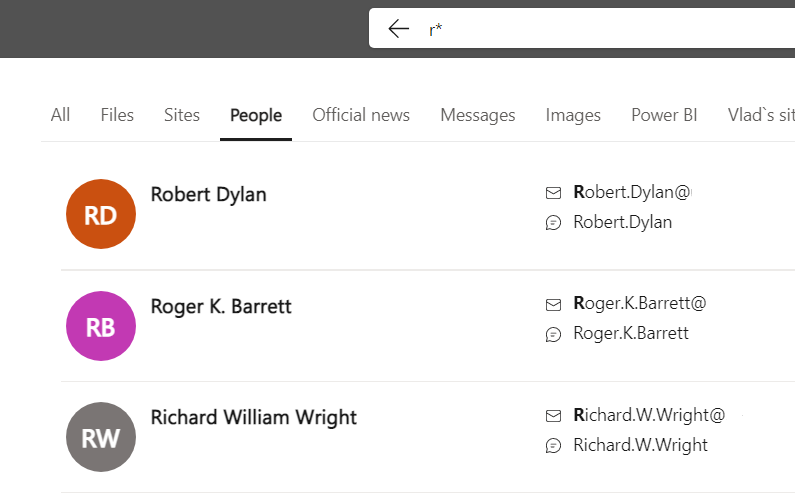
I have created a user “Robert Dylan” and never used name “Bob”, but search understands that I’m looking for Robert Dylan when I’m searching for Bob or Bob Dylan or Bobby.
Important thing – result is shown under “All” and “People” verticals.
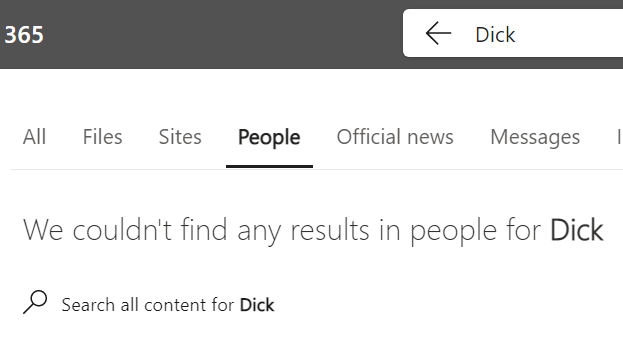
I know Microsoft claimed m365 search is backed by Turing technology – it understands you, answers your question but not just blindly display keyword occurences (announcement at Ignite Spring, more on Ignite Fall 2021)… So is that it?
But the same trick did not work with Dick for Richard or (of course) Syd for Roger Barrett:
How do we know when the SharePoint site was last updated?
We have multiple “when the site was modified last time” properties – e.g. some we can retrieve with SharePoint CSOM:
Site LastContentModifiedDate
Web LastItemModifiedDate
Web LastItemUserModifiedDate
Also we can get
MS Graph site object with LastModifiedDateTime property
get usage reports via Microsoft Graph (activity reports), and
use “Last activity” field via Admin Center GUI
On the other hand – we can view and modify site in multiple ways – visit site home page, open and/or update document/list item, change site/library settings, configure site permissions, assign site sensitivity label, setup site property and so on.
Question: which site “last modified” or “last activity” properties reflect what events/actions?
This might be important if we think of retention policies, or any kind of clean-up processes… Let say, we are getting report on abandoned sites (inactive sites), but we are also assigning sites sensitivity labels, or we are updating site custom properties (e.g. for adaptive scopes), we have an ownerless groups policy working etc.
What if we assign site sensitivity label to an old inactive (5 years old) site – would it affect retention policy since site was updated this way?
Results
So i did some tests and based on detailed results below, it seems like
Web LastItemModifiedDate is triggered when user just visited site (but property LastItemUserModifiedDate is not triggered)
If a document or list Item updated by user or app – all properties are triggered
MS Graph site property LastModifiedDateTime, root web property LastItemModifiedDate and Site LastContentModifiedDate – same values
If site custom property is updated – it does not affect any site “last modified” property
The same for sensitivity label updated by app – it does not affect any site “last modified” property
The same for Microsoft ownerless groups policy – when user accept or decline group membership – no site “last modified” properties are changed (the same is true for Microsoft 365 group last modified date/time property).
Please refer to the table below
Detailed test results
Test results if the event triggers property update:
Event
Last Content Modified Date
Last Item Modified Date
Last Item User Modified Date
Graph Last Modified DateTime
GUI Last activity
Page viewed by user
Yes
Yes
No
Yes
Home Page viewed by user
Site Page viewed by user
Document or list item updated by user
Yes
Yes
Yes
Yes
Document or list item updated by app
Yes
Yes
Yes
Yes
Site config settings updated by user
Site config settings updated by app
Site custom property updated by app
No
No
No
No
Site Sensitivity label updated by user via SharePoint
Yes
No
No
No
Site/Group Sensitivity label updated by user via Teams
Site/Group Sensitivity label updated by user via Azure
No
No
No
No
Site Sensitivity label updated by app
No
No
No
No
Site collection admin updated by user
Yes
Yes
No
Yes
Site collection admin updated by app
Yes
Yes
No
Yes
SharePoint group membership updated by user
Yes
Yes
No
Yes
Standalone Site connected to a group by user
Yes
Yes
Yes
Yes
Add Microsoft Teams to Site by User
Yes
Yes
Yes
Yes
Update m365 group membership via M365 admin console by admin
Yes
Yes
No
Yes
Update m365 group membership via Azure by admin
Update m365 group membership via Teams by user
No
No
No
Yes
Update m365 group membership via App
Accept group ownership invitation sent by ownerless groups policy
No
No
No
No
Decline group ownership invitation sent by ownerless groups policy