If you are seeing “Ownerless group policy configuration failed” and “Please try again.” error message:
there might be some different reasons:
Microsoft said it is (was) a know problem – it happens sometimes (timeout?), if you configured the policy properly and have enough permissions. So just go back one step and try again – all should be good.
Sometimes “Ownerless group policy configuration failed. Failure in configuring ownerless groups policy” is a permissions issue SharePoint admin, Teams admin: cannot configure Ownerless Groups Policy Global admin: yes, can configure Ownerless Microsoft 365 Groups Policy. What is the minimum role required? According to a recent update of the Microsoft’s article – “A Global administrator can create a policy…”. In my experience – groups admin can also configure the policy
Note: Groups admin when configuring the policy can see warning message “You don’t have permissions to save changes”. No worries 🙂 => You will be able to save changes 🙂
Video tutorial on the policy configuration (at around 5:00 you can see this error message):
getOffice365GroupsActivityDetail – details about Microsoft 365 groups and activity
getSharePointSiteUsageDetail – details about SharePoint sites and usage
getTeamsTeamActivityDetail – details about Microsoft Teams and activity by teams
Also we know, that Teams sites are group-based, and you can have private and shared channels under Teams – but these sites are not actually group-based and there are group-based SharePoint sites with no Teams behind.
And activities might be different – update document or just visit home page, provide permissions and update channel properties etc.
So the question is what kind of activity at what level is recorded at which report?
So far what I noticed is
If there were activities in Teams or SharePoint – the corresponding group will be included in Groups Activity report as well.
I analyzed sites activities as part of inactive sites decommissioning – and I found out that most of “active” group-based sites that have one or two in “active SharePoint files” under Groups Activity report are not really active. In many cases that activity is just OD sync or site logo read from desktop applications (word, excel) – with no actual documents reading/updating or teams activity. So consider “visited pages” from SharePoint Site Usage Detail report or “read messages” from Teams Activity report as a stronger indicator of activity.
Sometimes, mostly during PoC or testing policies like retention policy or lifecycle policy you would need some documents created and updated weeks, months or even years ago.
But if you create or upload a document in SharePoint library – it will be just a regular new document. So, how to get old documents in the new environment?
I see two options:
Sync with OneDrive If you sync a library with your local folder (done Microsoft by OneDrive desktop app) and put some old document in your synced folder – the doc will be synchronized back to SharePoint library with Created and Modified properties preserved.
Make the document older with PowerShell With “Set-PnPListItem” PowerShell command you can update not only such properties like Title, but also “Created By”, “Modified By” and even date and time document was created and modified via “Created” and “Modified”. Optionally you can play with document history with “-UpdateType” parameter. UpdateType possible values are:
Update: Sets field values and creates a new version if versioning is enabled for the list
SystemUpdate: Sets field values and does not create a new version. Any events on the list will trigger.
UpdateOverwriteVersion: Sets field values and does not create a new version. No events on the list will trigger
As SharePoint or Teams admin you manage Microsoft 365 groups (create, update, delete, manage membership etc.) having your admin role activated. I prefer PowerShell 7 and Microsoft.Graph PowerShell module, and I need an Azure registered app with “Group.ReadWrite.All” Microsoft Graph API delegated permission.
Some findings:
If a user was not a group member or group owner – and the user is added to the group members – this user will get notification “You’ve joined the <Group Name> group” via e-mail that comes from a group e-mail address.
When a user is added to the group owners (or elevated to group owner if user was a group member) – user does not get notification.
When a user was a group owner and now you are adding this user to the group members – user does not get notification.
All the actions are logged into Microsoft 365 audit log under your personal Id.
Script samples:
# This script is just a sample to demonstrate basic technique on getting, updating groups membership and deletion m365 groups with PowerShell and MS Graph
#
# please do not run this script as is, but update it based on your needs

# authentication with personal Id
#  app must have as minimum "Group.ReadWrite.All" Microsoft Graph API delegated permission
#  user must have SharePoint admin (or Teams admin) roles activated
Connect-MgGraph -ClientId $clientid -TenantId $tenantId
Get-MgContext | Select-Object Scopes -ExpandProperty Scopes

# sample data
$groups = @()
$groups += [PSCustomObject]@{GroupId = '443d22ae-683a-4fe4-8875-7bd78227a026' }
$groups += [PSCustomObject]@{GroupId = 'e5805388-c18c-48c0-b42d-6223cf8f3d82' }

# Get Groups
foreach ($group in $groups) {
    Get-MgGroup -GroupId $group.GroupId
}

# add members to the group
$groupId = '443d22ae-683a-4fe4-8875-7bd78227a026'
$userId = 'df74e0d3-d78c-495b-b47a-549437d93cf7' # Adele
New-MgGroupMember -GroupId $groupId -DirectoryObjectId $userId

# add Owner to the group
$groupId = '443d22ae-683a-4fe4-8875-7bd78227a026'
$userId = 'eacd52fb-5ae0-45ec-9d17-5ded9a0b9756' # Megan
New-MgGroupOwner -GroupId $groupId -DirectoryObjectId $userId

# Delete group
$groupId = '443d22ae-683a-4fe4-8875-7bd78227a026'
Remove-MgGroup -GroupId $groupId
It is known that a single Microsoft Exchange account is not sending more than 10k emails per day.
It is also know that once activated – Microsoft 365 groups ownerless policy will be sending notifications for all groups in scope to specified number of group members within 24 hours.
The question is: what if there are more than 10,000 notifications to send (e.g. 4,000 ownerless groups and the policy is configured to send notification to 3 members per group – that gives us 12,000 notifications to send)? Would the policy send 10k notifications and the rest 2k notifications the next day?
I’m conducting an experiment. I created 10k groups in my lab tenant with one owner and 3 random members. Then I configured a policy that is sending notification to a 3 most active members (in this case – random members). And then I made all these groups ownerless by deleting the single owner Id from Azure AD (Microsoft Entra).
Here is what I got from users perspective:
user
user groups number
got messages day 1
got messages day 2
got messages total
1 Roger
5012
1374
2 Dick
5039
1349
3 Bob
5108
3412
4 Bapu
4908
1376
5 Stas
4996
1437
6 David
4959
1377
total
10325
Here is what audit log says:
Events “OwnerlessGroupNotified” day 1: 4949 Events “OwnerlessGroupNotified” day 2: 95 Events “OwnerlessGroupNotified” total: 5044 Each event details says 3 members were notified.
It seems like groups are selected by policy in random order.
Massive E-mails sending was started 43 minutes after midnight UTC
“OwnerlessGroupNotified” were logged at the rate of 1925 events during 1-st hour, 2029 events during 2-nd hour, 785 events during 3-rd hour, 176 events during 4-th hour, 26 events during 5-24 th hour, 95 events during next 25-48 hours so max rate was one event every 3 seconds in the beginning (or 1 e-mail per second) …
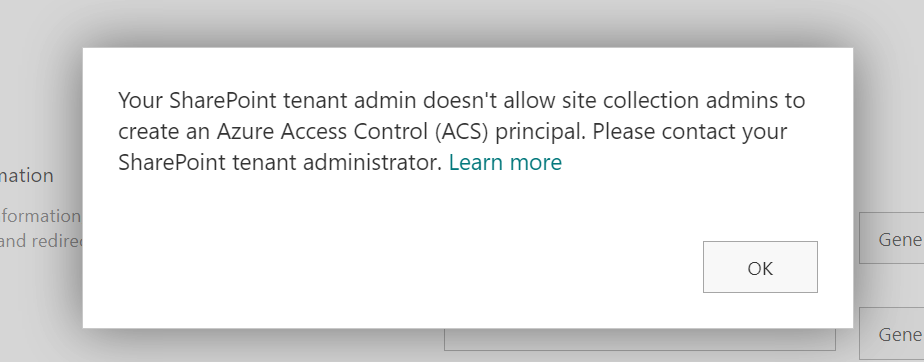
You are trying to register an application at SharePoint site with appregnew.aspx page and you are getting an error or notification message “Your SharePoint tenant admin doesn’t allow site collection admins to create an Azure Access Control (ACS) principal“.
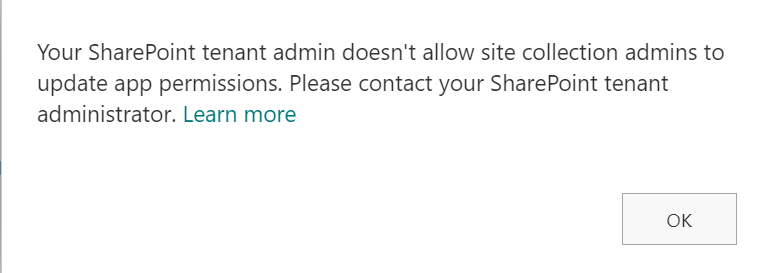
Or you are trying to provide ACS-based permissions for an application to SharePoint site with appinv.aspx page and you are getting “Your SharePoint tenant admin doesn’t allow site collection admins to update app permissions. Please contact your SharePoint administrator.”
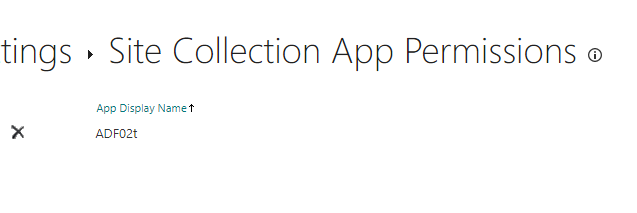
You can still view and even delete your apps permissions from /_layouts/15/appprincipals.aspx page:
Reason
This is due to a recent update to Microsoft 365 (tenant governance security measures enhancement MC660075) implemented by Microsoft in Aug/Sep 2023. According to the update, only tenant administrators can create or update ACS service principal by default.
The root cause for this is that the Microsoft is pushing developers out of that legacy ACS-based SharePoint Apps-only service principals towards Azure-registered applications with Sites.Selected API permissions as they are more secure etc. In Nov 2023 Microsoft announcement retirement of ACS principals.
Key differences between ASC and Sites.Selected are:
ACS-based SharePoint app/permissions
Apps registered in Azure with Sites.Selected API permissions
Support authentication with client secret only, Secrets are valid for 1 year exactly.
Support authentication with client secret and/or certificate, custom expiration time.
Support granular access to SharePoint site, e.g. to site collection or web (subsite) or a specific list or library.
Support only access to entire site collection (but Microsoft says granular access is coming) Granular permissions are available – ‘Lists.SelectedOperations.Selected’, ‘ListItems.SelectedOperations.Selected’ and ‘Files.SelectedOperations.Selected’ permissions allows to provide application access to list, library or list item or particular documents
Support only classic SharePoint REST API and CSOM
Support both – classic SharePoint REST API and CSOM and Microsoft Graph API
App id (client id) is created via appregnew.aspx at a specific SharePoint site by site collection administrator (disabled in Sep 2023).
App id (client id) is created in Azure portal (Entra Id), API Sites.Selected permissions are configured via Azure portal (Entra Id) and require tenant admin consent.
Permissions for the app to a site are provided at the site by site collection administrator via appinv.aspx page (disabled in Sep 2023).
Permissions for the App to to a specific SharePoint site are provided via Graph API by SharePoint admin with PowerShell script.
Solution #1 – switch to Sites.Selected
Register an application in Azure (via Entra Id – Azure portal GUI, PowerShell script or your company’s specific helpdesk/servicedesk request)
Update the app so both – MS Graph API Sites.Selected and SharePoint Sites.Selected permissions are configured, then
API permissions must be consented – so you’d seek/request your tenant admin consent
Obtain and upload client certificate (recommended) or generate client secret (at this moment you should be able to authenticate to tenant)
Request access for the app to a specific SharePoint site – your SharePoint service admin should be able to do that (at this moment you should be able to authorize to your SharePoint site).
Validate your app has access to the target SharePoint site with PowerShell (check validation scripts below under References).
Use recommended by Microsoft technique, code samples are available for the most popular languages/platforms – Python, C#, Java etc. (check below under References).
Secure your certificate and/or secret. It is not a good idea to use hard-coded secrets, so consider using special services/storages for secrets (aka Vaults)
If you are hosting your application in Azure – consider using managed identity.
There are 3-rd party (and Microsoft) apps developed using classic approach (examples – Azure data Factory, Alteryx). So in some cases Sites.Selected permissions are not enough to get access to SharePoint.
Solution #2 – admin to register/update an ACS app
This option is acceptable if you have existing application that require ACS-based access. This option is not recommended for new development, as ACS is deprecated and scheduled for retirement.
Microsoft (MC660075 in Message Center): “site collection admin will be unable to register app or update app permissions through above pages unless authorized explicitly by the SharePoint tenant admin” and “With this update site owners will not be able to register/update apps unless the tenant admin explicitly allows it.”
That is incorrect. Site collection admin cannot register app (appregnew) or provide permissions to the app (appinv) anymore. Tenant admin does not authorize site collection admins. Instead tenant (or SharePoint) admin can register an app or provide permissions to the app at a specific site (not changing the entire default behavior back…). But there was no such option (!) in the middle of October 2023, when this feature was enabled at all tenants. Even having a SharePoint admin or tenant admin permissions – if you tried to register an app with AppRegNew.aspx – you got the same error message “Your SharePoint tenant admin doesn’t allow site collection admins to…”.
Later (Checked today – Nov 6, 2023) it seems like Microsoft has implemented it! E.g. now SharePoint or tenant admin is able to register an app with AppRegNew.aspx or update it with AppInv.aspx at any specific site collection. SharePoint or tenant admin must also be among this site collection admins.
It is ok (and I’d say the preferred way) to provide ACS permissions to the app registered in Azure, so do not register apps in SharePoint anymore (do not use AppRegNew.aspx).
Bottom line: if ACS-based permissions are required for app here you go:
register application in Azure (Entra id)
activate your SharePoint service/tenant admin role
ensure you are also target site collection administrator
navigate to the site appinv.aspx page – e.g. “https://yourtenant.sharepoint.com/sites/yoursite/_layouts/15/appinv.aspx” and us Azure registered app (client) Id. E.g. for lookup provide
Azure registered app (client) Id for – click lookup
localhost as app domain
https://localhost as redirect url
Permission Request XML – depending on permissions you need, e.g. for full app access to entire site collection:
It is possible to switch back this new default behavior that prevents site collection admin to register/update apps at SharePoint. This is done with PowerShell command
To run this command – you’d need to be a SharePoint service or tenant admin.
But this will be a step back on your journey in improving m365 tenant safety, as after that you’ll have a self-registered service principals out of control again. So devs will be using it not being aware of ACS retirement and when Microsoft switch off ACS – it will be a disaster, as all app will stop working. That is why Microsoft implemented this feature to soft-disable ACS and allowed us 2 years to redesign or apps and migrate from ACS to Entra Id apps with Sites.Selected. So this solution is not recommended.
In case you really need an exception to provide an ACS-based service principal – there is Solution number 2.
Full text of Microsoft’s MC660075 message
(Updated) SharePoint admin control for App registration / update
Tag MAJOR UPDATE ADMIN IMPACT FEATURE UPDATE
Message Summary Updated August 30, 2023: We have updated the content below for clarity. Thank you for your patience.
This is an enhancement to the security measures for administrative governance that modifies the default procedures for SharePoint app registration via AppRegNew.aspx page and permission updates via AppInv.aspx page. Following the implementation of this change, site collection admin will be unable to register app or update app permissions through above pages unless authorized explicitly by the SharePoint tenant admin.
Upon attempting to register an application on AppRegnew.aspx page, a notification will be displayed stating “Your SharePoint tenant admin doesn’t allow site collection admins to create an Azure Access Control (ACS) principal. Please contact your SharePoint tenant administrator.”
Similarly, upon attempting to update app permissions on AppInv.aspx page, a notification will be displayed stating “Your SharePoint tenant admin doesn’t allow site collection admins to update app permissions. Please contact your SharePoint tenant administrator.”
Kindly note that app registration and permission update via Microsoft Azure portal are not impacted by this change.
When this will happen:
The rollout process is scheduled to commence in late August and is expected to conclude in mid-September.
How this will affect your organization:
With this update site owners will not be able to register/update apps unless the tenant admin explicitly allows it.
To modify the default behavior, the tenant administrator must execute the following shell command to explicitly establish the flag as TRUE, thereby superseding the default value of FALSE. The service principal can only be created or updated by the tenant administrator by default. However, when the flag is set to TRUE, both the SharePoint tenant admin and site collection admin will be able to create or update the service principal through SharePoint.
The shell command is: Set-SPOTenant -SiteOwnerManageLegacyServicePrincipalEnabled $true
Note: The property ‘SiteOwnerManageLegacyServicePrincipalEnabled’ becomes visible in tenant settings after SharePoint Online Management shell is updated to 16.0.23710.12000 or a later version. But before this rollout, the value will always be TRUE even explicitly set to FALSE. It will only automatically be switched to FALSE as the default value after the rollout is launched.
What you need to do to prepare:
No proactive measures are required to prepare for this change. Nevertheless, it is advisable to inform your users of this modification and update any relevant documentation as necessary.
Sites.Selected permissions are required for the application to get access to one or a few specific SharePoint sites using Microsoft Graph API and/or SharePoint API. Since Microsoft announced the EOL for SharePoint App-only service principals, Sites.Selected is the only option going forward. In this article we’ll go through all aspects of using Sites.Selected permissions, here is the index:
Historically, we utilized so-called SharePoint app-only service principals to get unattended (daemon/service) access to one specific site programmatically. Initially in on-premises, later in SPO. We used to get SharePoint app-only service principals via appregnew.aspx and provide permissions via the appinv.aspx page. SharePoint app-only principals allow calls to SharePoint (REST) API and usage of SharePoint CSOM via ACS-based authentication.
Then Microsoft started developing Graph API. You’d need to register your app in Azure to get App ID and App Secret to authenticate to Microsoft Graph API. You’d also configure specific API permissions for this app to get access to services you need (SharePoint, Exchange, Teams etc.). Unfortunately, for a long time there were no options to get access to only one specific site with Graph API. Available API permissions (e.g. Sites.Read.All) allowed access to all SharePoint sites in the tenant.
Then, in 2021 Microsoft introduced Graph API “Sites.Selected” application permissions. Hooray! But the problem was developers needed to have two service principals – new Sites.Selected to call Graph API and classic SP-App-only to call SharePoint API. Later, in 2022 Microsoft added SharePoint “Sites.Selected” API permissions – so both APIs are available for a single App Id (more App-Only and Sites.Selected history details…).
Long story short, below are the detailed steps to configure Sites.Selected for you unattended app access to SharePoint site.
Steps to get and configure Sites.Selected permissions
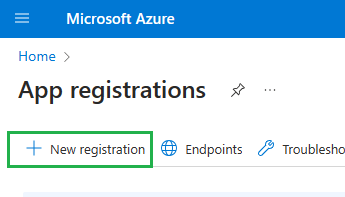
1. Register an application in Azure (Entra Id) via Azure portal GUI, PowerShell script or helpdesk/servicedesk request. E.g. with GUI you’d login to portal.azure.com, then “Entra Id” -> “App registrations” and select “+ New registration”:
If you are not allowed to register an Entra Id app due to restrictions in your company – connect with your IT/admins, as there must me some way to request an app.
Once you get an application registration and you are this app owner – you should be able to navigate to your app registration in Azure Portal and configure it (Step 2 below).
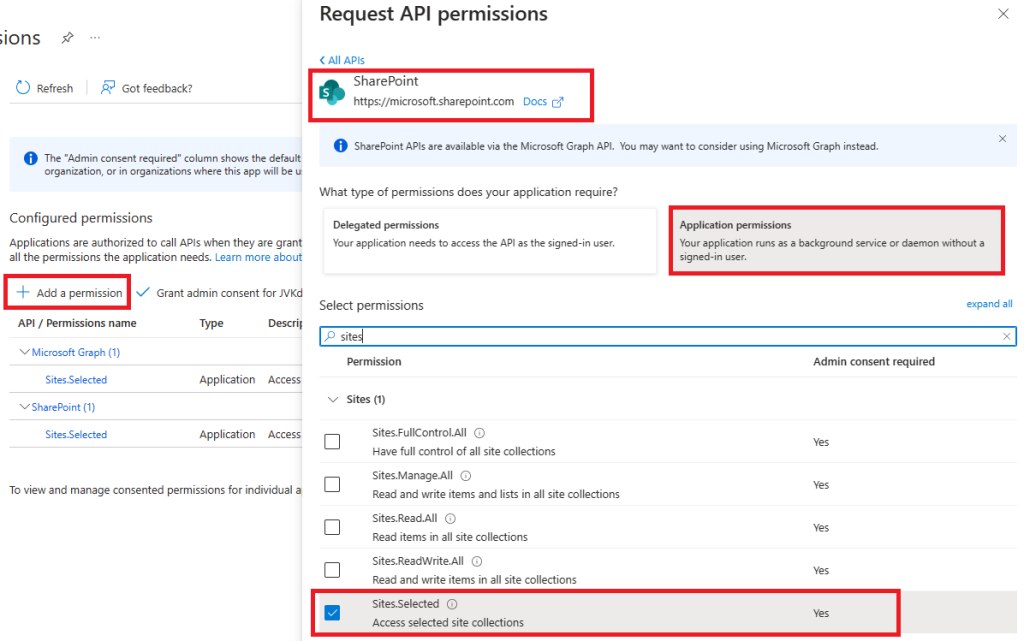
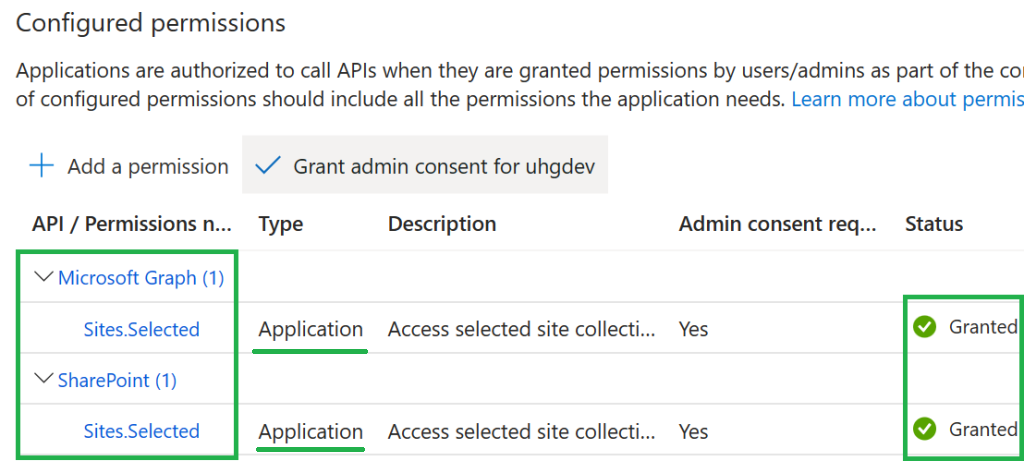
2. “API permissions” – you’d need both – MS Graph API Sites.Selected and SharePoint Sites.Selected application API permissions configured (as libraries/modules and 3-rd party software can use both APIs under the hood):
Then you’d request tenant admin consent for your API permissions. Finally your app registration “API permissions” should look like:
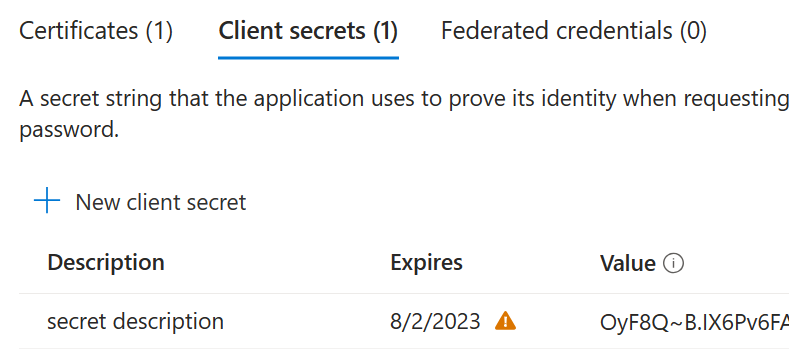
3. App Secret or Certificate Under Certificates and secrets – generate client secret, copy secret value to safe location. Or you can get a certificate (obtain trusted or create self-signed), and upload it to your app registration. Certificates are considered as more secure option.
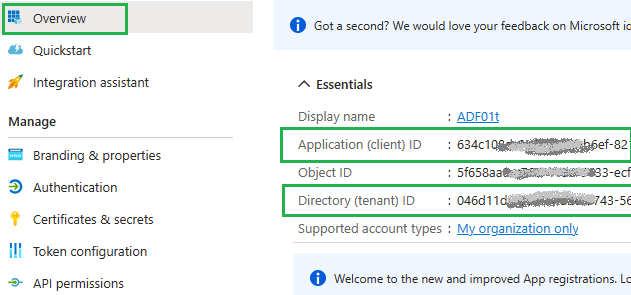
4. At the Overview page – grab your app client id and tenant id :
At this moment, having tenant id, app (client) id and client secret (or certificate) – you should be able to authenticate to Microsoft 365 tenant with app-only authentication flow, but will not be able to access any resource.
Having just Sites.Selected API permissions configured for the app does not mean your app has access to any SharePoint site automatically. Access to a specific site for the app is granted by the SharePoint team via another Graph API call. That leads us to the next step.
5. Application access to SharePoint site You need to request this from your SharePoint service admin (or if you are an admin – DIY), but access needs to be provided for the specific app to the specific site with specified permissions: Read-Only or Read/Write or Manage or Full Control. – Here is the Graph API – Here is PowerShell PNP cmdlet
Write role is similar to “Contributor” user permissions – it allows CRUD operations against list items (library documents and metadata)
Manage role allows create/update/delete lists/libraries
FullControl is full control
At this moment you should be able to access SharePoint sites. How? See below:
Use Sites.Selected permissions
Once your SharePoint tenant/service admin confirmed that access has been provided for you app to a specific SharePoint site/sites – you can use the app client id and client secret (or certificate) to work with SharePoint from your code using MS Graph API or SharePoint API. The exact technique depends on the language/platform you use, but there are some good tutorials published:
Generally, these Sites.Selected permissions allow you to make calls that are documented under “Files” and “Sites and Lists” Graph API documentation. I.e. get site details, get site lists/libraries, create lists and libraries, CRUD operations against list items, download/upload library documents – all within the specific site. Sites.Selected permissions do not allow search operations, anything related to groups or teams etc.
If you are facing issues – first of all, try to isolate the issue – are permissions to blame, or is it something else? To ensure permissions for your app were provided correctly – you can validate your app access to the target SharePoint site with simple PowerShell scripts: here is the sample code
Important Note: Sites.Selected API permissions allow you to call Microsoft Graph API with client Id and client secret or certificate. Calling SharePoint API with a client secret is not supported. You have to use a certificate to call SharePoint API.
Calls to SharePoint API with client Id and client secret are possible only if ACS-based permissions are provided for the app to the site (with appinv.aspx), which is strongly discouraged due to the announced retirement of App-Only (ACS) – see updates in the end of the article.
Secure your credentials
You should not hard-code your secret as you do not want your credentials to be leaked. So you need to secure your secrets in production. Solutions for secrets are included in cloud providers’ offerings, you can also use environment variables. If you are hosting your application in Azure – consider using key vault to store your secrets. You can configure managed identity for your application and provide access to the key vault for you application’s managed id. (Actually, if your app is running in Azure – it is possible to provide permissions for your app directly – via managed identity. This is considered as an even more secure setup – no app registration and no Key Vault is needed, as there are no credentials to store, but that’s a separate story: Connecting to Microsoft 365 and Graph API from the Azure Function App via Managed Identity).
Govern Sites.Selected permissions
(For SharePoint admins).
Existing admins API/cmdlets allow yo to provide Sites.Selected permissions for specific app to specific site, and to get Sites.Selected permissions provided to the specific site. But there is no API/cmdlet for the specific app to get all sites (with permissions) this app has access to. Meantime as SharePoint admin if you keep providing permissions upon users/devs requests – after some time you have no idea what app has access to what site with what level of access, especially in large organizations. Surely you can (and should) pull reports on all registered apps with access to SharePoint, but…
There is a solution developed by Joe Rodgers (Microsoft). This solution use SharePoint list as an inventory/storage and Power Automate flows to pull data from Entra Id and SharePoint and provides kind of dashboard so you can review details of all app registrations in the tenant with at SharePoint Online permission. Cool!
Also, if you have a licensed Copilot for Microsoft 365 – you have a license for SharePoint Advanced Management (SAM). And under SAM – Reports – you have aт “App insights” report, that tells you how various non-Microsoft applications registered to your Microsoft Entra Id access your SharePoint content (report is based on the Microsoft 365 audit log).
Note: you would not provide Sites.Selected permissions just upon user/developer request. You’d always get an approval from the target site owner. The site owner must understand that application will have permanent unattended access to the entire SharePoint site with permissions specified (read or write or manage or full control).
Generally, to provide an Application with Sites.Selected API permissions configured access to a specific site, SharePoint admin would run a set of PowerShell commands (or C# program or…) to ensure the client id exists, API permissions are configured and consented, to get app owners, target site owners, to get existing app permissions etc. Finally, admin would provide permissions and validate that permissions were provided correctly. It does not take long…
Update: Microsoft announced ACS permissions (app-only principals) retirement in 2026. So using ACS for any new development is not recommended.
It may be acceptable to grant ACS permissions to existing legacy custom applications or third-party or Microsoft apps/web apps (e.g. Alteryx, Azure Data Factory) – applications that only support a client ID and secret and use the SharePoint API under the hood – but only to avoid disruption to business processes and keeping in mind that ACS will expire soon, so these applications must be replaced/updated before 2026.
SelectedOperations: Even more granular access to SharePoint
Update 2025: Microsoft is implementing SelectedOperations – even more granular permissions (to lists, items or files) alongside with Sites.Selected permissions. Original implementations of Sites.Selected allowed access via Graph API to entire SharePoint site collection only. With new ‘Lists.SelectedOperations.Selected’, ‘ListItems.SelectedOperations.Selected’ and ‘Files.SelectedOperations.Selected’ permissions it is possible to provide application permissions to a single list, library or list item or particular document. Here is:
There are well‑known SharePoint app‑only service principals and ACS‑based permissions. This is an old‑school approach—introduced as part of SharePoint Add‑Ins for SharePoint 2013—to provide unattended access to a SharePoint site (application access, i.e., access without a user being present). Such applications are often referred to as daemon apps, service apps, background jobs, and similar terms.
For you to smoothly switch to new, recommended Entra Id based service principals and permissions – it is important to know some details about classic app-only service principals and ACS-based permissions. As you know, any access is a two-step procedure:
Authentication, when systems ensure you are indeed the one you claim you are
Authorization, when system grants you access to the resource, as it knows that this id is allowed to access specific resource with these permissions
So, when it comes to deprecated SharePoint app-only service principals and ACS-based permissions, AppRegNew is responsible for authentication and AppInv is responsible for authorization.
AppRegNew.aspx
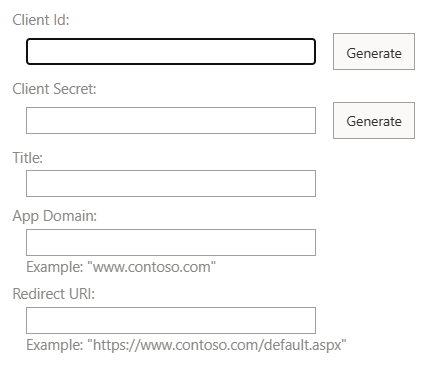
To get a SharePoint app-only service principal – you’d need to register a new one at any SharePoint site using the AppRegNew.aspx page. This page is not available from GUI, so you’d need to type the Url manually. You’d need to be a site collection admin to register a new app.
Let’s say, your site Url is “https://YourTenant.sharepoint.com/teams/YourSite“. Then this appregnew page’s Url would be “https://YourTenant.sharepoint.com/teams/YourSite/_layouts/15/appregnew.aspx“
If you go to this page, you’ll see (*) something like
You’d click generate client id, then generate client secret and type your app display name. I usually use “localhost” as app domain and “https://localhost” as redirect Url.
If all good – you’d get app id (client id) and app secret (client secret) and you’d be able to authenticate to your SharePoint site.
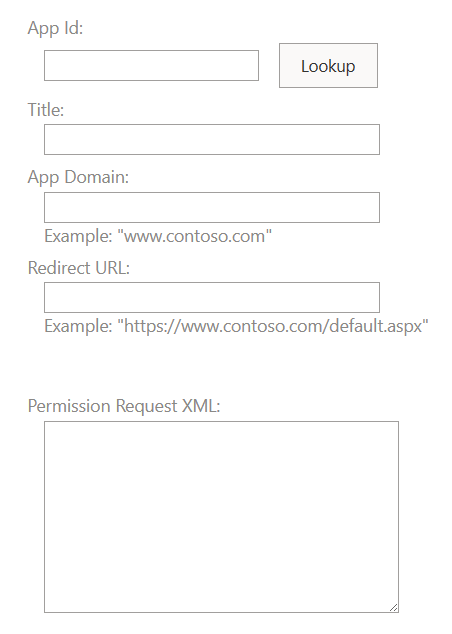
AppInv.aspx
Providing permissions for your SharePoint app-only service principal to your SharePoint site is done using AppInv.aspx page. This page is also not available from GUI, so you’d need to type the Url manually again. You’d need to be a site collection admin to use this page.
Let say, your site Url is “https://YourTenant.sharepoint.com/teams/YourSite“. Then this appinv page’s Url would be “https://YourTenant.sharepoint.com/teams/YourSite/_layouts/15/appinv.aspx“
If you go to this page, you’ll see (*) something like
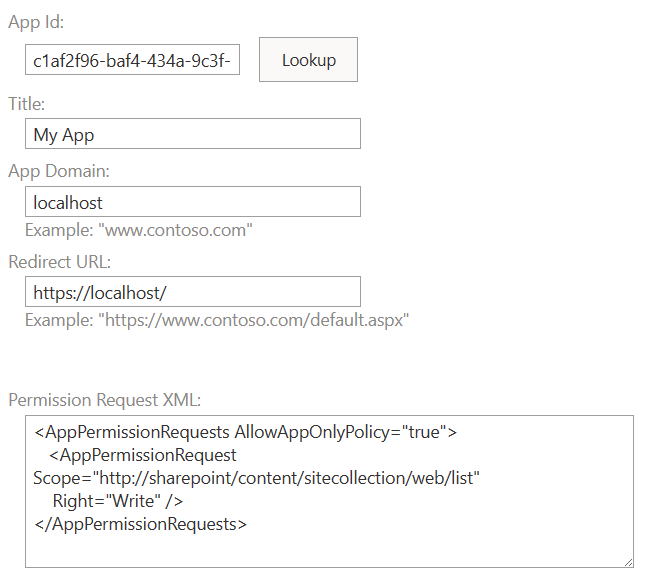
At this moment – you need to enter app (client) id here and click lookup – so all the app metadata would be populated, then you’d need to enter Permission Request XML. Via this “Permission Request XML” you are specifying exact permissions your app will have in this site. E.g. you can specify scope – all site collection or one specific subsite (web) or even one specific list or library. Also you can specify permissions level – e.g. read, read/write, manage or full control. This is tricky, but let me share some examples with you.
Permission Request XML for the app to have full control over entire site collection:
Any mistake in XML might prevent app access, so be very careful.
Finally, your AppInv.aspx page would look like
If you specify scope as web – you’d do it on the specific web url, e.g. “https://YourTenant.sharepoint.com/teams/YourSite/SubSite/_layouts/15/appinv.aspx”
If you specify scope as list – you’d do it on the specific web url, e.g. “https://YourTenant.sharepoint.com/teams/YourSite/SubSite/_layouts/15/appinv.aspx” and after you click “Save” – there will be a page – you’ll be asked to choose a list from available web lists.
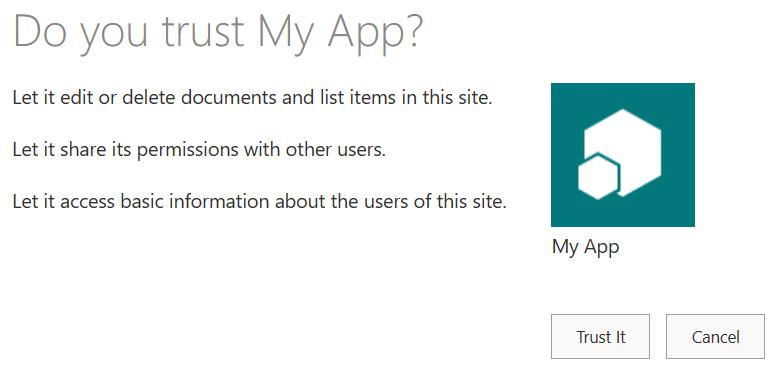
After all, you’ll be asked to confirm that you trust the app:
And after that your app (SharePoint app-only service principal) will have access (ACS-based access) to you site.
AppPrincipals.aspx
From site settings page (/_layouts/15/settings.aspx) you should be able to see apps registered on your site with “Site app permissions” or “Site collection app permissions” links available via GUI. That would be “appprincipals.aspx” page.
Update Since July 2025 – modern apps (Entra id apps) appears under AppPrincipals.aspx page as well (see details here). Unfortunately, AppPrincipals.aspx page, you cannot see what kind of app has permissions to your site, what kind of permissions were provided, or secret expiration time. Some data can be pulled via PowerShell with Get-PnPAzureACSPrincipal though…
Possible complications
After Microsoft announced retirement of ACS – you can see this message on appinv and appregnew pages:
You might also see “Your SharePoint tenant admin doesn’t allow site collection admins to create an Azure Access Control (ACS) principal” message at appregnew page and “Your SharePoint tenant admin doesn’t allow site collection admins to update app permissions. Please contact your SharePoint administrator.” at appinv page.
That’s because a recent update to Microsoft 365 (MC660075) pushed by Microsoft in Aug/Sep 2023 changes default behavior so only tenant administrators can create or update ACS service principal by default.
Microsoft 365’s default setup for user profiles creates a significant problem: multi-value fields like “Skills,” “Education,” and “Hobbies” automatically dump all user-entered data into a single, unmanaged “Keywords” term set. This lack of organization means that diverse information is jumbled together, making it impossible to categorize, filter, or effectively use this valuable data for business needs, like finding internal experts or tracking project experience. While it’s possible to manually fix this by linking each property to a dedicated, managed term set (e.g., a “Skills” term set), this complex configuration ideally needs to happen before users start filling out their profiles. If an organization goes live without this crucial setup, retroactively restructuring the data becomes a major, custom undertaking, ultimately hindering the ability to leverage rich user profile information effectively. Please find solution below.
SharePoint User Profiles Metadata
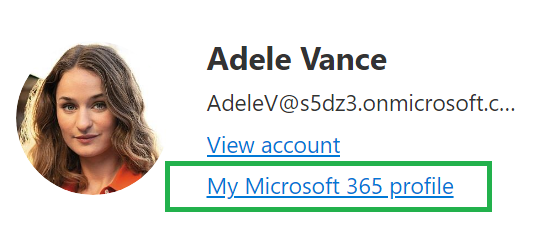
Users of Microsoft 365 can go to “My Microsoft 365 profile”:
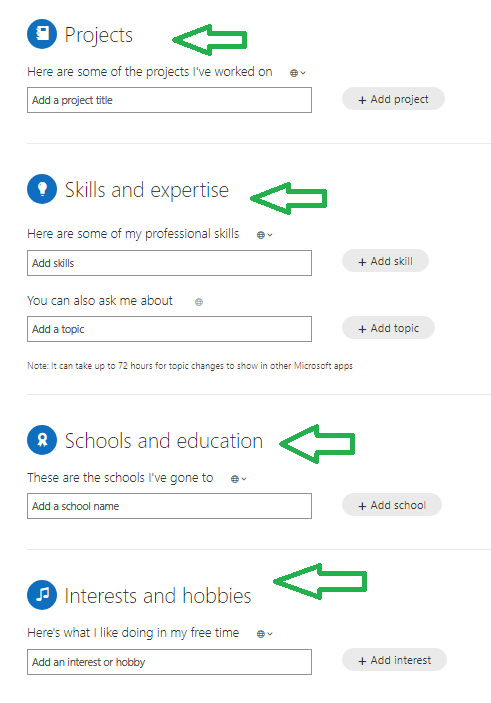
and update profile providing some details like birthday, home/mobile phone, summary, education, hobbies, skills and projects. Some properties are text fields, some are metadata. Specifically – projects, “skills and expertise”, “schools and education” and “Interests and hobbies” are backed by metadata:
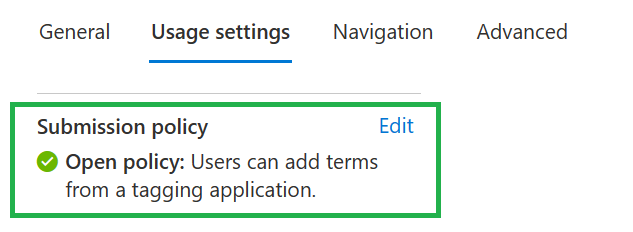
People can add information free, as the corresponding term store’s submission policy is “Open policy: Users can add terms from a tagging application.” by default.
The Problem
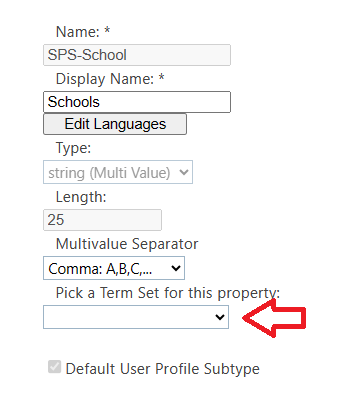
The problem is: all mentioned user profile properties are not connected to term store by default:
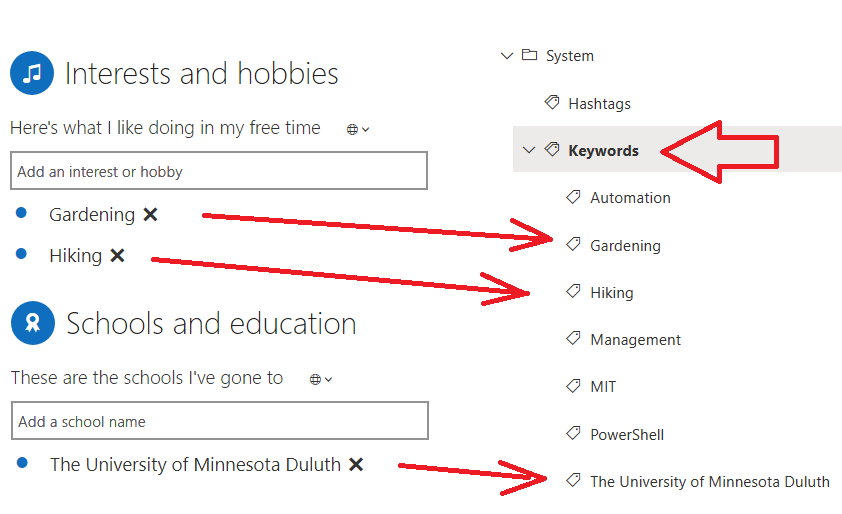
and everything users add to their profiles goes to the default “Keywords” term store under “System” term group:
(To ensure – a SharePoint admin can go to “More features” – “User Profiles” – “Manage User Properties” and “Content services” – “Term Store” from SharePoint admin center.)
Obviously, after some time there will be a mess… Universities, hobbies, skills and projects are different subjects and should not be in the same list.
Solution
Once the problem is understood, the solution would be straight-forward:
If you are just implementing Microsoft 365:
Create a Term Set
Map User Profile Property to a Term Set
The only you need is to
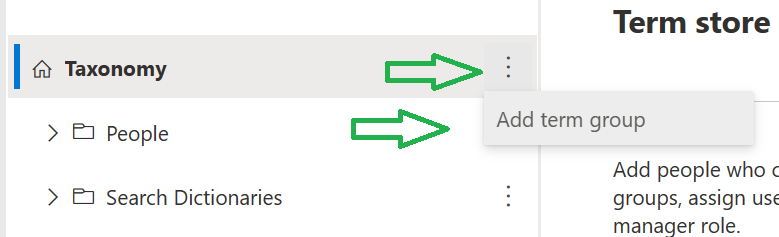
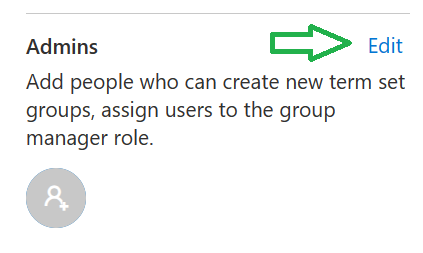
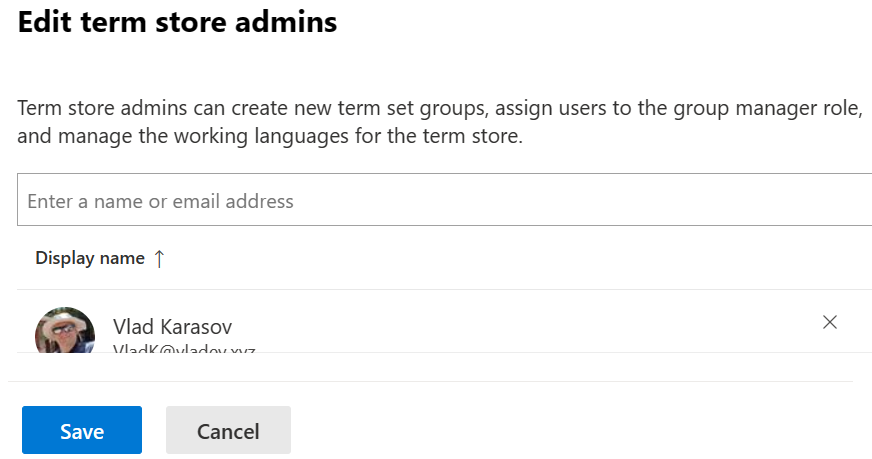
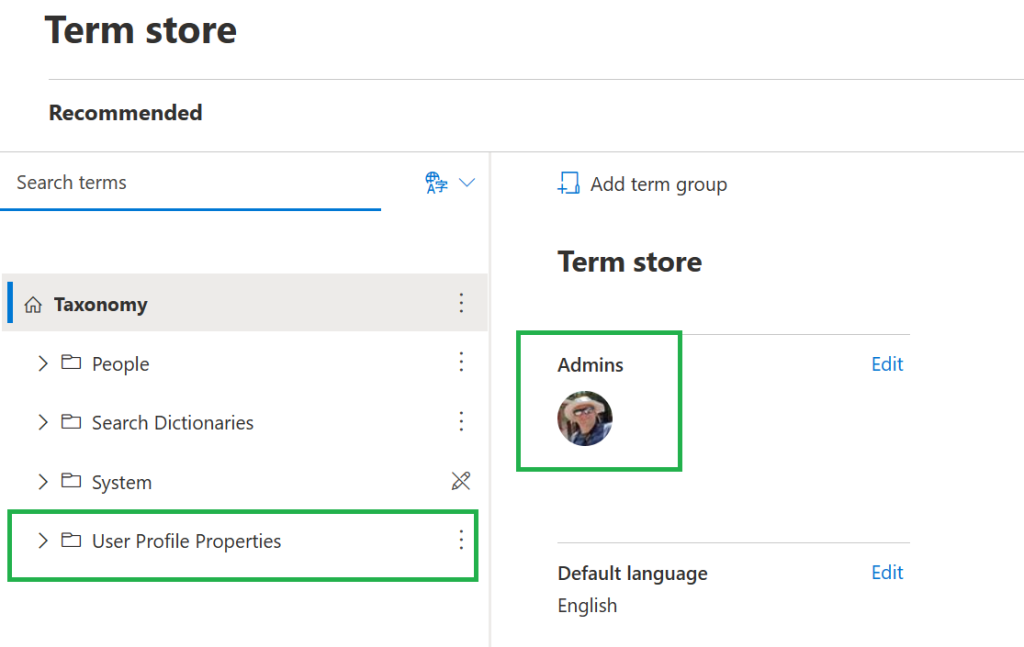
1. Provide permissions to yourself so you can create a term group and term store:
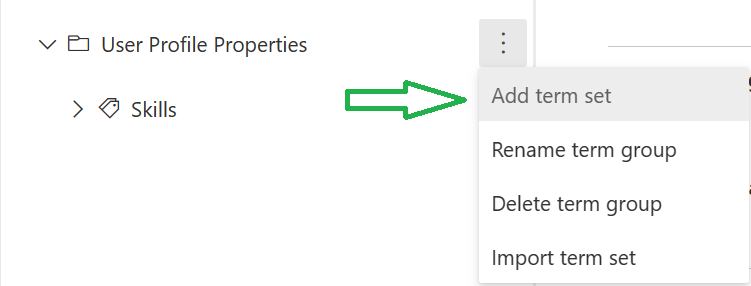
Under SharePoint admin center – Content Services – Term Store
2. Create a term group, e.g. “User Profile Properties”
and 3. come up with names for your term sets, as default naming is ambiguous/controversial:
How a user can see it in his/her personal profile (Delve)
SharePoint Admin Center User Profiles Properties Display Name
SharePoint Admin Center User Profiles Properties Internal Name
Project
Past projects
SPS-PastProjects
Skills and expertise: Here are some of my professional skills
Skills
SPS-Skills
Skills and expertise You can also ask me about
Ask Me About
SPS-Responsibility
Schools and education
Schools
SPS-School
Interests and hobbies
Interests
SPS-Interests
Create term set:
Configure submission policy, so users can add terms:
(alternatively, you may want to have closed submission policy but in this case you would pre-create terms so users can choose from existing)
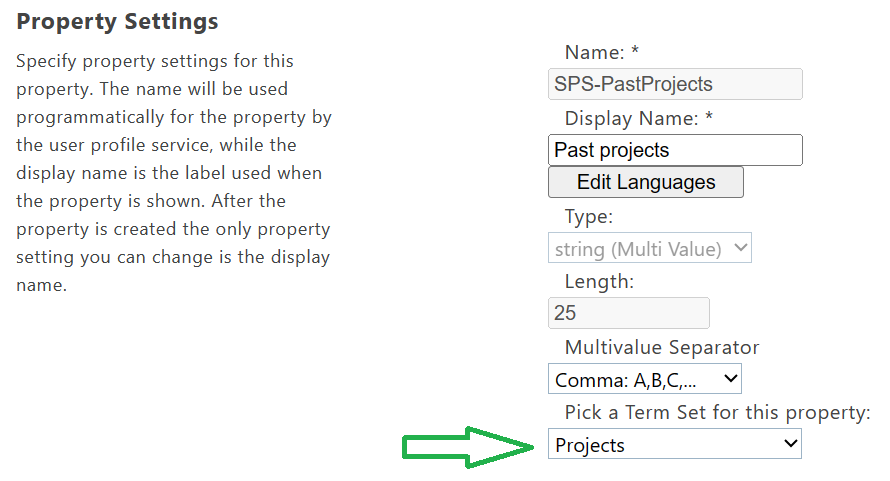
Map User Profile Property to a Term Set (Under SharePoint admin center – More features – User Profiles – Manage User Properties):
If you already have users with their profiles filled with values
In case you already have users with their profiles filled with values, you need to deal with it, and you have 3 options:
Inform users about the change and that all values will be lost and ask them to update their profiles again
(if number of profiles/values relatively small) – just manually write it down and re-create after reconfiguration
Develop a custom PowerShell script to save all the values and custom PowerShell script to restore the values.
Let say you need to run some code against Microsoft 365 on a scheduled basis. For this, you can use Azure Function App and timer-triggered Functions. From the code you’d call Microsoft Graph API and/or SharePoint API, so you’d need your Function somehow to get credentials on the fly from the KV and use it to call APIs. For this – you’d have a key vault where credentials will be be stored and retrieved by functions when needed. How does KV know if it’s ok to share secrets with the function app? Below I’ll share step-by-step how to create, configure and secure an Azure Function with system-assigned managed identity, and Azure Key Vault.
Below is a “classic” approach with client id, client secret and a key vault.
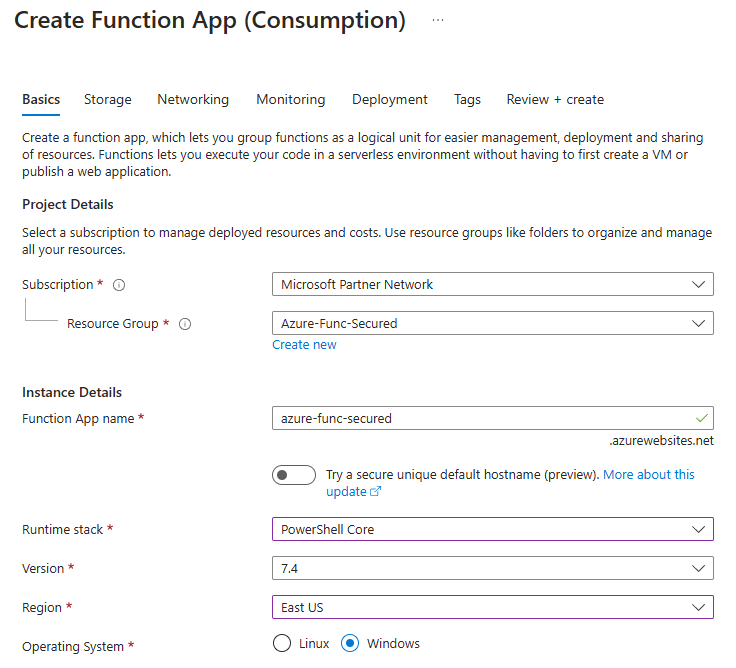
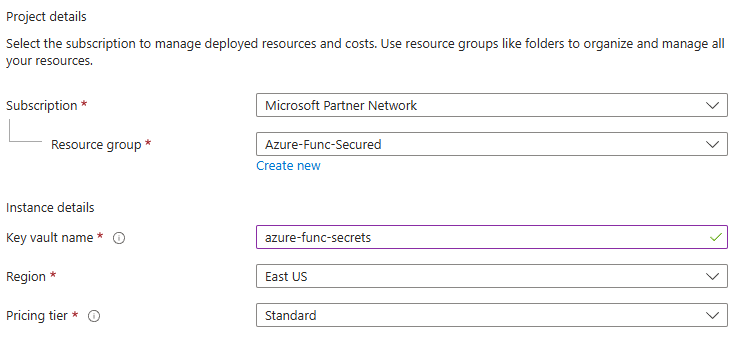
First, we’ll create a resource group, e.g. “Azure-Func-Secured”.
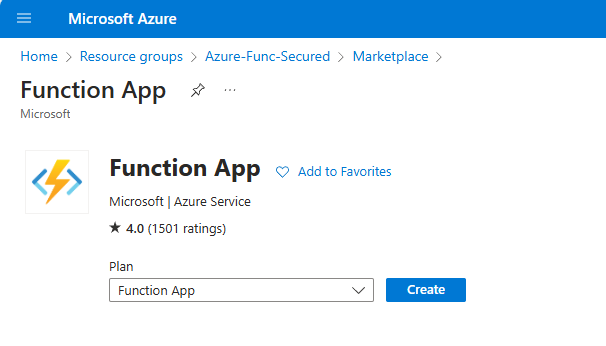
Next, we’ll create a function app:
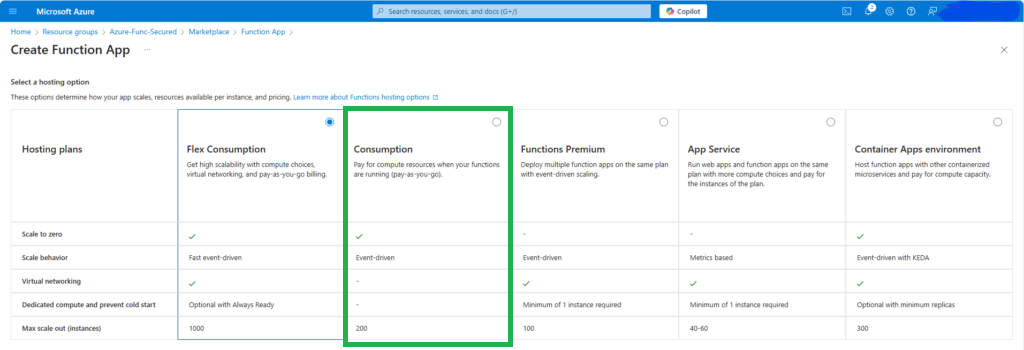
We’ll avoid the default “Flex Consumption” service plan (as it is Linux-only and does not support dependencies) and select “Consumption” a hosting option for now:
Runtime stack we’ll be using is PowerShell Core 7.4, but you can choose your own (options are – Python, .Net (C#), Node.js, Java). Let us leave other configuration settings by default (e.g. Enable Public access: On) for now, we’ll fix (secure) it later.
Ok, the function app has been created. Notice that app service plan, application insights and storage account, as well as some other services were created automatically under the same resource group:
Now we can create one or more functions under this function app, also we’d need to create a key vault and a registered app. Let us start with function and VS Code would be our environment of choice.
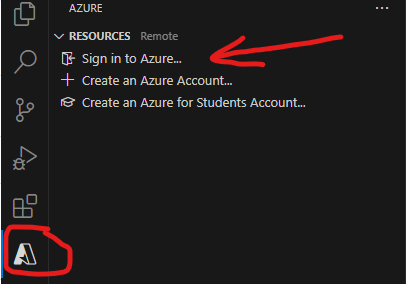
Let us start Visual Studio Code in a separate folder. Ensure you have “Azure Functions”, “Azure Resources” and PowerShell extensions by Microsoft. You’d sign-in to Azure:
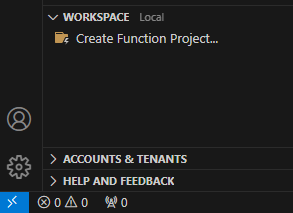
and create a function project:
You’d choose “Timer triggered” function (as we need the function running on schedule), the function name would be MyScheduledFunct01 and we’d leave the default schedule as “0 */5 * * * *” – so our function will be triggered every 5 minutes.
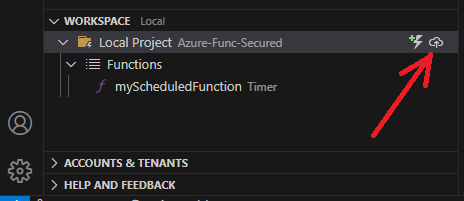
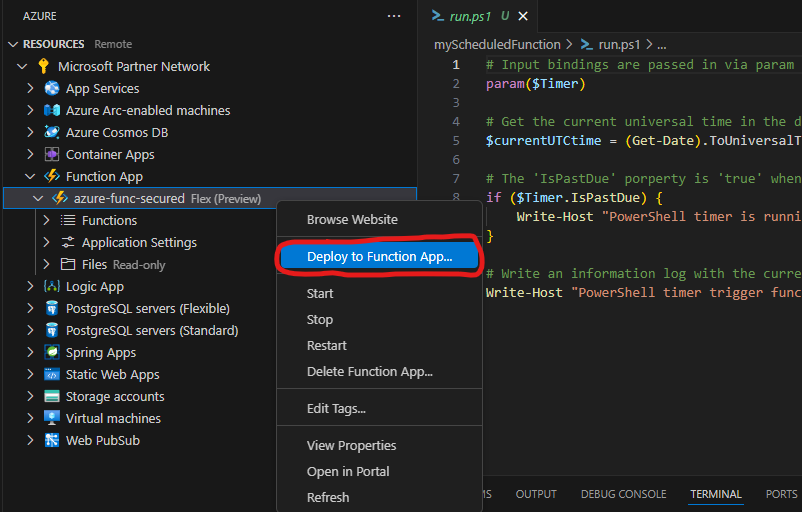
Let us deploy the function right away and see if it works. For this, we can use “deploy” icon under “WORKSPACE” panel:
or “Deploy to function app” option from the function app context pop-up menu under the Azure “RESOURCES” panel:
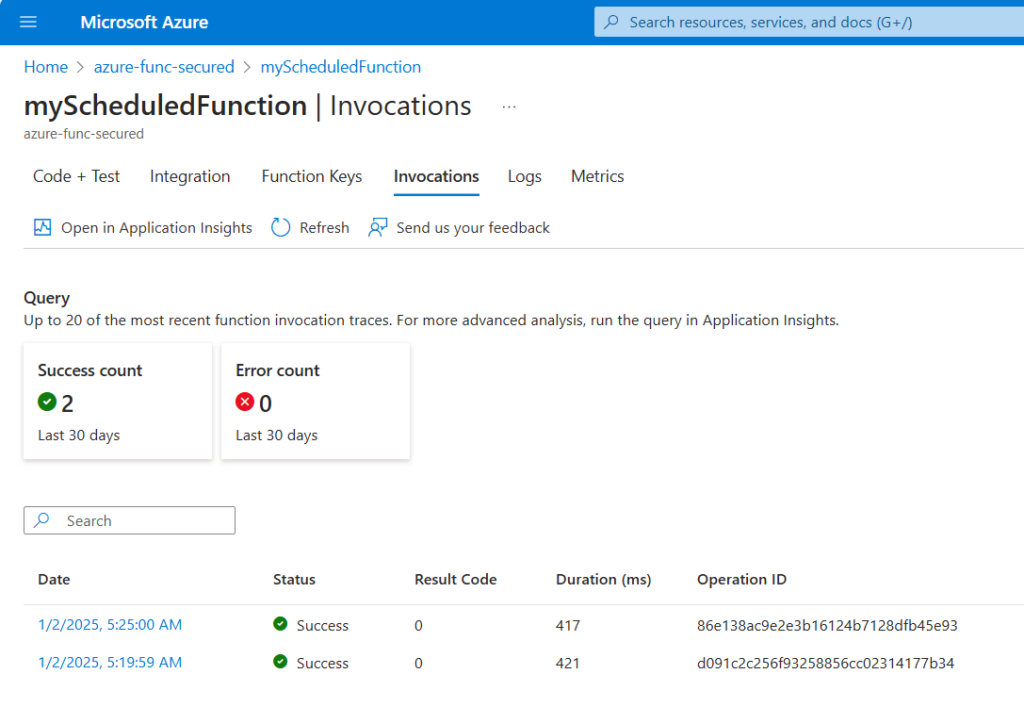
After successful deployment give it some time, then check function invocations and ensure function is triggered an running:
Next, we’d update “requirements.psd1” to include Azure Key Vault and PnP PowerShell modules as it takes some time for the function app to pull in and install dependencies. Requirements.psd1:
# This file enables modules to be automatically managed by the Functions service.
# See https://aka.ms/functionsmanageddependency for additional information.
#
@{
    # For latest supported version, go to 'https://www.powershellgallery.com/packages/Az'. Uncomment the next line and replace the MAJOR_VERSION, e.g., 'Az' = '5.*'
    # 'Az' = 'MAJOR_VERSION.*'
    'Az.KeyVault' = '6.*'
    'PnP.PowerShell' = '2.*'
}
And we’d update function itself to monitor if dependencies are installed, than we’d deploy the function again so time would work for us. MyScheduledFunction/run.ps1:
# Input bindings are passed in via param block.
param($Timer)
$currentUTCtime = (Get-Date).ToUniversalTime()
if ($Timer.IsPastDue) {
    Write-Host "PowerShell timer is running late!"
}
Write-Host "PowerShell timer trigger function ran! TIME: $currentUTCtime"
#############################################################################################
Write-Host "Check modules installed:"
Import-Module PnP.PowerShell
Import-Module Az.KeyVault
Get-Module PnP.PowerShell
Get-Module Az.KeyVault
Write-Host "Check command available:"
Get-Command -Name Connect-PnPOnline -Module PnP.PowerShell
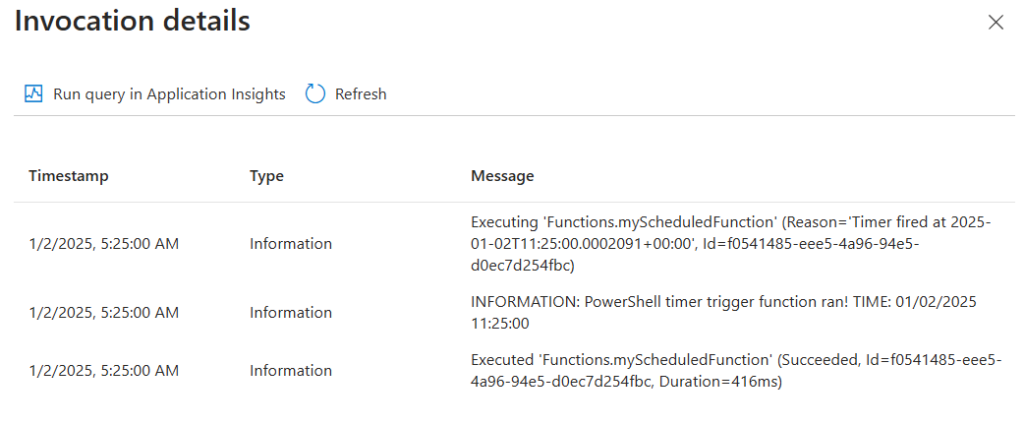
At first, we might see warning like “The first managed dependency download is in progress, function execution will continue when it’s done. Depending on the content of requirements.psd1, this can take a few minutes. Subsequent function executions will not block and updates will be performed in the background.”. So we’d just wait.
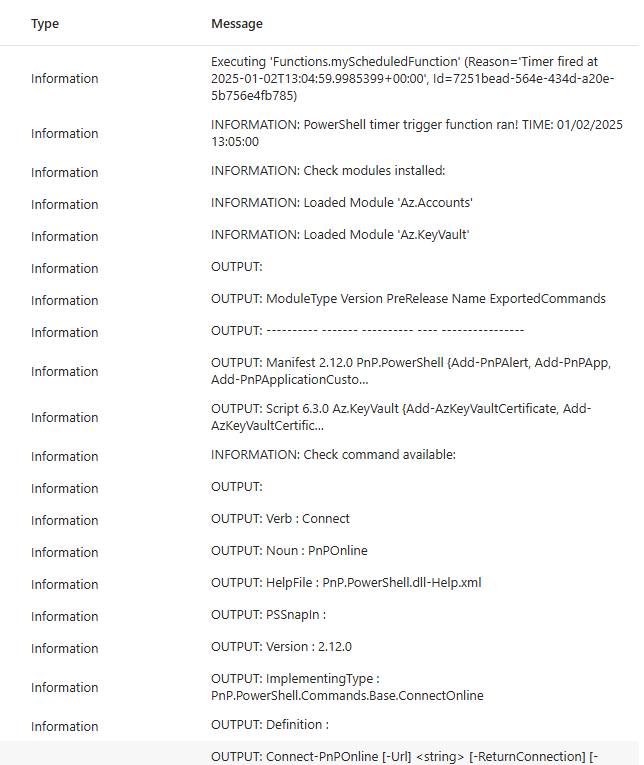
After some time the function will be able to use required modules. Here is the invocation output example:
App Registration To get unattended access to SharePoint (or Teams or Exchange etc.) as a service (daemon) application – we need credentials. It is done via “App Registration” under Entra Id (Azure AD) – here is the detailed step-by-step guide on registering apps in Azure.
Finally, we’d have a service principal with permissions we need:
We do not hard-code secrets, so let us create a key vault to keep secrets safe:
We’d leave all other configuration option by default, including “Azure role-based access control”, Allow access from: All Networks etc.
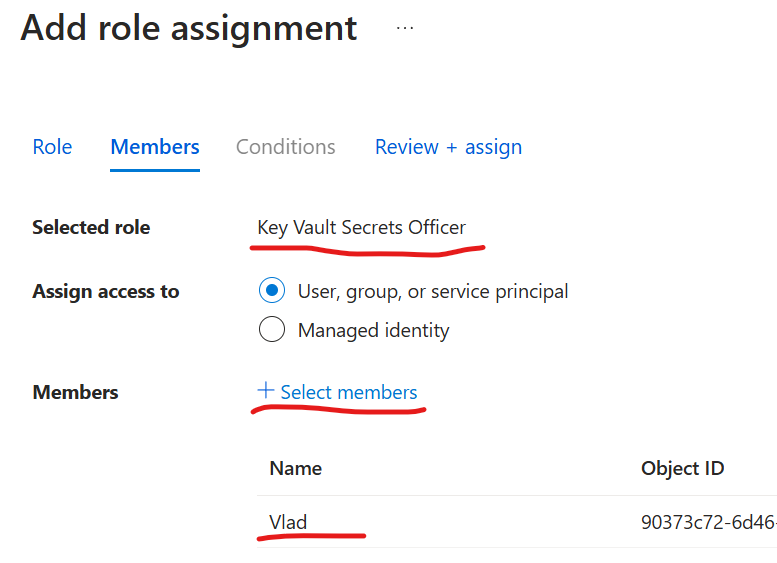
Here is the trick: even if I created this key vault and have an admin-level access, I’m not able to work with secrets values. So I need to provide additional access to myself. Being at the key vault, navigate to “Access control (IAM)” and add role assignment…
We’d select “Key Vault Secrets Officer”, next, select members… and select own name:
From this moment you should be able to CRUD secrets with values.
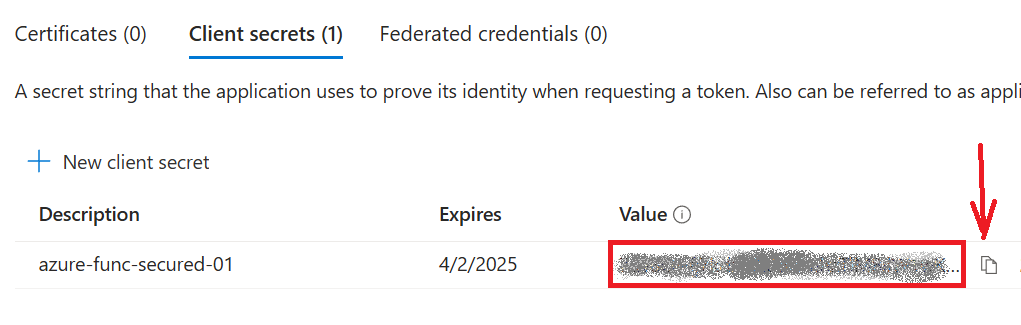
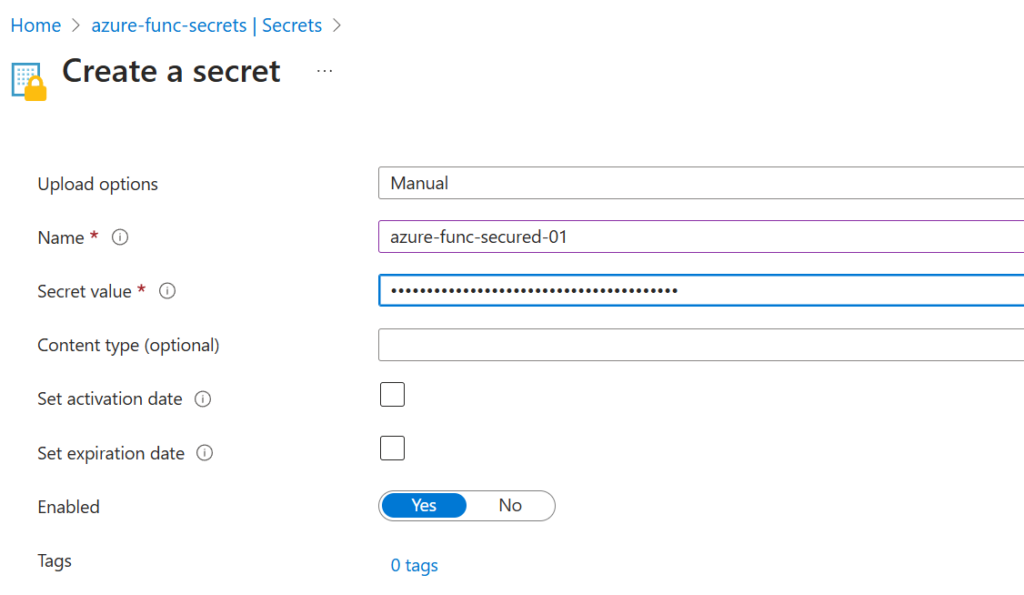
Now, let us generate a secret under App registration and copy secret value:
Then navigate to the Key Vault -> Object/Secrets -> Generate/Import – and save the secret value there:
Now you can get this secret… but the function cannot reach the secret… Here is the proof. Let us update the function code with:
and check the function output. You’d see something like (which is not very descriptive):
ERROR: Run Connect-AzAccount to login. Exception : Type : System.Management.Automation.PSInvalidOperationException ErrorRecord : Exception : Type : System.Management.Automation.ParentContainsErrorRecordException Message : Run Connect-AzAccount to login. HResult : -2146233087 CategoryInfo : InvalidOperation: (:) [], ParentContainsErrorRecordException FullyQualifiedErrorId : InvalidOperation TargetSite : Name : get_DefaultContext DeclaringType : [Microsoft.Azure.Commands.ResourceManager.Common.AzureRMCmdlet] MemberType : Method Module : Microsoft.Azure.PowerShell.Clients.ResourceManager.dll Message : Run Connect-AzAccount to login. Source : Microsoft.Azure.PowerShell.Clients.ResourceManager HResult : -2146233079 StackTrace : at Microsoft.Azure.Commands.ResourceManager.Common.AzureRMCmdlet.get_DefaultContext() at Microsoft.Azure.Commands.KeyVault.Models.KeyVaultCmdletBase.get_DataServiceClient() at Microsoft.Azure.Commands.KeyVault.GetAzureKeyVaultSecret.ExecuteCmdlet() at Microsoft.WindowsAzure.Commands.Utilities.Common.CmdletExtensions.<>c__31.<ExecuteSynchronouslyOrAsJob>b__3_0(T c) at Microsoft.WindowsAzure.Commands.Utilities.Common.CmdletExtensions.ExecuteSynchronouslyOrAsJob[T](T cmdlet, Action1 executor) at Microsoft.WindowsAzure.Commands.Utilities.Common.CmdletExtensions.ExecuteSynchronouslyOrAsJob[T](T cmdlet) at Microsoft.WindowsAzure.Commands.Utilities.Common.AzurePSCmdlet.ProcessRecord() CategoryInfo : CloseError: (:) [Get-AzKeyVaultSecret], PSInvalidOperationException FullyQualifiedErrorId : Microsoft.Azure.Commands.KeyVault.GetAzureKeyVaultSecret InvocationInfo : MyCommand : Get-AzKeyVaultSecret ScriptLineNumber : 19 OffsetInLine : 13 HistoryId : 1 ScriptName : C:\home\site\wwwroot\myScheduledFunction\run.ps1 Line : $kvSecret = Get-AzKeyVaultSecret -VaultName $vaultName -Name $secretName -AsPlainText Statement : Get-AzKeyVaultSecret -VaultName $vaultName -Name $secretName -AsPlainText PositionMessage : At C:\home\site\wwwroot\myScheduledFunction\run.ps1:19 char:13 + $kvSecret = Get-AzKeyVaultSecret -VaultName $vaultName -Name $secretN … + ~~~~~~~~~~~~~ PSScriptRoot : C:\home\site\wwwroot\myScheduledFunction PSCommandPath : C:\home\site\wwwroot\myScheduledFunction\run.ps1 InvocationName : Get-AzKeyVaultSecret CommandOrigin : Internal ScriptStackTrace : at , C:\home\site\wwwroot\myScheduledFunction\run.ps1: line 19 PipelineIterationInfo : 0 1
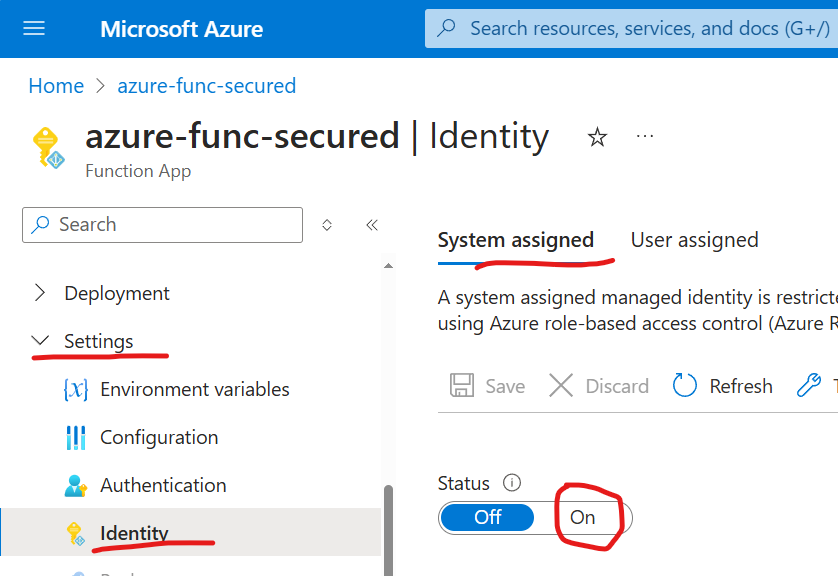
So, how’d we allow key vault access for the function app? It’s as simple as that: – first, we’d need some identity assigned to function app – second, we’d provide access to the key vault to this identity
Managed Identity: assign an identity to the function. For this, you’d go to function Settings/Identity, and under System Assigned, you’d switch status to On and Save settings.
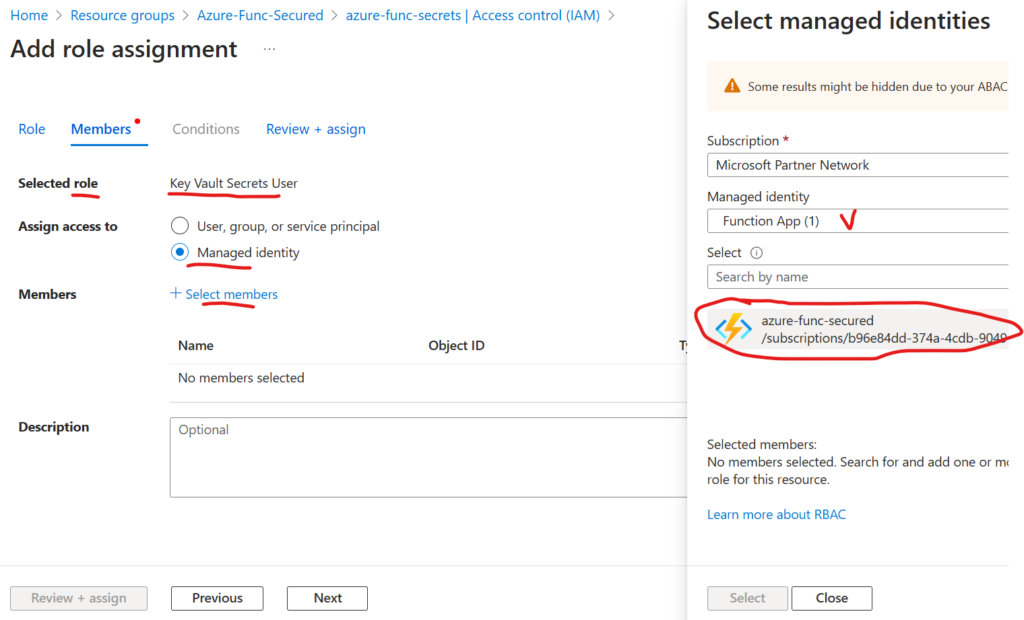
Then, you’d go to your key vault, Access Control (IAM) and add role assignment. But this time, you’d select the role “Key Vault Secrets User” (more about roles), and “Assign access to” Managed Identity, and select members – select your function app identity (notice, identity is assigned to function app, so all functions under the app will be able to use the identity):
Now, we’d check the next function invocation detail, and voila:
You can see that azure function was able on the fly to pull secret from the key vault, so now we should be able to use these credentials to access SharePoint.
As you know, having client id and client secret would allow you to call MS Graph API. But calling SharePoint API would require authentication with a certificate. “PnP.PowerShell” module use both APIs under the hood, so we’d need a certificate to connect to tenant and work with SharePoint using “PnP.PowerShell” module. Please refer to this article on how to run Connect-PnPOnline with Certificate stored in the Key Vault.
Securing Azure Function
Out-of-the-box Azure Function App is created in a not very secure manner. Here is whan we’d need to do to secure Azure Functions:
Finally, it’d be more secure not to have a key vault, but provide permissions to the managed identity of the Azure Function App.